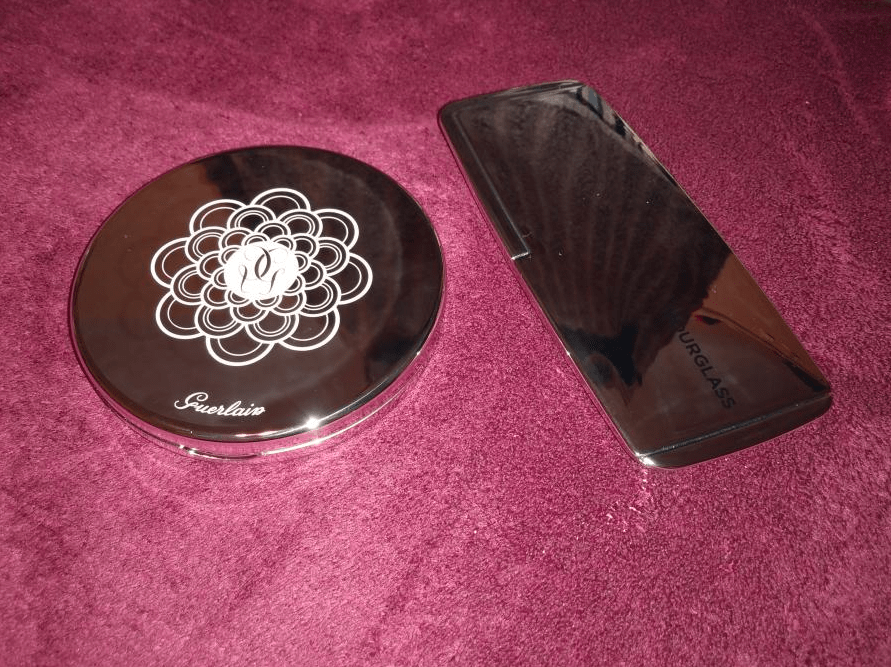
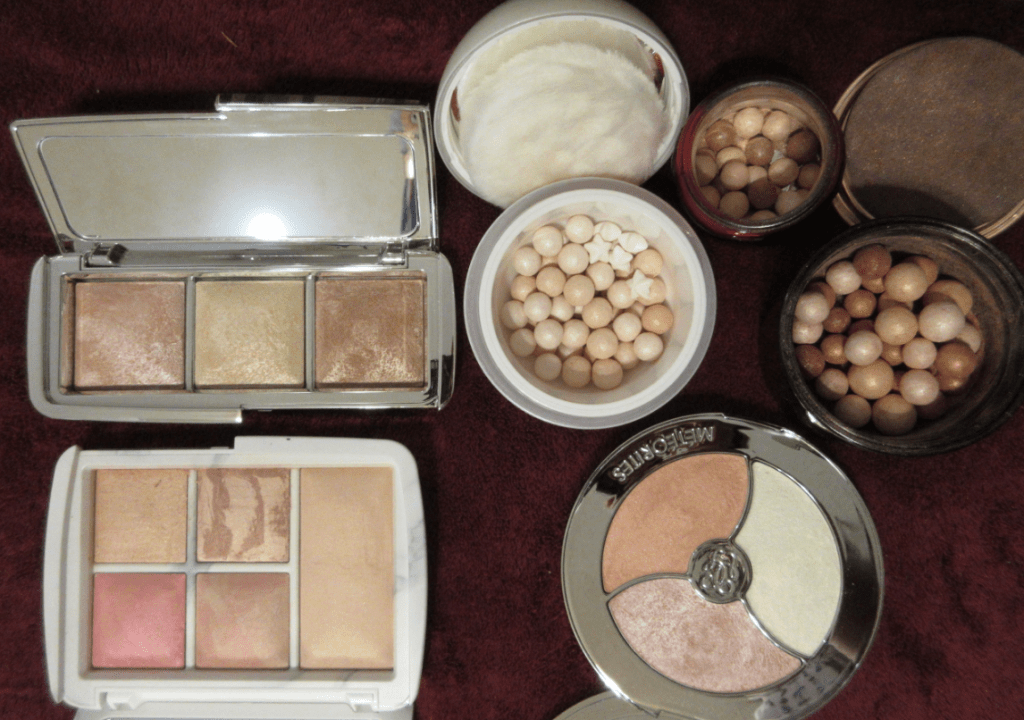
Hourglass and Guerlain are the two most hyped brands I’ve seen when it comes to all over face powders that give a blur and sheen but aren’t shimmery enough to be considered highlighters. So, when I saw both brands release actual highlighters and noticed how similar they were, I had to buy them.
Hourglass Metallic Strobe Lighting Palette
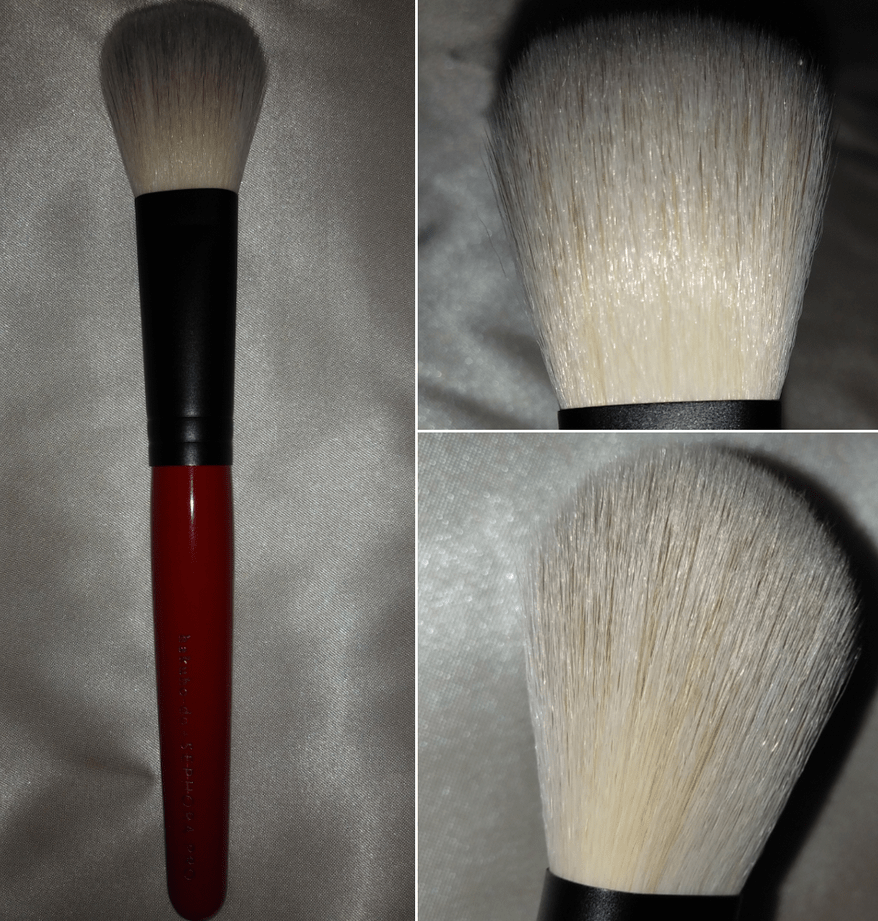
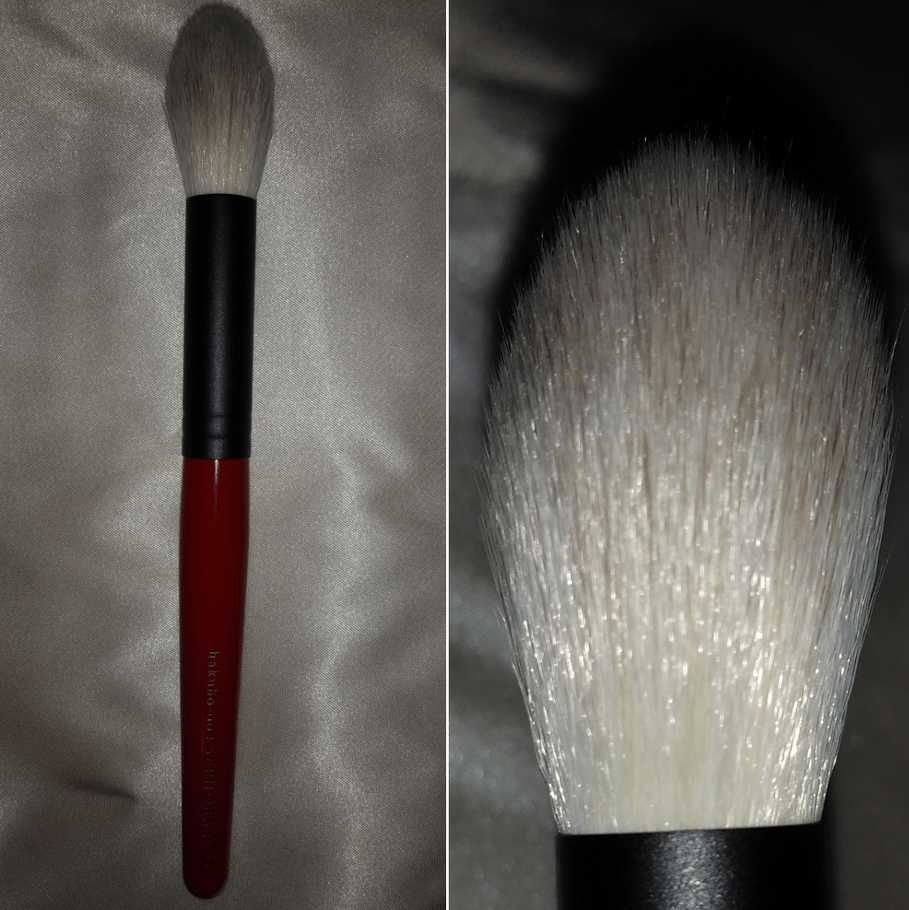
This palette has a net weight of 9 grams for $64. It was originally released for the holidays in 2017, but they brought it back for a limited time in 2020. I purchased this in May, but as of August, it’s still available on multiple retailers’ websites.
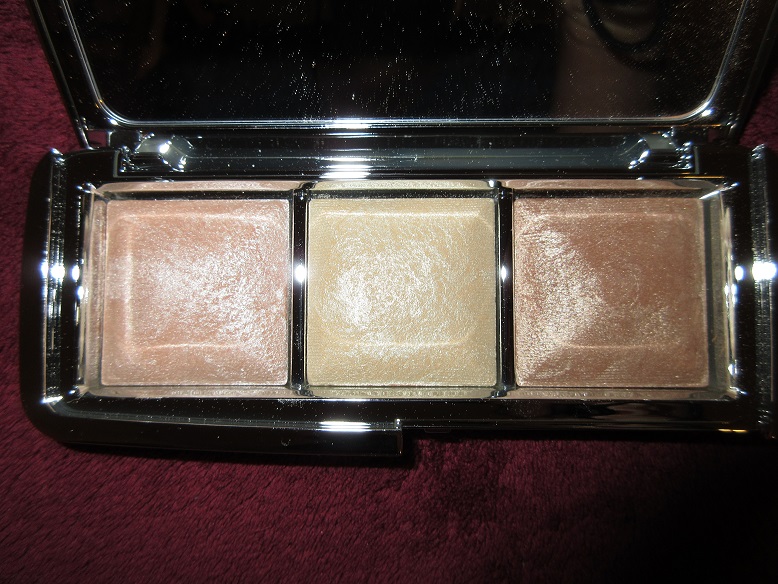
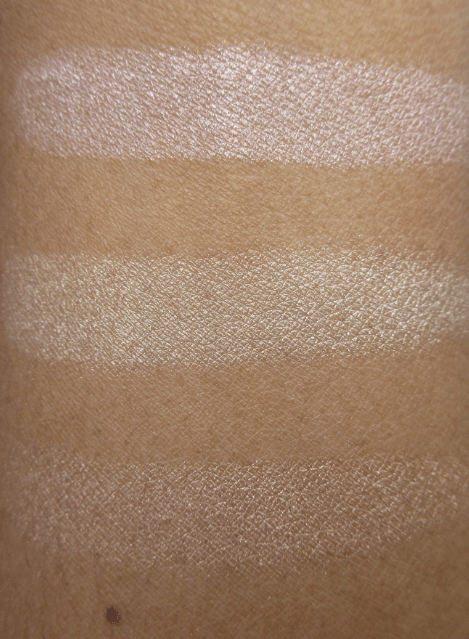
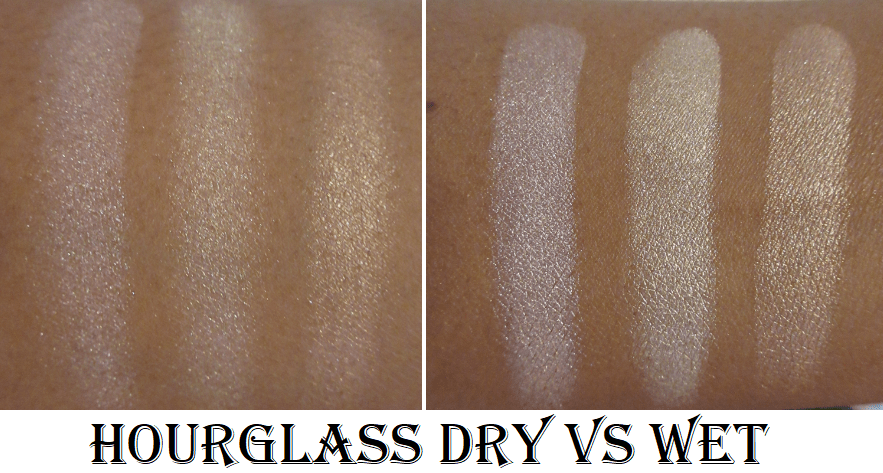
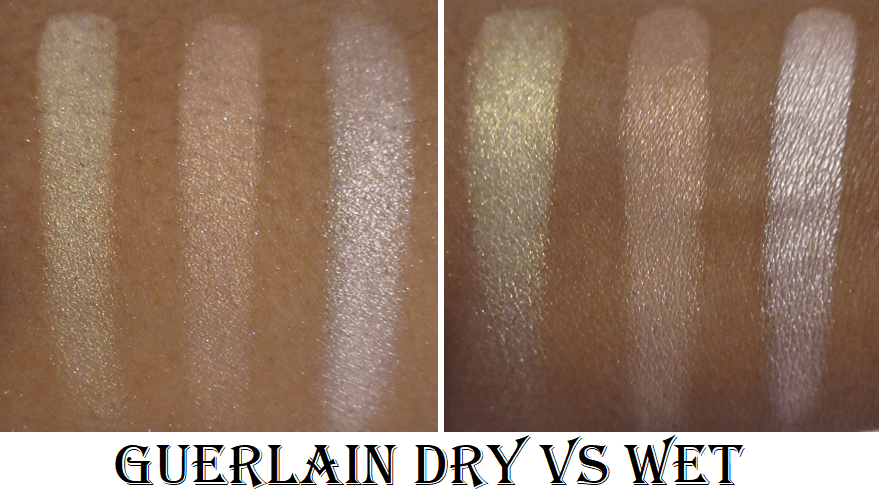
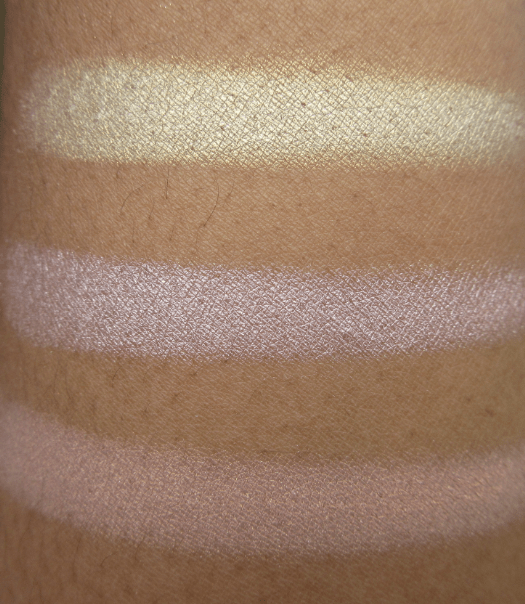
The Hourglass powders have a sheer base to them, which is why they appear sheerer in swatches than the ones from Guerlain. However, the Hourglass powders are much more reflective, as can be seen when applied to my cheeks. So, they end up making a bigger impact with my usual application method. They are meant to be used wet for more intensity (with a spray or primer) or dry. When I apply them dry, they’re at my maximum shimmer comfort level (unless I use a light hand and blend them very well), so I don’t use them wet. The Guerlain ones can also be applied wet too, but the difference is minimal compared to the jump in intensity when the Hourglass powders are used wet.
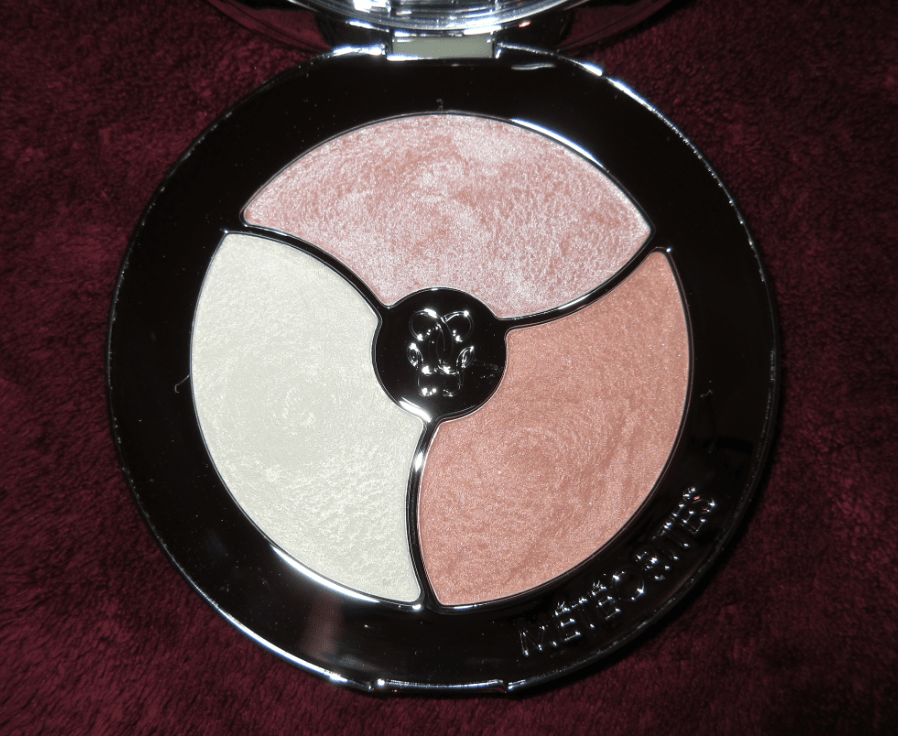
Guerlain Pearl Dusting Palette
Also known as the Meteorites 3-in-1 Highlighting and Illuminating Pressed Powder Palette, this has a net weight of 8.5 grams for $65. So, it’s slightly more expensive for a bit less product. The compact is huge with a lot of wasted space, though the packaging feels luxurious. Both palettes have mirror-finish plastic packaging, but despite the Guerlain one having less makeup inside, it’s a bit heavier. I suspect the actual mirror inside the Guerlain compact is heavier than the one in the Hourglass and accounts for the difference in weight.
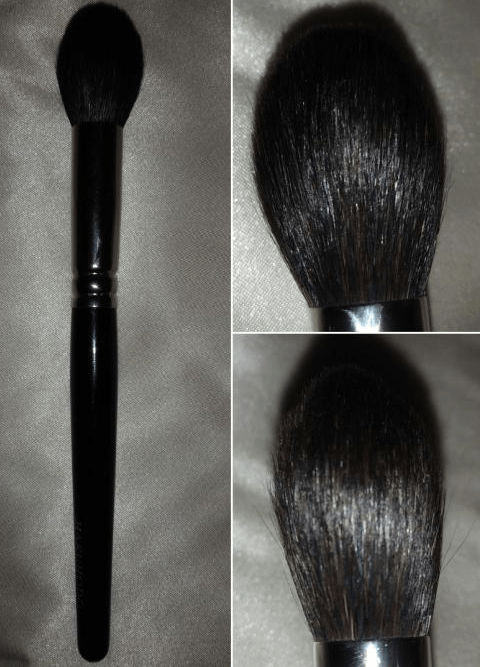
The visible sheen on the surface of Hourglass and Guerlain’s trio powders are unlike any other highlighters I own. This is probably due to the addition of pearl powder which both brands cite as the main contributor to the beauty of these highlighters. Even though a sheer base, in theory, seems like the Hourglass powders would look better on my skin, the micro pearl particles are whitish, which doesn’t look as complimentary to someone like me with a yellow undertone and dark skin. The base pigment in the Guerlain highlighters help match me better, with the exception of the pink one.
All Guerlain Meteorites have a lovely violet scent that I enjoy experiencing whenever I open the containers. I have a keen sense of smell, so perhaps I’m more sensitive to fragrances than most people, but the violet scent in this trio is way more intense than the regular meteorites. It’s on the cusp of headache-inducing. It takes a few hours before I can no longer smell it on my face, which is not something I ever experienced with the regular meteorite pearls. I bought this a month and a half ago, and even let it air out for a few hours, but the scent is still as present as the day I bought it. I can tolerate it enough to keep using it, but if you’re sensitive to smells I would caution against buying this.
FINAL THOUGHTS
The Hourglass powders don’t have as much color to them, are smoother to the touch, easier to blend, are buildable and highly reflective. The Guerlain powders are more pigmented, stick where they apply, and have an impactful sheen without being blinding.
I’ve always favored Guerlain Meteorites over the Hourglass Ambient Powders, but when it comes to their highlighters it’s not as simple to decide between them.
Neither of the pink shades from Guerlain and Hourglass are flattering on me. They’re too stark on my skintone and look more white on my skin than the actual white pan powders.
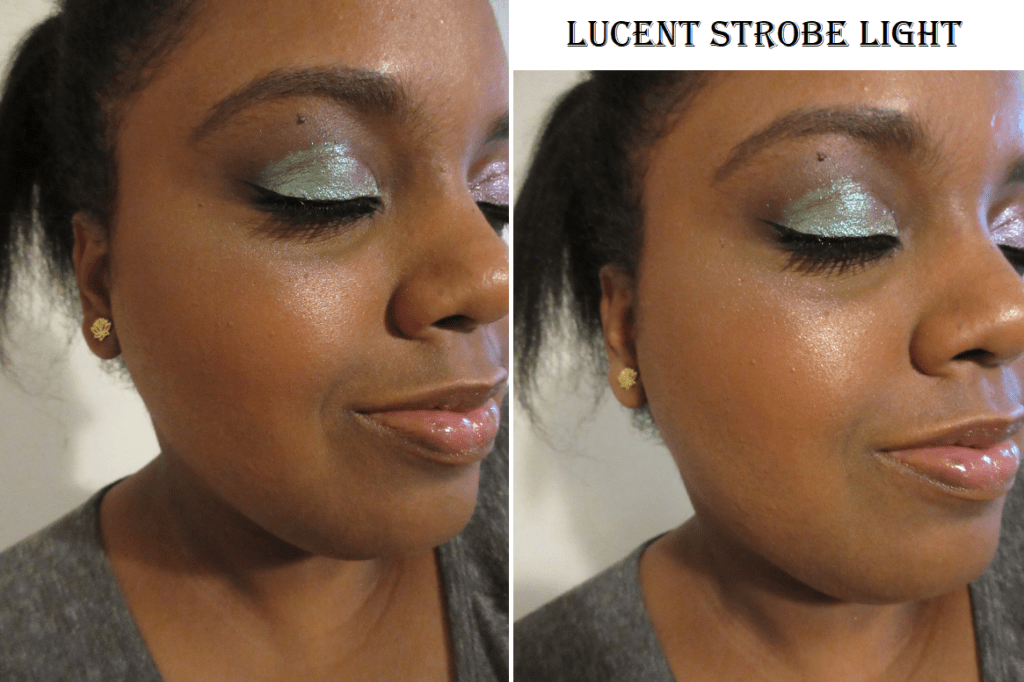
The other two Guerlain powders are probably the most flattering on me and more of my style, though I have to tolerate the smell to wear them. I still think the other two Hourglass powders are beautiful. Lucent Strobe makes the most wearable-impact of them all, as it’s intense but not as icy.
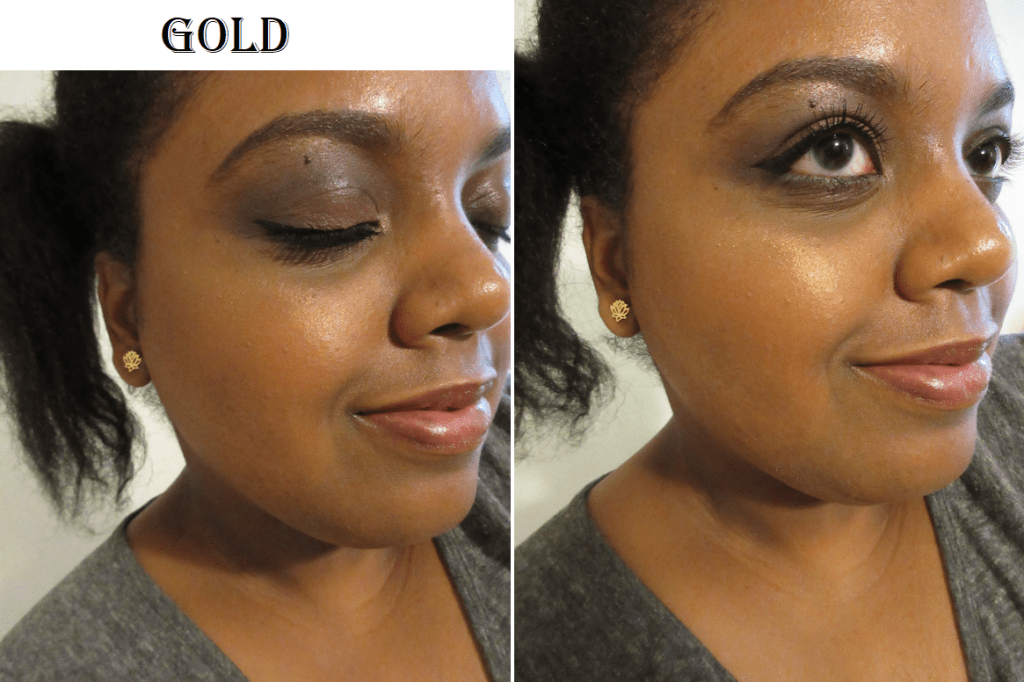
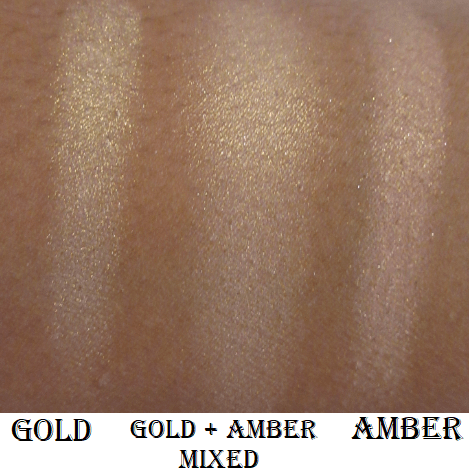
The best uses of the Guerlain Trio I’ve found is using Gold alone, Amber alone, or mixing the Gold and Amber shades together. It tones down the yellow base in Gold while amping up the intensity that Amber doesn’t have on its own.
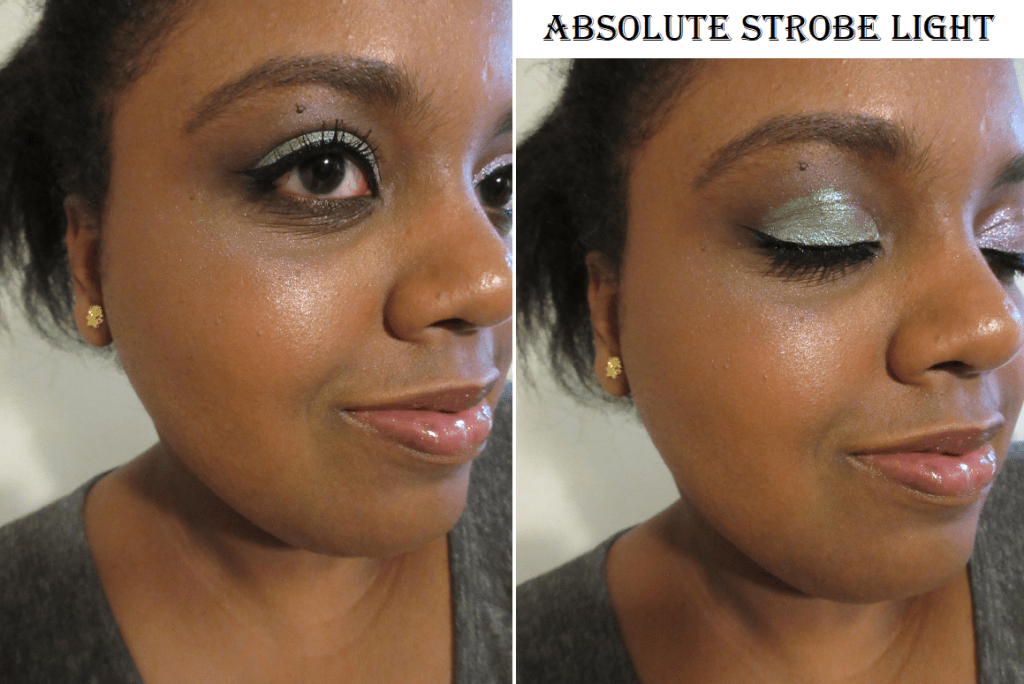
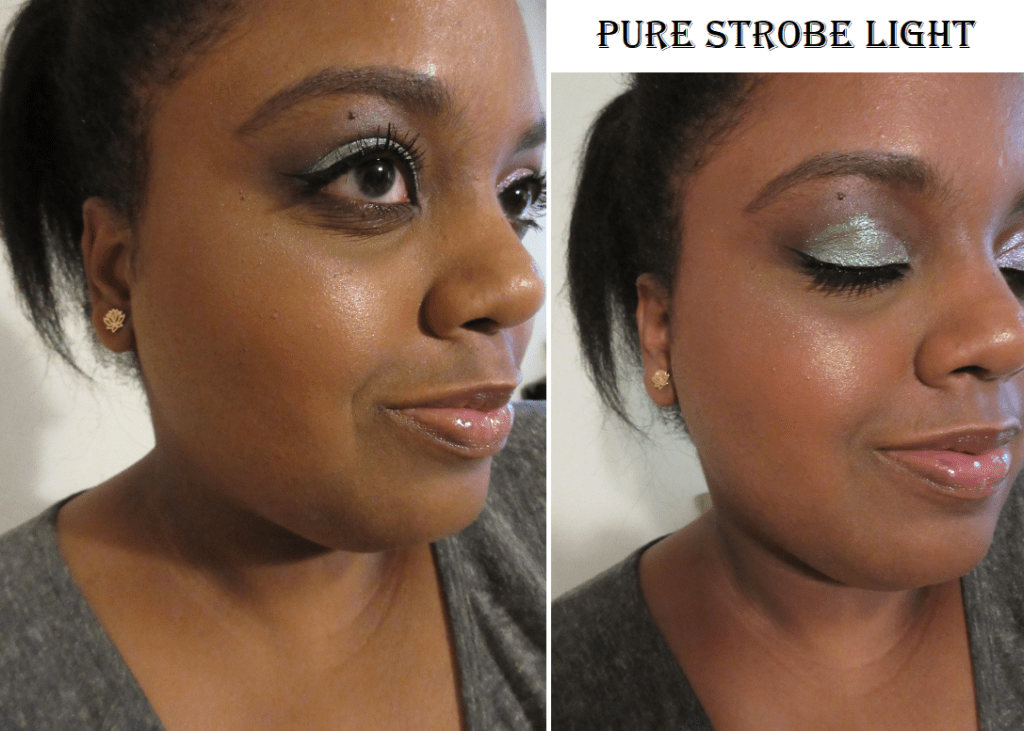
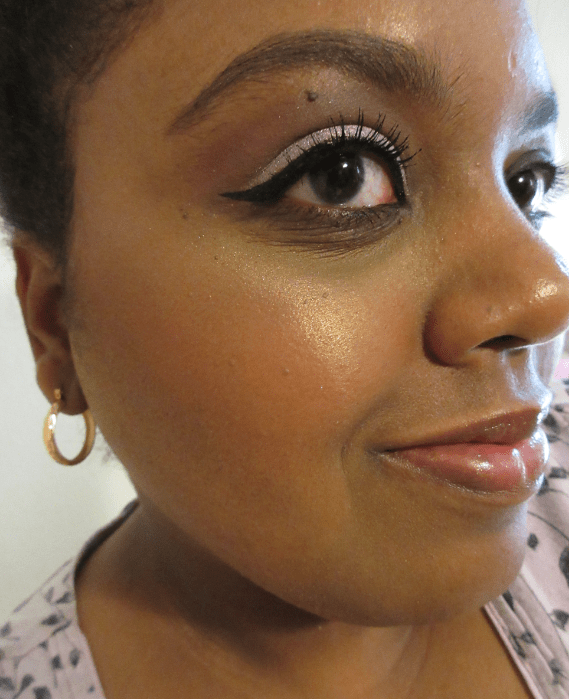
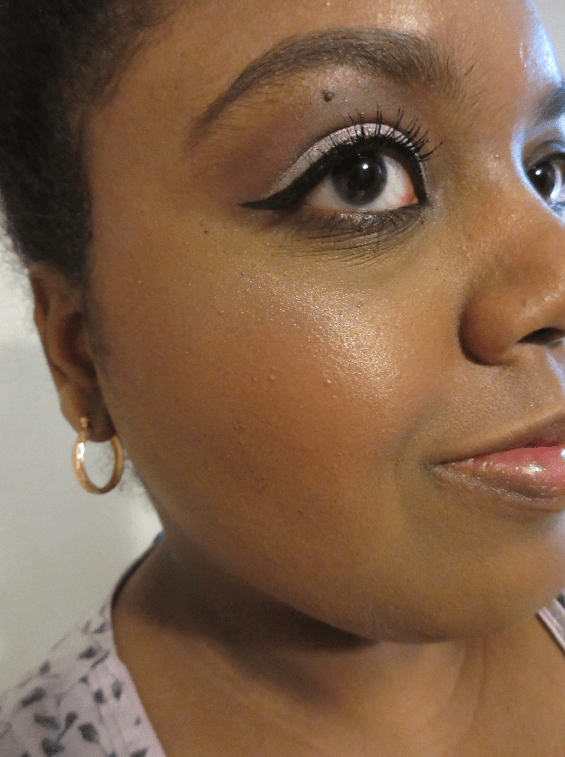
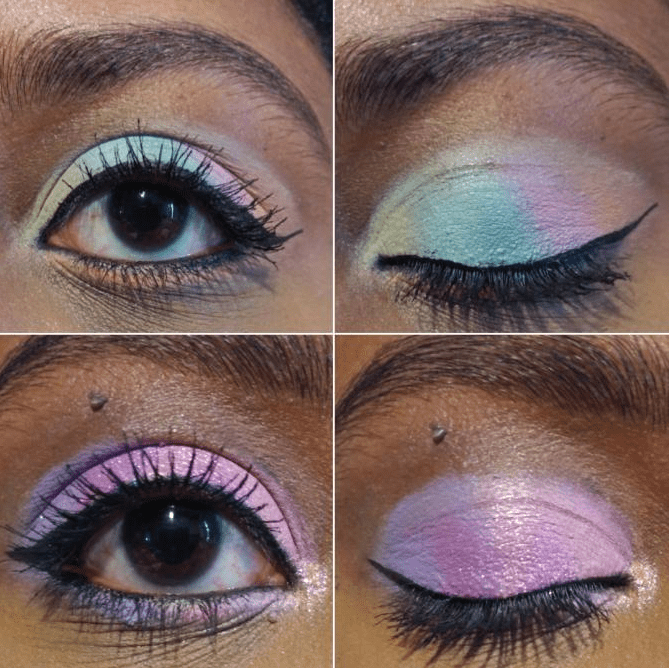
The best use of the Hourglass Trio I’ve found is to use Pure Strobe as an inner corner of the eye highlight and Lucent Strobe as a spotlight/pinpoint highlighter. I basically use a regular highlighter along my cheeks and at the very highest point of my cheekbone add Lucent Strobe to make that spot stand out even more. All that these Metallic Strobe powders really need is to be mixed with something deeper, and then the outcome is much more to my liking. In the photo below, I used Nabla’s Amnesia highlighter, which is not an example of a deeper highlighter, but of one that’s on the more subtle side that was amped up by Lucent Strobe.
The shades in the Guerlain Pearl Palette better compliment my skin tone than the Hourglass Metallic Strobe Palette. Both brands advertise these products as “universal” highlighters, but I don’t believe this to be the case. They can be used on a wide range of skin tones, but none were catered to me, not even the Guerlain trio. I still really enjoy them anyway and don’t regret my purchases.
2014 was the year my obsession with makeup really started, but my history with E.L.F. began in 2011 at the latest. My Aunt bought me one of their Smoky Eye books that had a step-by-step diagram of how to achieve a smokey eye. I don’t believe I used it that often but compared to the chalky eyeshadows I’d been experiencing at the time, I thought it was amazing. This was the period when I was still using sponge tip applicators and I’d never heard of actually blending eyeshadows!
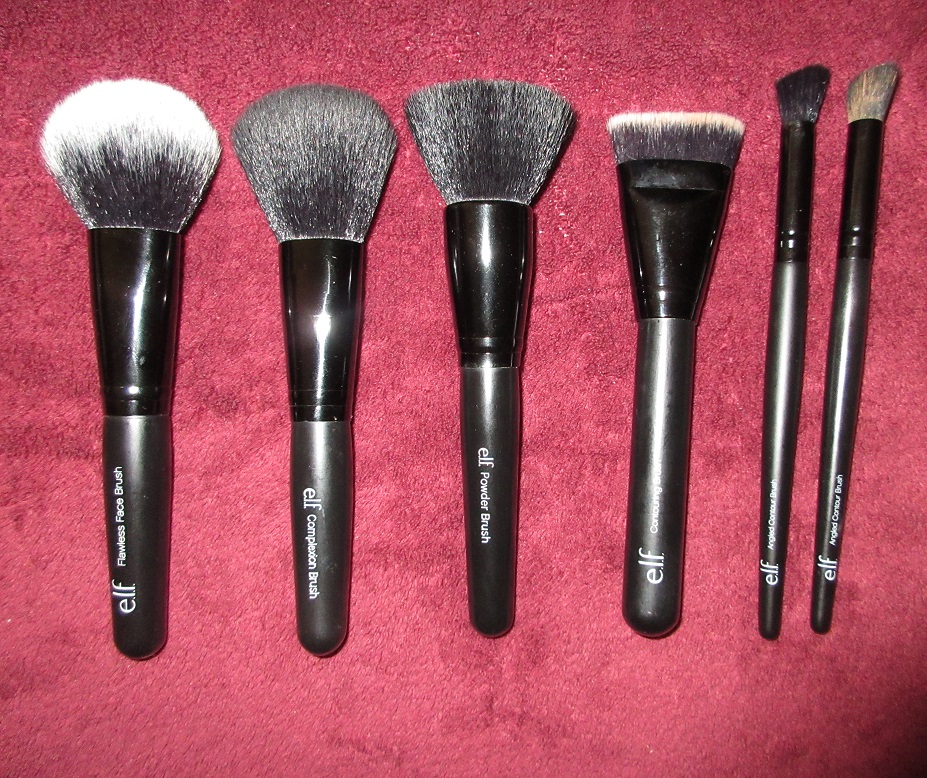
Elf Cosmetics, and myself, have come a long way since then. They managed to produce some nice quality products at very affordable prices long before Colourpop. Despite having incredible Japanese brushes of the highest quality, I still use some of my ELF brushes that have lasted me years!
But I’ll try to keep this post on the short side for once. I have 4 out of the 8 Bite-Size Face Duos, the newest additions to their line of minis. I also recently purchased another Bite-Size eyeshadow quad, making my total of those 4 out of 8 as well.
At the cost of $3, they’re definitely worth checking out. I recently did a massive MAC blush and highlighter post, so the quality of these duos don’t blow me away when compared to MAC’s formula. However, the color combinations are pretty; they’re lightweight but still decently pigmented, and they blend into the skin nicely without being patchy. I can’t ask for more at this price point. An odd bonus point for me is that I’ll finally have the satisfaction of hitting pan on a blush because the pans are thin and I could definitely get through one eventually.
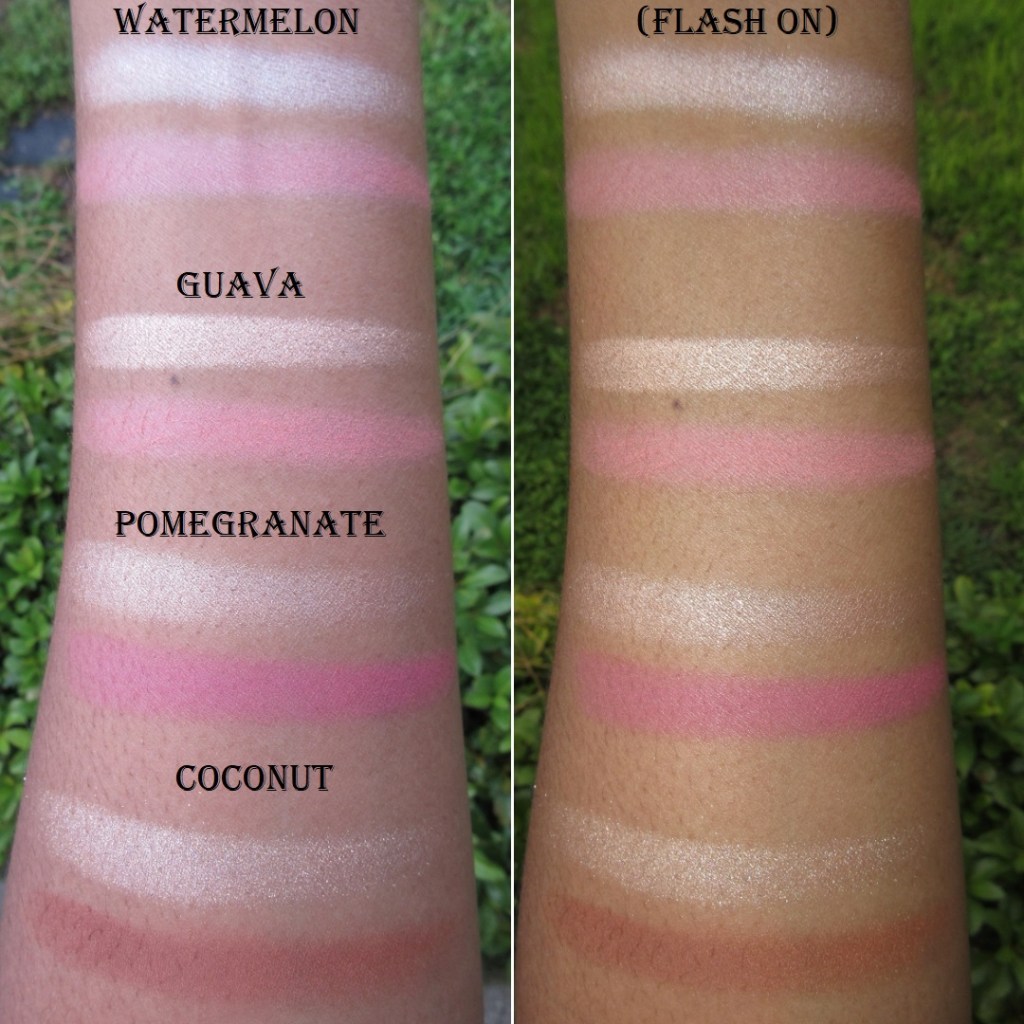
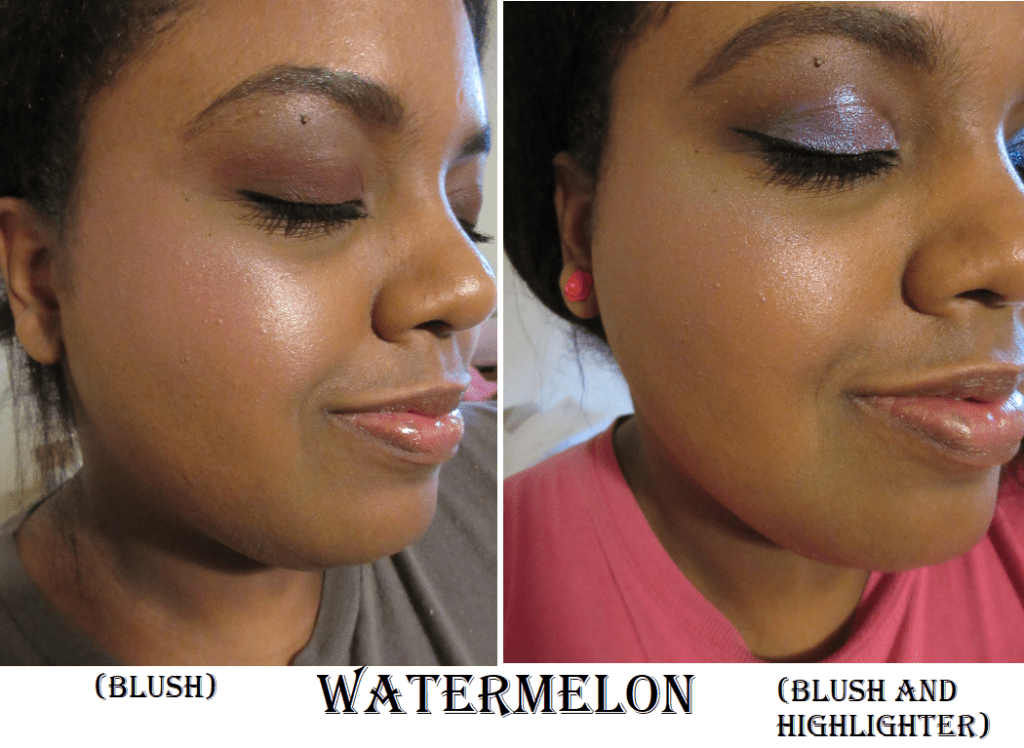
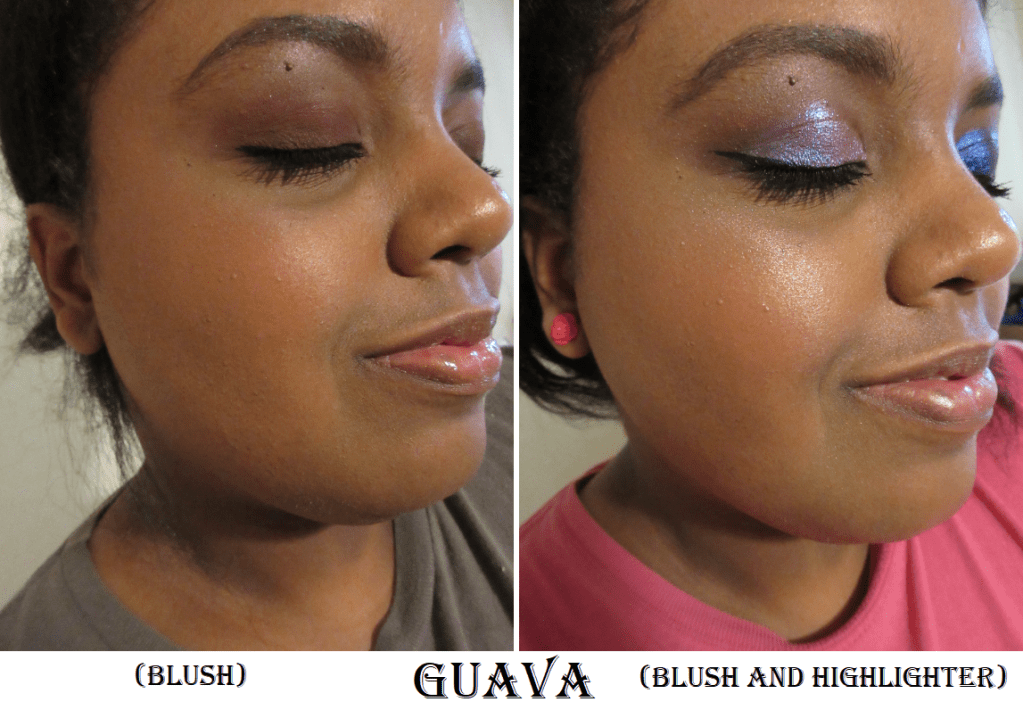
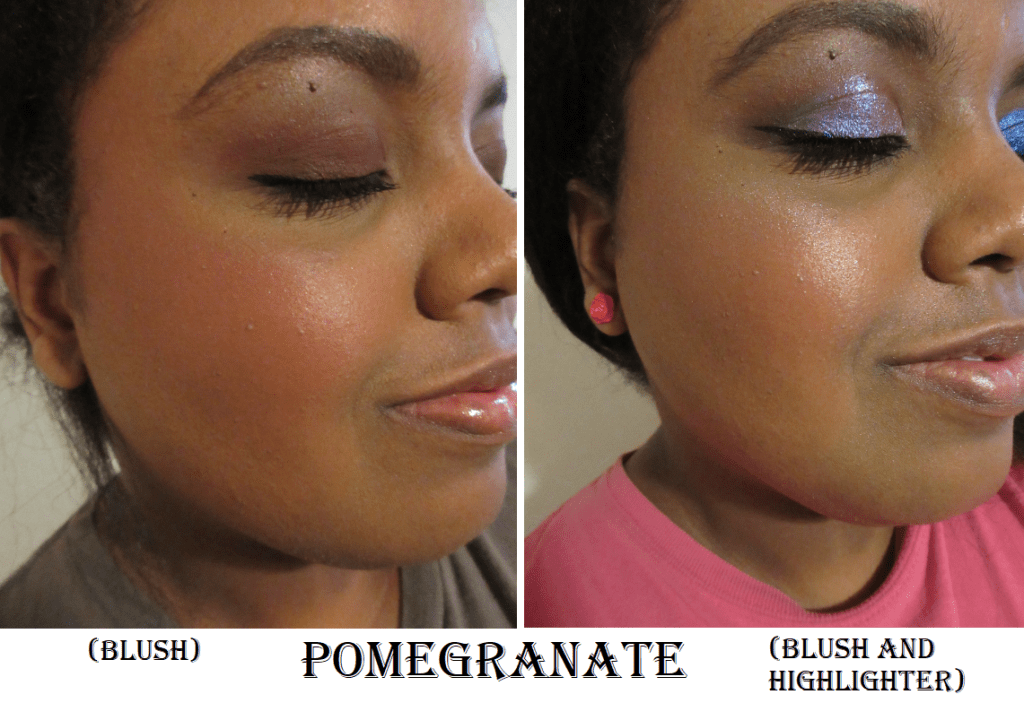
I will be posting cheek swatches, but because some of the shades are so light, I wanted to show what my bare cheek looks like with just foundation for comparison purposes. I’m wearing the Shiseido Synchro Skin Self-Refreshing foundation with SPF in 440 Amber. In the grey shirt, I have the original ELF poreless primer. In the pink shirt, I’m using the MILK Hydro Grip primer.
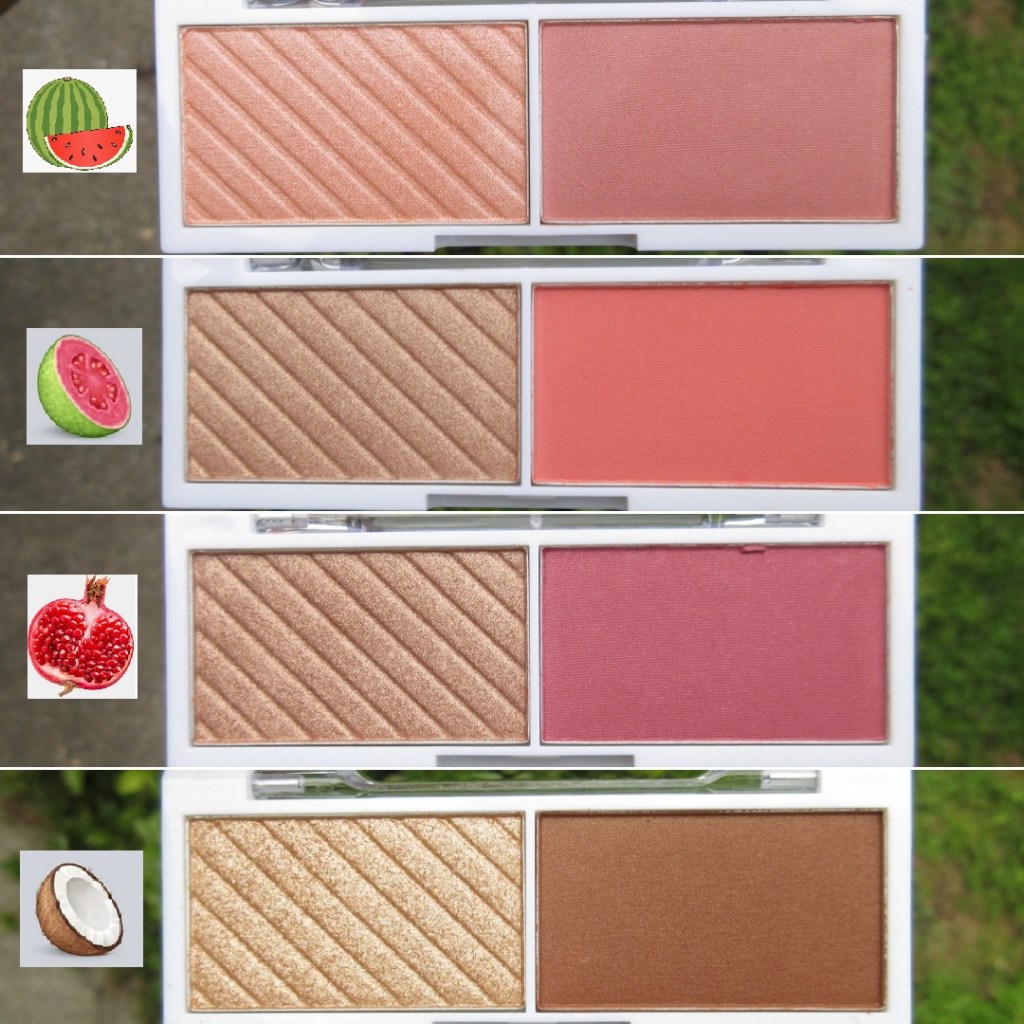
Watermelon – This shade is too light for me, and it’s emphasized by the white/silver shimmer in the blush. It looks matte based on website photos, but it’s far from it. I was also disappointed by the highlighter shade, which is a beautiful salmon color in the pan but just comes off icy on my cheeks. I don’t see myself reaching for this one anymore, or even repurposing the blush because of the shimmer. Even though it doesn’t work for me, it would look beautiful on someone of a lighter complexion (especially neutral to pink undertone).
Guava – This is the only matte blush out of the four duos I have. It’s just dark enough for me to be able to wear this, but I think the buildable nature also helps me to pull it off. It looks brighter and more coral in the pan, but that doesn’t translate to my cheeks. In swatches, it looks very similar to Watermelon, but thankfully without the frosty shimmer.
The highlighter in this duo is the most flattering of the four for my complexion. The Guava duo is one I will keep using.
Pomegranate – This is the one duo made for darker complexions. On the day I wore the pink shirt, I wanted to show how sheer the blush could be applied, because I knew it was pigmented enough that I could actually overdo it. In the grey shirt, I used a denser brush for stronger impact with just a few swipes.
Even though this one is better suited for my skintone, it still comes off a little darker than I prefer. So, I’ll continue to use this with either a very light application or by combining it with a lighter blush nearer to/on the apples of my cheeks.
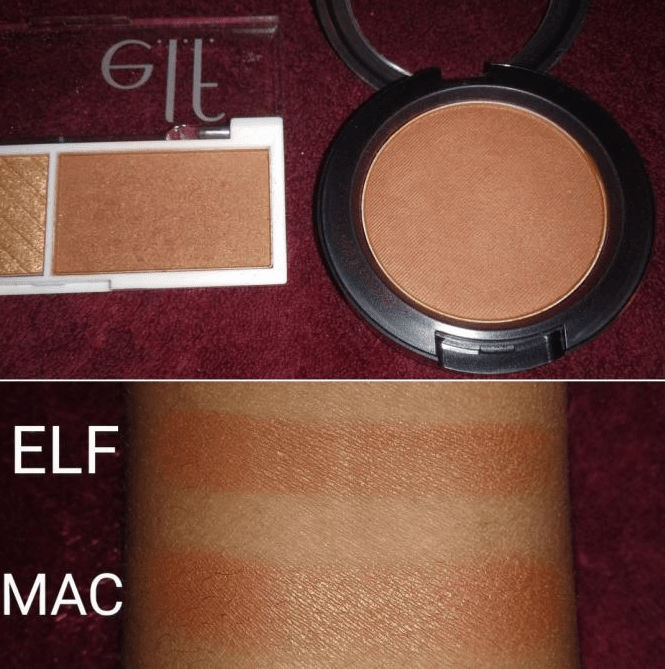
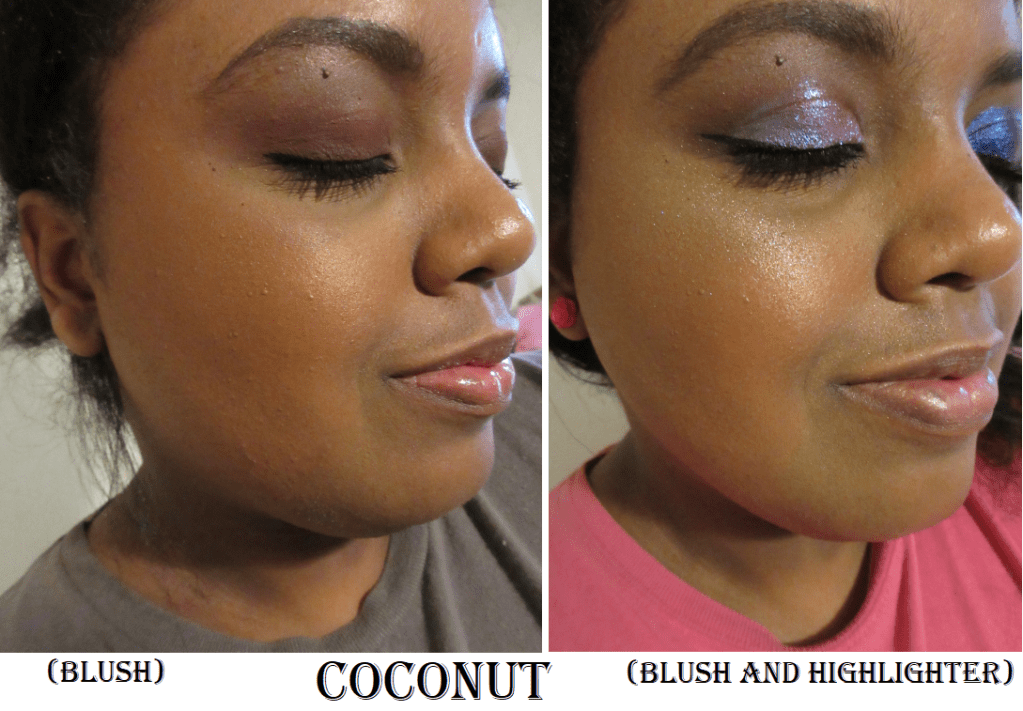
Coconut – This shade is a little harder to blend than the others, but the formula feels slightly creamier and less powdery (satin finish). I believe this shade was actually intended to be more of a bronzer shade for light-medium skin tones, rather than a blush for tan, dark, or deep complexions, but I decided to try it as a blush anyway. It reminds me a bit of the Format shade from MAC. I like this one, but I’d love it if it had a slightly reddish tone. I’ve worn this shade the most so far, but since I already own a similar shade that I like better (Format), if I continue to use it, I would use it as a blush topper over blushes with some red in it. For example, I’ve worn it with MAC’s Burnt Pepper shade to tone it down a bit, and it looked pretty nice once I was able to blend it in properly, which took a while. I haven’t decided if it’s really worth it trying to use up or not. TBD.
For some reason, the highlighter formula in this duo is different from the others. The glitter is much chunkier, and I’ve never liked sparkly highlighters. It’s a shame because gold is my most loved shade of highlighter among any brand. I was really looking forward to this one until I saw the texture in person.
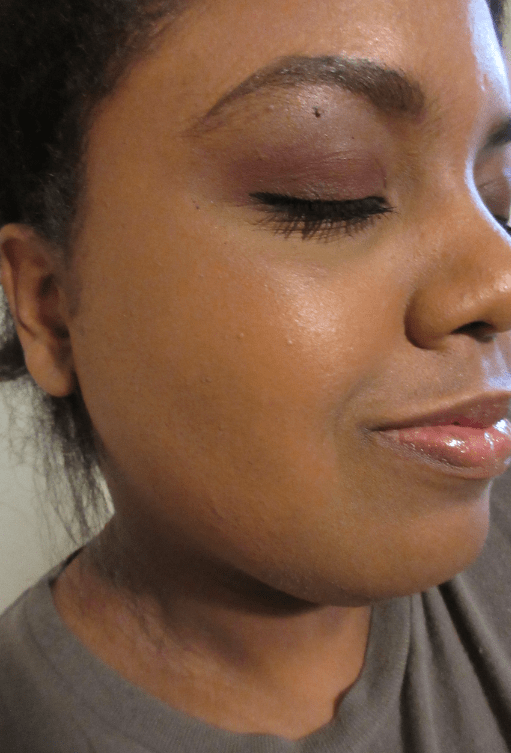
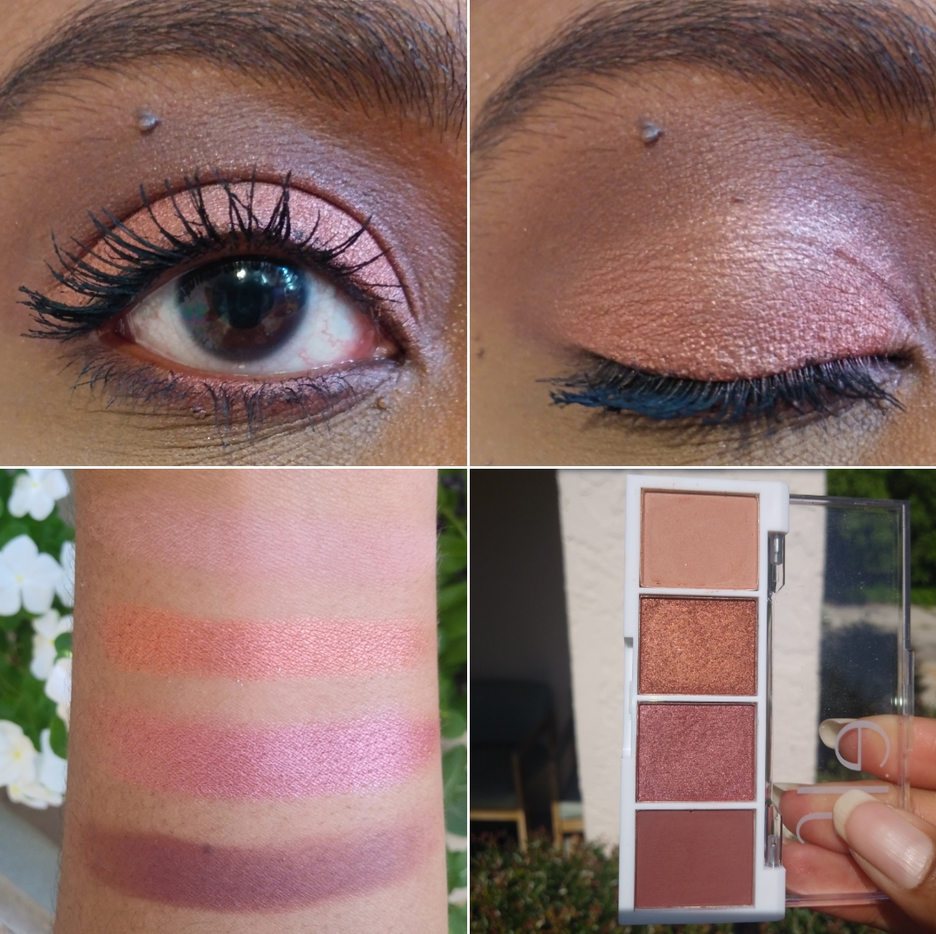
Berry Bad – In my pictures wearing a grey shirt, I wore the lightest and darkest shades in this palette. The lightest one doesn’t show up on me. It’s a buildable shade but still not opaque enough. The second shade is a more metallic formula compared to the rosy shimmer in the third pan. When I put the two next to each other on my lids in the photo below, I could barely see a difference in person, let alone on camera. And the combination of textures when I applied both shades with a wet brush looked odd and did not blend together seamlessly, so I reapplied the rosy third shade with my finger all over the lid to get that original dull dry texture back. Then I applied the metallic shade wet to the lower lash line so I could still show it in this look, although dampening that shade made it look reddish copper instead of orange copper. In my crease, I have the darkest shade. Basically, the last two in the quad are the most pigmented, but still look very light.
For now, I like it enough to keep using the last three shades. It’s still better than the Acai palette, but not as good as the Jalapeño or Truffle. I’ve discussed the other three mini palettes in this post if you’re interested in seeing more about them.
ELF’s Instant Lift Brow Pencil was in my favorite products from 2019 post, and I still love it and have continued to use it consistently since then. I recently bought the Ultra Precise Brow Pencil with my ELF website order because Ulta only sells the 4 lightest shades.
The Instant Lift Brow is 0.006 oz. Not only is the Ultra Precise Brow Pencil much smaller in packaging size, it actually contains a third of the product at 0.002 oz. What I love about the Instant Lift is how creamy it is, though that also means it only stays put as long as you don’t accidentally rub your brows. The Ultra Precise Brow is a bit stiffer, as is necessary to maintain the precision, but it’s not as stiff as all the other brow pencils I’ve used. It’s also not quite as easy to remove.
Both shades are in Dark Brown. The Instant Lift is $2 whereas the Ultra Precise is $5. Despite the Ultra Brow being more expensive for less product, I never go through my brow products before having to toss them, so I think I will continue purchasing the Ultra Brow in the future because I really enjoy how sharp I can make my brows look! That being said, I still love the Instant Lift and will continue to use it up until it’s finished or it’s time to throw it out.
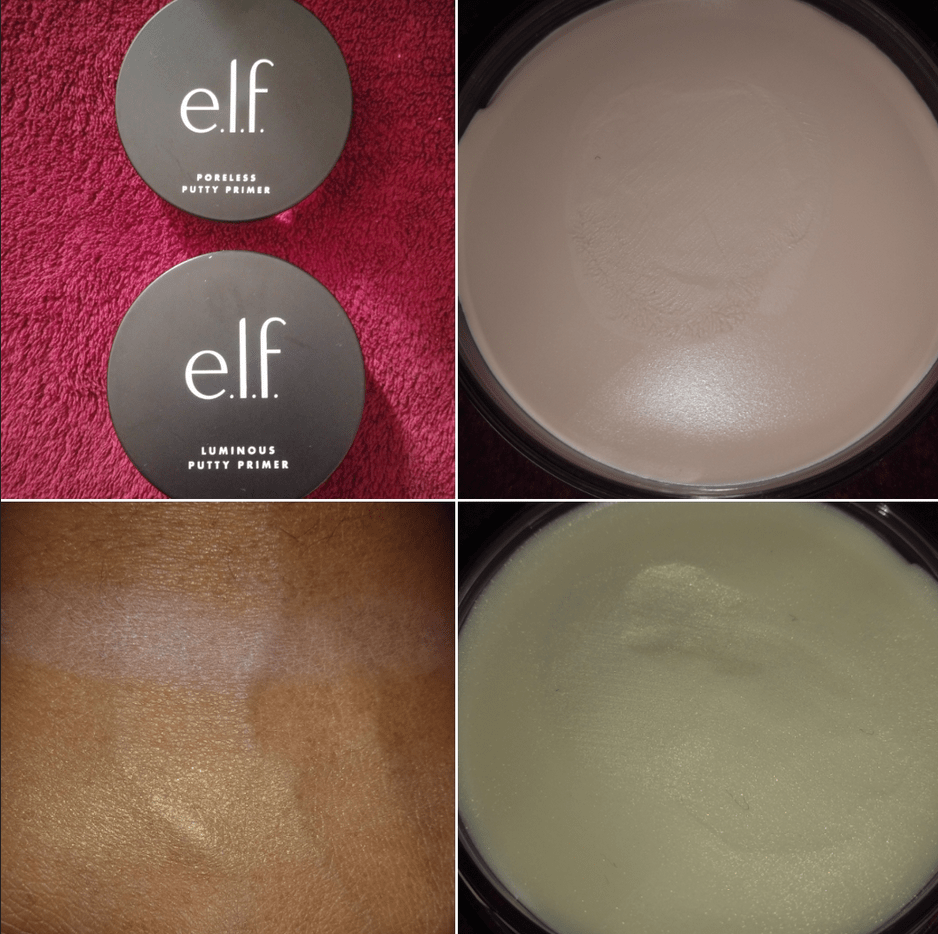
The original Poreless Putty Primer has been touted as the dupe for Tatcha’s Silk Canvas primer, but I can tell the difference. The ELF primer is more emollient and actually easier to blend into the skin than the Tatcha primer. On the smooth areas of my face, they perform similarly. However, my favorite place to put the Tatcha primer is under my eyes, because I noticed it helps my Tarte Shape Tape to look a little less dry and minimizes the look of creases under my eyes. They’re still obviously there, but when I tried to ELF primer under my eyes, within hours they drew attention to them in the worst way. It made the concealer slide away in some spots and gather up in the creases instead. It basically looked worse than if I’d used no primer at all with Shape Tape. I can still recommend this primer (and I will still use it) on the rest of my face, as it worked nicely everywhere except the under eyes.
I think the original is a great option, but I absolutely hate the Luminous Putty Primer. At the time I bought it, I didn’t realize the luminosity was due to shimmer particles; that it would leave visible glitter specks randomly dotted all over my face, even under the foundation, and look like I had glitter fallout from eyeshadow before even doing my eye makeup.
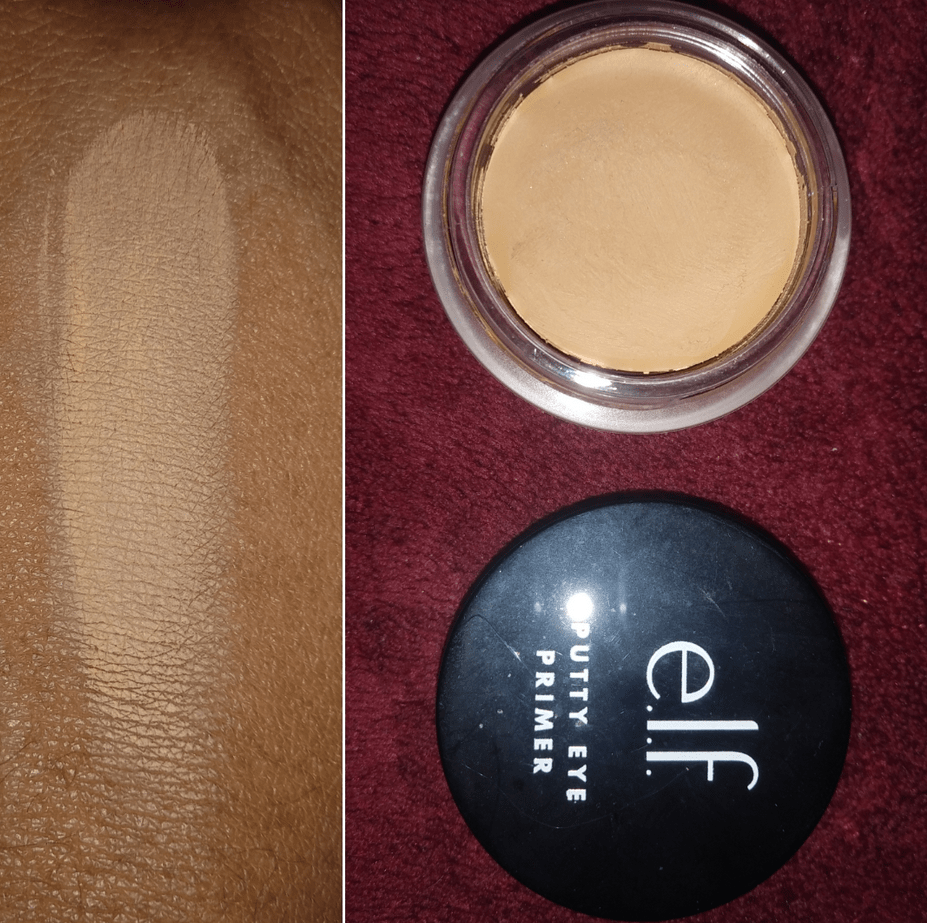
The Putty Eye Primer that I own is in the shade Sand. These eye primers are often compared to the MAC paint pots. It does feel similar straight from the eyeshadow pot, but as it’s applied to the eyes and dries down, it takes on a very stiff texture that is similar to the feel of the ABH eye primer. MAC paint pots stay a little more creamy on the skin.
I enjoyed the Putty Eye primer for about four months until my eyeshadows were no longer sticking to my lids as well when I used this product. The formula became drier over time and a week after I started writing this, I checked again and it’s even drier than before. I no longer have the original box to confirm, but I believe it has a 6 month or less period after opening suggestion. Some products perform well for much longer than the PAO number, but this one didn’t. There are youtubers I admire who like this product (though the videos were first impressions while the pots were still fresh), but I don’t think it’s worth getting when there are other brands who make affordable eye primers too which last longer.
Lastly, I have the Deep Chestnut shade of the 16HR and Hydrating Camo concealers, yet they look like different shades. The original camo concealer has an olive undertone, but the hydrating version is lighter with a very yellow undertone. This difference in color was also noted by Samantha March who wears a very different shade than me, yet still encountered this issue. When you look at the consistency of both concealers, the hydrating one does look more fluid and has a creamier feel under my eyes when it’s freshly applied. After it sets, it continues to look dewy but it feels just as dry as the original. This doesn’t seem to be the case for everyone, but it is for me. I was hoping at least one of them could be an inexpensive replacement for my Tarte Shape Tape, but I can’t find a color to suit me.
In addition, these concealers also have the problem of not lasting as long. Granted, they lasted longer than the PAO date, but still quicker than any other concealer I’ve purchased. The 16HR Camo concealer has spots where the color is starting to separate in the tube. The Hydrating Camo concealer, which I’ve had an even shorter time, is definitely separating. I only used it perhaps five times in the seven months I’ve owned it, so I can’t even say it’s due to overexposure of oxygen from opening and closing the tube. Even if they did last longer, I don’t like the formula of the hydrating one anyway. I do prefer the original, but the shades and undertones in the range are a bit strange to me. I will be tossing them both out, but I at least showed swatches in the gallery further up in the post, even though I didn’t demonstrate them under my eyes.
That concludes this post! I hope it has been helpful. Thank you for reading!
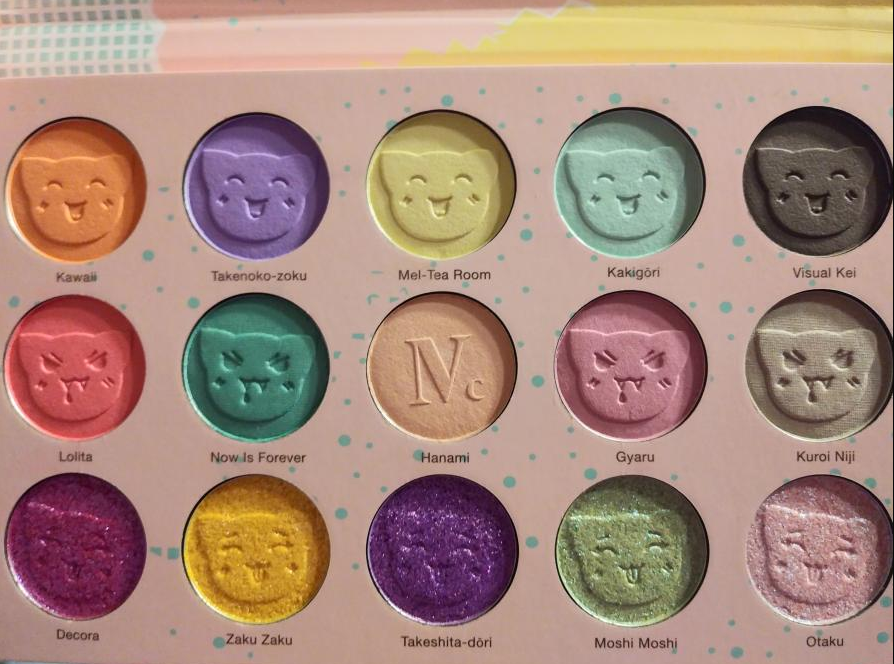
I’m starting this post with a description of the palette to set the tone of what I was expecting: “Nomad x Tokyo Harajuku Intense Eyeshadow Palette. This poppy pastel palette of fun combines 10 high-pigmented eyeshadows and 5 unique multi-chrome toppers for a sheer prismatic color effect. 15 kawaii shades inspired by the wild creativity of the trendy Tokyo youth. Infused with Camellia Japonica Oil to make skin soft and silky smooth. Cruelty-free & vegan.”
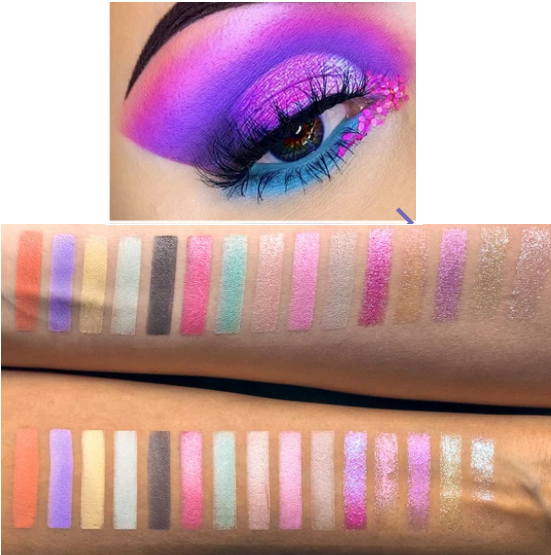
Nomad’s website features Instagram looks from people who have used the palette. Someone please teach me this sorcery of how you get that purple and that blue on the eye compared to the swatches that Nomad themselves posted. Below are my own swatches which I don’t think are that far off from Nomad’s. So, the color intensity from my palette matches up to what I was supposed to get. Yet the site description and photos give the impression that the palette is much more vibrant than it really is.
Perhaps this is considered “intense” because it’s not a neutral color story. Maybe it’s “highly pigmented” for an eyeshadow palette as opposed to the color payoff it should have if it was a pigment palette. There are many times I’ve seen a photo on Instagram with a list of multiple branded eyeshadows used in a single look, yet one brand will repost the photo and make it seem like the whole thing was created using just their eyeshadows. So, it’s possible this person used more than the Harajuku palette on the eyes and that would explain the color differences. Or they used highly pigmented bases/paints underneath. It’s also possible someone used editing tools to turn up the color saturation and tweak the brightness, intensity, etc. I’m not saying it’s impossible to be talented enough to produce that kind of look from this palette. I just have no idea how to naturally do that regardless of what base I used. I tried seven different ones, which I will discuss further into this post.
This was the outcome of my first use of this palette, which I quickly realized has a learning curve.
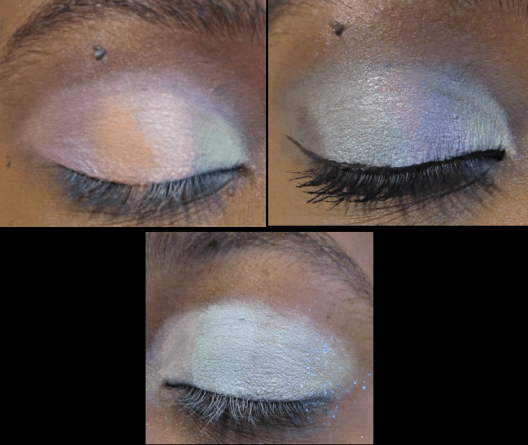
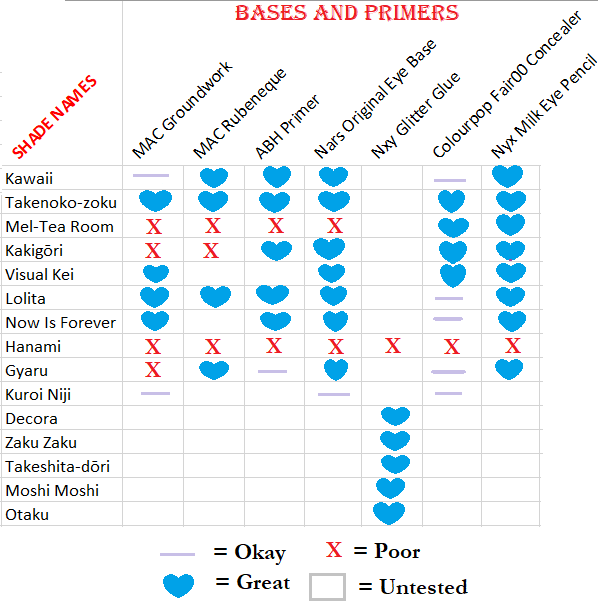
These eyeshadows swatch beautifully! They feel smooth and glide across the skin nice and evenly. I swatched them on my MAC Paint Pot in Groundwork, yet when I used the same base on my eyes, they wouldn’t stick and kept dusting away. The reason I was able to pack three different colors on top of each other on my lid was because the previous two blew away and just left me with white powder on the lids. Patting motions produce decent results with some of these eyeshadows, but I have been unable to actually blend any shade besides that dark grey called Visual Kei.
Pastel shades can be quite tricky to use, particularly on darker skintones. While it’s true that I tend to avoid pastels because they’re time consuming to use if the formula isn’t suited for me, the pastels from Lethal Cosmetics and Makeup Geek show that they can be made to work for everyone.
What I learned from my failed attempts is that it’s not enough to just have a creamy base (MAC paint pot) or a white base that is dry (Anastasia Beverly Hills eyeshadow primer), so I switched to the Nars Smudgeproof Eyeshadow base which is whitish-clear and emollient. Making this switch provided better results.
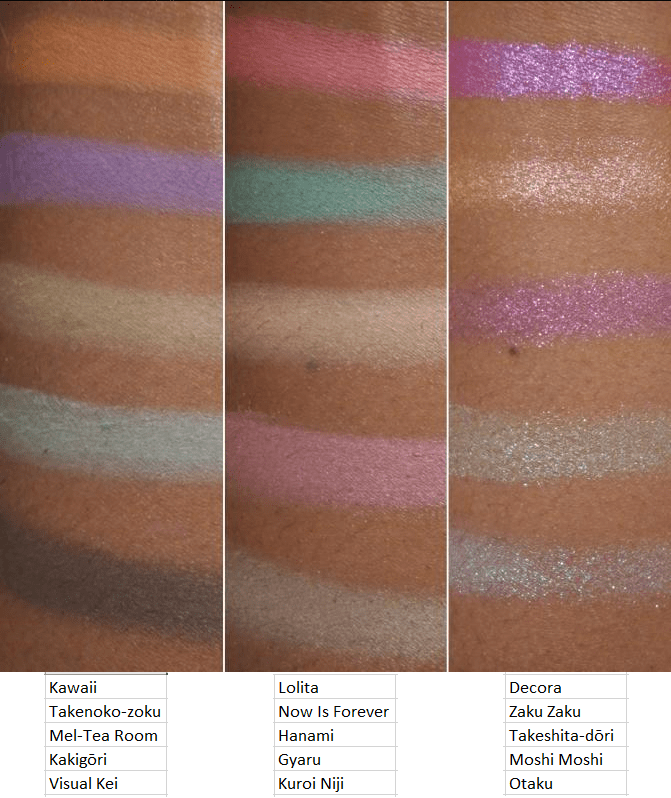
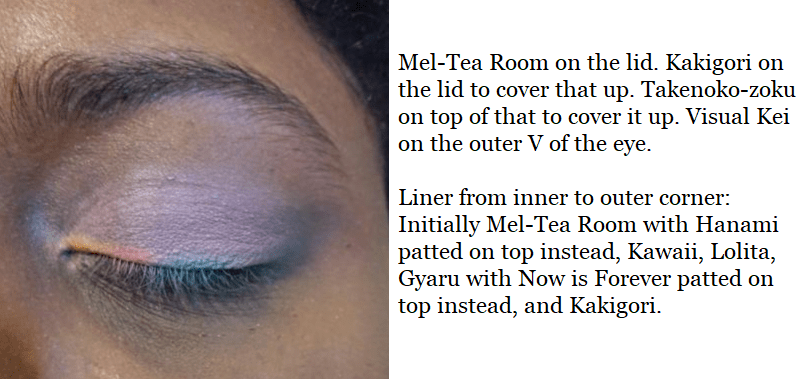
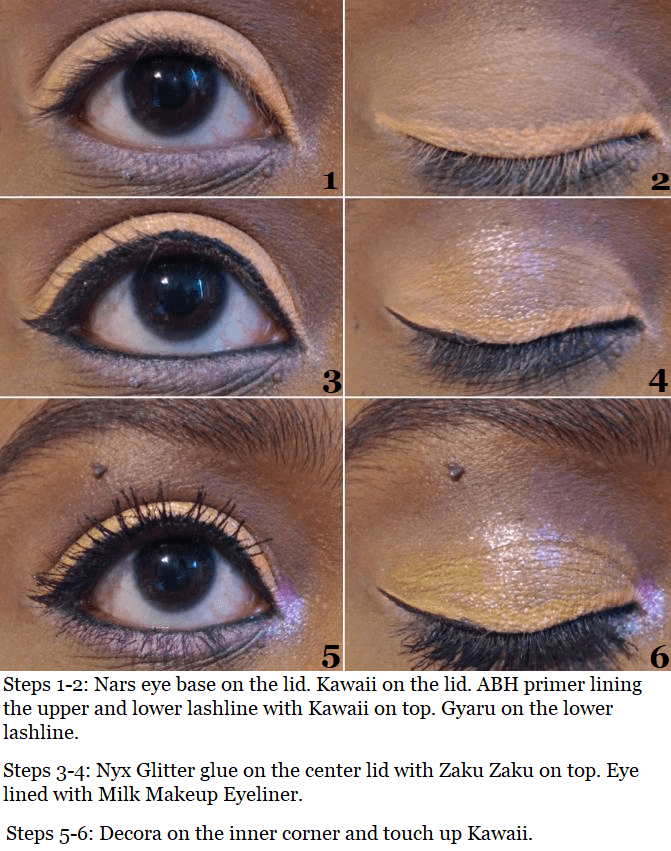
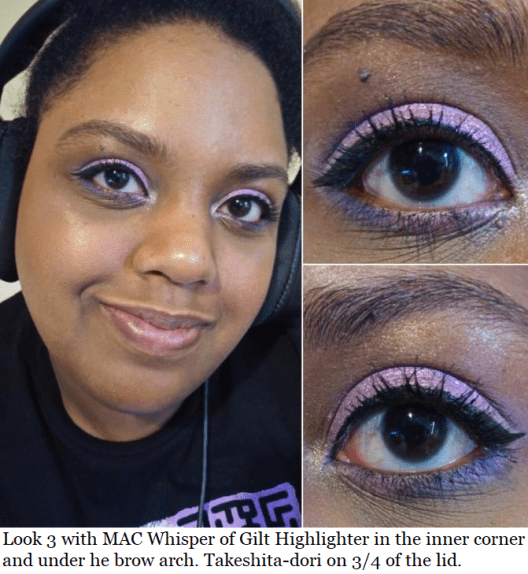
I still wasn’t satisfied though, so I continued to test things until I came to the realization that the Nyx Jumbo Eye Pencil in Milk is the best base that I have. I was able to get every shadow to perform decently from the top two rows of the palette, excluding the two shades which I couldn’t get to work with any base: Hanami and Kuroi Niji. And the satin finish in Now is Forever is what helps me distinguish between that shade and Kakigori, even though they look different in the pan.
These are the results of my testing, which I hope better explains what I was trying to say. The difference between the lilac line and blue hearts is that some of the bases had the color show up but the shadows faded quickly. And even though the Nyx Jumbo Eye Pencil worked the best of all, there’s still a learning curve to using this too.
Shadows do crease on me, but if I use too much of the Nyx pencil on my eyes the creasing becomes deeper and more noticeable. Using too much also prevents it from drying down, but too little and the shadows won’t stick. A few hours after I did that eyeshadow look, which had a little too much of the Nyx pencil, I accidentally rubbed my eye and a thick patch of eyeshadow left a streak across my hand. I’ve had shadows come off a little but not to this degree. So, it’s important to find the right balance.
As for the “multi-chromes,” the five sparkly shades on the bottom row have multi-colored shimmery specks but when I think of a multi-chrome, I expect a color shift. Perhaps it just doesn’t show as well on my skintone, but to my own eyes these are duochromes at most. That doesn’t take away from the fact that these really are beautiful and are the stars of this palette. They stick fairly well on their own, but Nyx Glitter Glue ensures that there’s minimal glitter fallout. They definitely stay in place, even when rubbed.
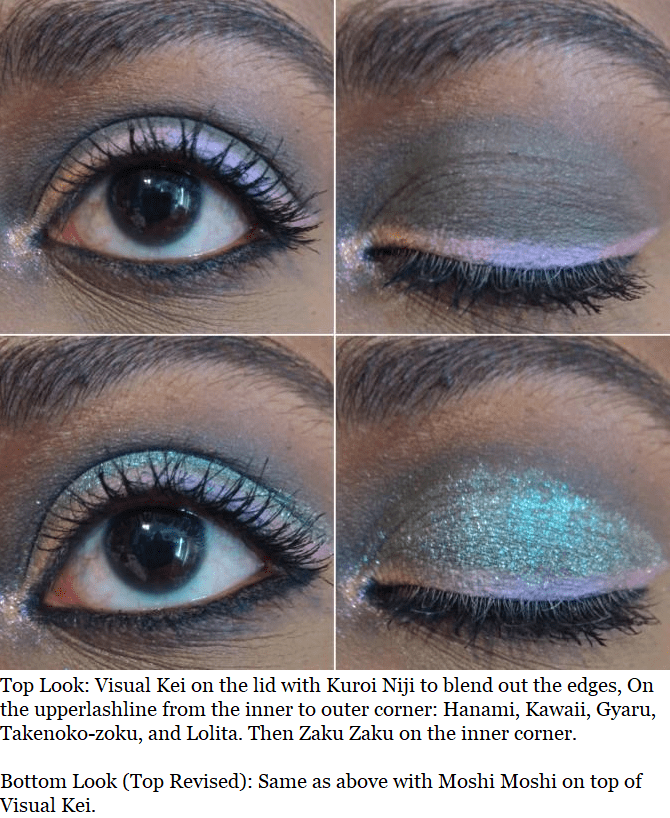
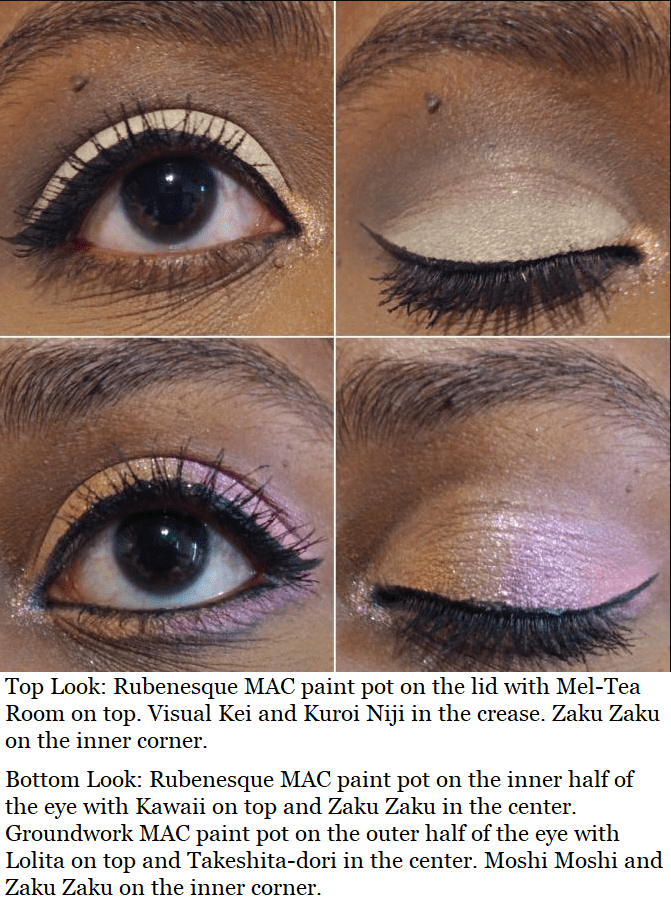
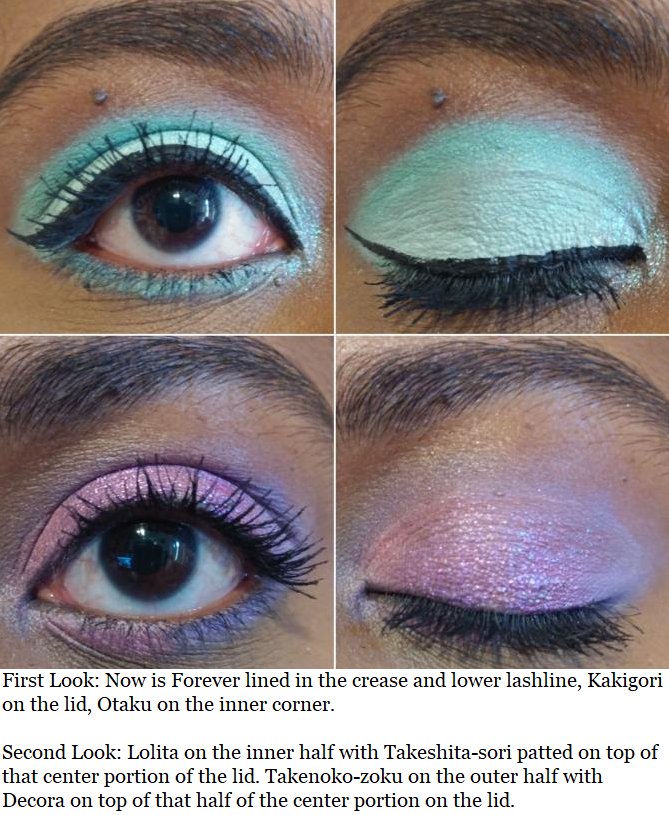
The base in Decora is the most pigmented, and therefore is the darkest one, especially with its darker purple glitter. That’s why I often pair it with Takenoko-zoku over Lolita or Gyaru when one of those two are on the other half of my eyes. Takeshita-dori looks darker in the pan, but the light purple glitter makes it appear lighter than Decora. The vibrant yellow in Zaku Zaku doesn’t translate to the eye and appears more of a peachy pink, which is why I pair it most often with Kawaii. Moshi Moshi looks mostly green with blue glitter. Otaku looks pink in the pan, but it just looks blue on me.
FINAL THOUGHTS
Now that I know the trick to making this palette work for me, I can foresee myself continuing to use it. Liking 9 out of 15 shades is a decent ratio for a premade palette. However, I can’t recommend this despite loving the packaging, the concept, the texture of the shadows, and the results with specific shades. The formula is too finicky. And although it didn’t work as well for me, I thought it was still worthwhile to post about for anyone wanting to see this on a dark skintone. If you have a lighter complexion or a more advanced skillset than I do, you may enjoy this palette more than I did.
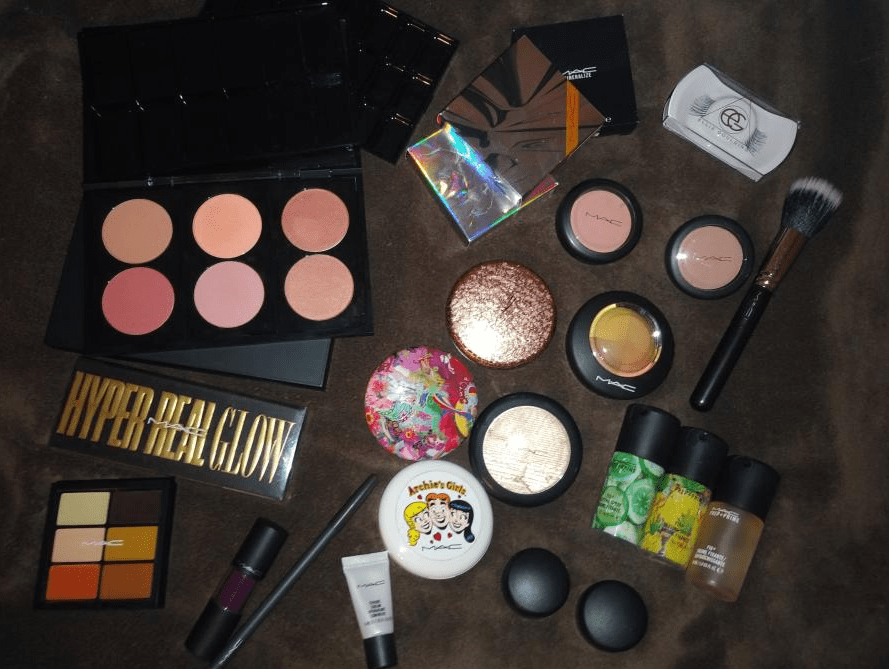
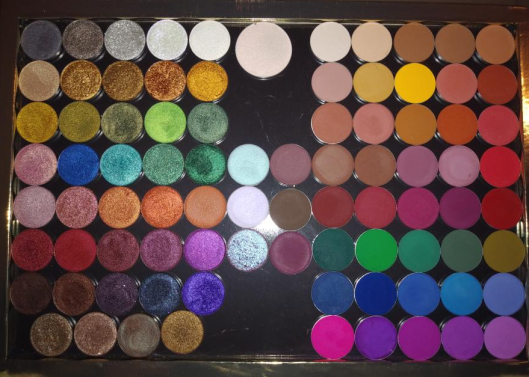
My MAC products are scattered throughout my collection, so I didn’t realize how many different items I had until I started looking. I initially wanted to review everything from MAC that I own (much more than what is pictured above) but the post was getting absurdly lengthy. So, I will likely do a second MAC post in the future.
BLUSHES
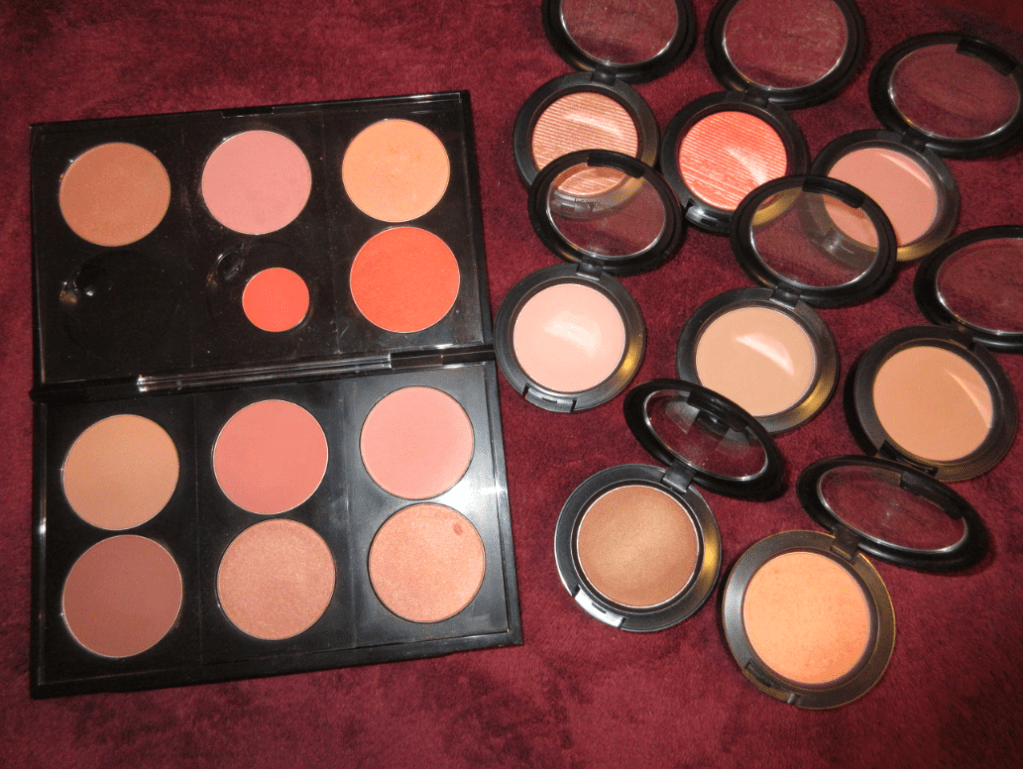
MAC has five different finishes of powder blushes: matte, sheertone, sheertone shimmer, satin, and frost. They are sold in compacts for $25 or the Pro refill pans for $17. Some Pro refill shades are only available in the refill form (like Ambering Rose) and some blushes are only available as compacts (like Format). They also have Extra dimension, Mineralize, and Glowplay (bouncy) blush formulas. I only own two Extra Dimension blushes and then the rest are Powder blushes.
MAC is an artist brand that works with professional makeup artists. Pros who meet the necessary requirements get a discount on products. Because of this, I thought the items in MAC’s Pro line such as makeup refills, empty palettes with custom inserts, etc. were exclusive to MUAs, but anyone can buy them. I’ll discuss inserts, palettes, and refills more in-depth after the blush section is completed.
*IMPORTANT NOTE: All the individual product shots of the blushes and swatches were taken outside in natural lighting. I could hold the blush pans and my arm at whichever angle I needed to get the sun to hit it directly, without casting any shadows. However, I was unable to do that with my own face. The weather is also an issue as it’s either too cloudy and raining (we’re in hurricane season) or it’s too sunny and I start to sweat profusely in just minutes of being outside. Florida summers are brutal! Because I took my face pictures indoors, sometimes my skin tone looks lighter or darker due to the lighting. However, I kept the photos that show the blush as closely to how it actually appears in person. This wasn’t as much of an issue with the matte shades but the shimmery ones, which reflect differently in the light, were trickier. This is why I made this post so picture heavy to be as helpful as possible; it’s not easy to figure out which blushes will work best based on the photos on MAC’s website.
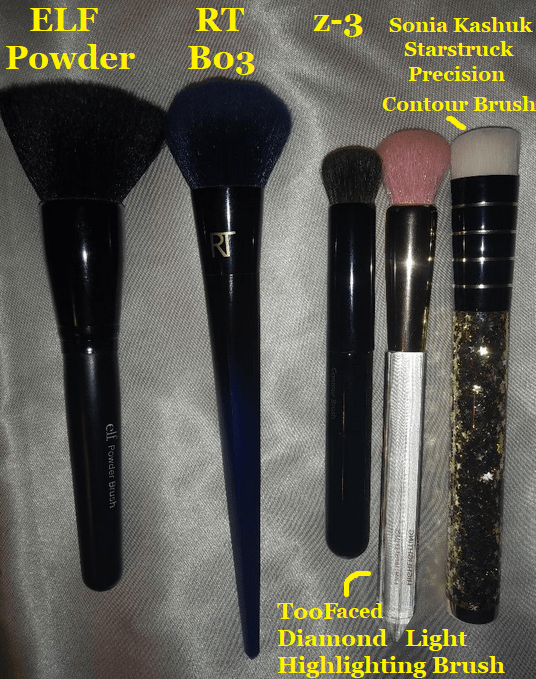
BLUSH BRUSHES USED: I only used squirrel and goat blush brushes for my cheek swatches. Each brush was wiped clean between uses and only used for a maximum of two blushes to ensure there was no shade mixing.
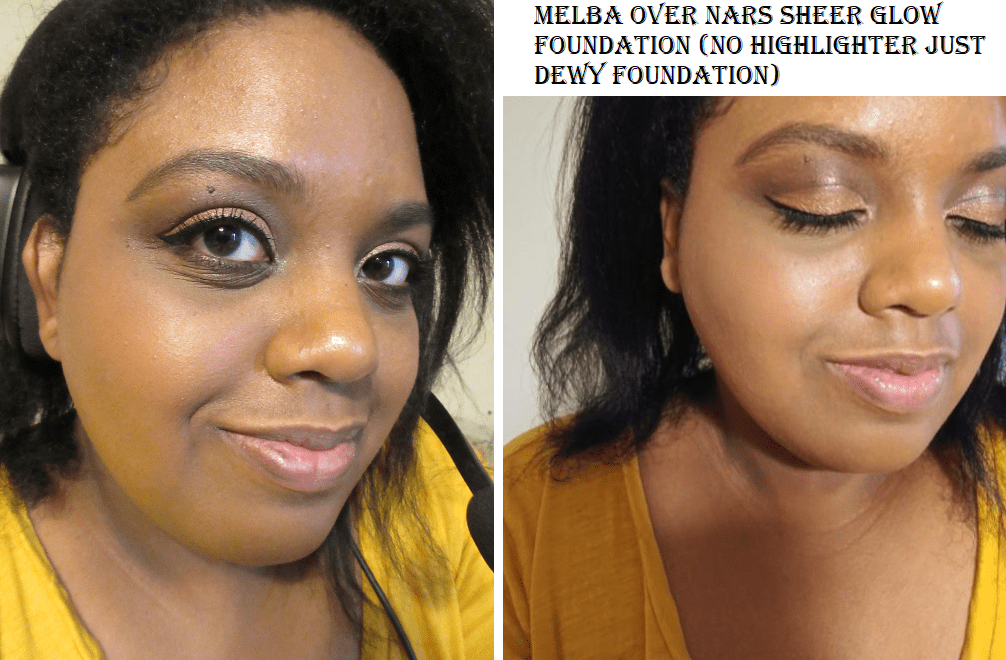
FOUNDATION AND PRIMER USED: I’m wearing Nars Sheer Glow foundation in Macao as well as MILK’s Hydro Grip primer in every photo for consistency. The finish of this glowy foundation, plus the hydrating primer, accounts for the dewy shine in the photos with even the matte blushes. I considered using a matte foundation but the Nars one is my best current shade match. I expect the matte blushes to stay matte on a matte foundation, but I thought it would be interesting to see how much a dewy foundation might affect mattes.
I’m not wearing any contour, bronzer, or setting powders either in order to show the blushes on their own.
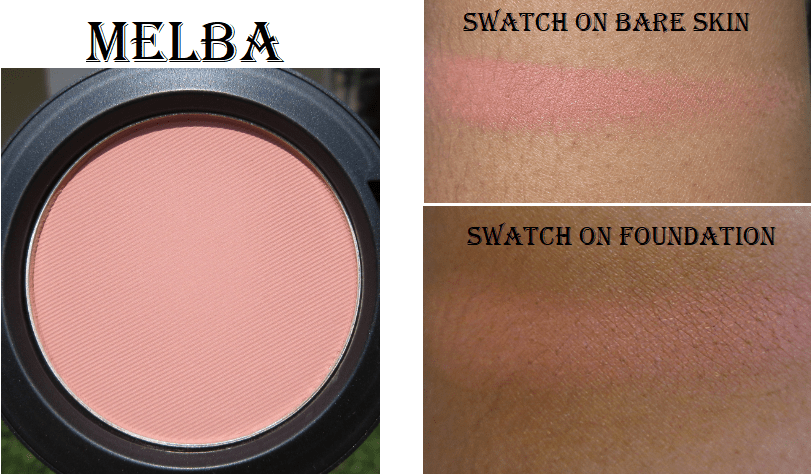
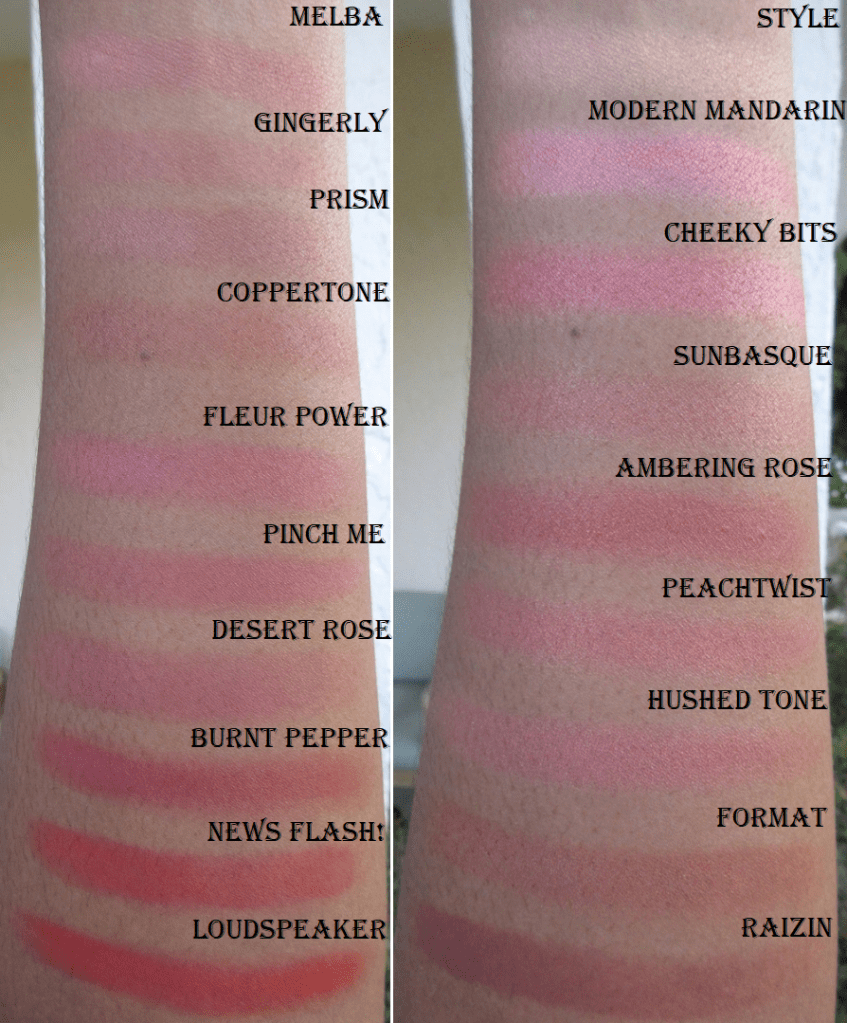
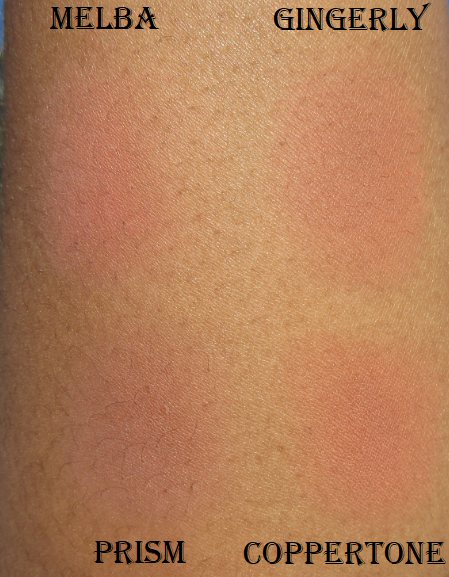
Melba is described as a matte soft coral-peach. This blush highlights the reason I wanted to do this post. Based on the shade in the pan, I would never expect a shade this light to be in any way flattering on my skin tone. There’s enough peachiness to keep it from appearing ashy on my skin tone the way other blush shades that are too light would look. Although this is extremely subtle on camera, it’s more noticeable in person as a natural-looking slightly pink flush. Melba isn’t as pigmented as some of the other matte blushes, so it takes quite a lot of building up in order to be seen on my skin tone, but I find the effort is worth it.
About two months ago, MAC had a deal to choose 7 products (out of a gigantic selection) for $63. This was why I decided to give this shade a try. I don’t know why I like this shade so much, as I prefer blushes that make a little more of an impact, but I’m glad I have it.
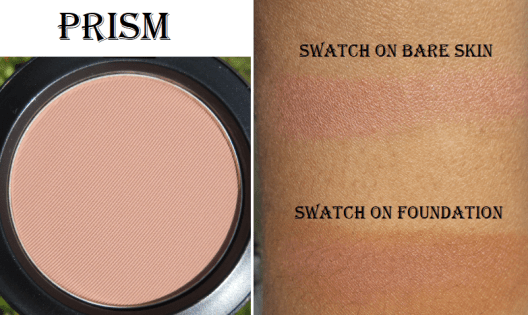
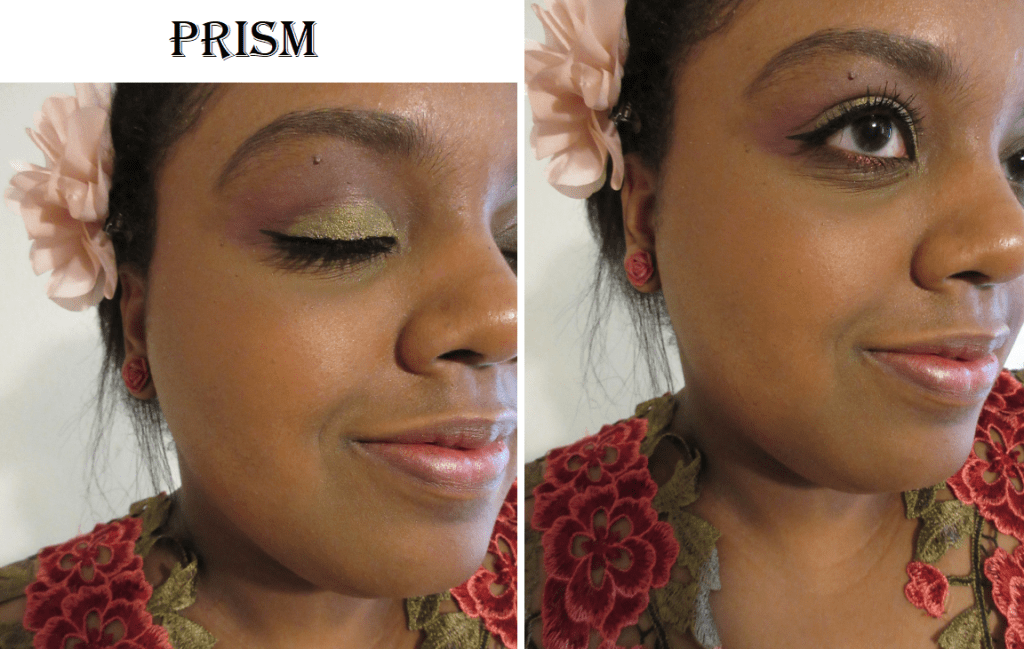
Prism is a muted pinkish-brown matte. It looks a little more mauve on bare skin, but over my warm foundation, the pink in the shade is more visible. I’ve had this sitting in my collection for a while, expecting to give it away because I didn’t think it would work on me. After seeing some swatches on others and noticing how many times a blush I thought was too light ended up working for me, I decided to give it a try. It’s a nice subtle buildable blush.
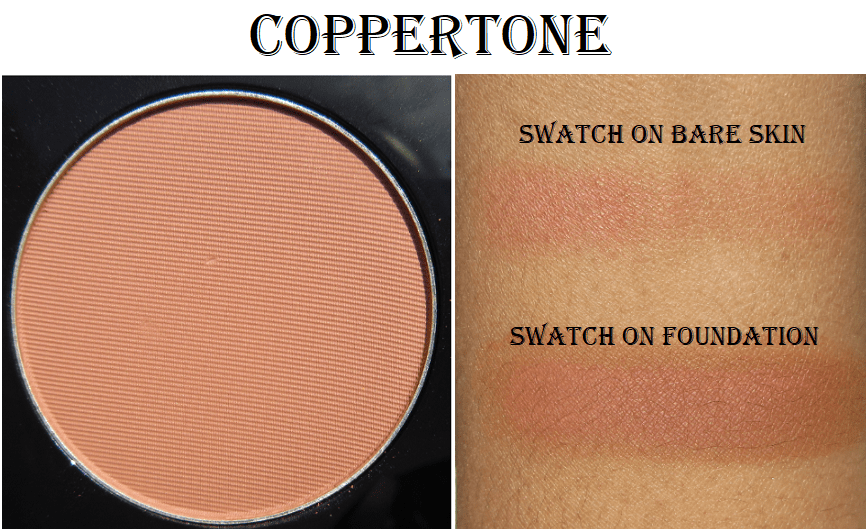
Coppertone is a matte peach brown and another shade I’d assume wouldn’t work for me due to the color in the pan. Just like the previous blush, this leaves a very subtle flush as the brown blends into my foundation but the peachiness pokes through just enough to look natural and beautiful. The pigmentation level makes it easier to build up than the other more natural blushes. Melba and Prism are intended for light to medium skintones, whereas Coppertone is probably best for medium and up. I spoke with a MAC representative via live chat who said “Our blushes have a small amount of grey in them to ensure they work for a variety of skin undertones and saturation.” I was always under the impression that white or grey additions to blushes is what makes them ashy, but I’m just the messenger! I don’t know how MAC does it, but their range is phenomenal.
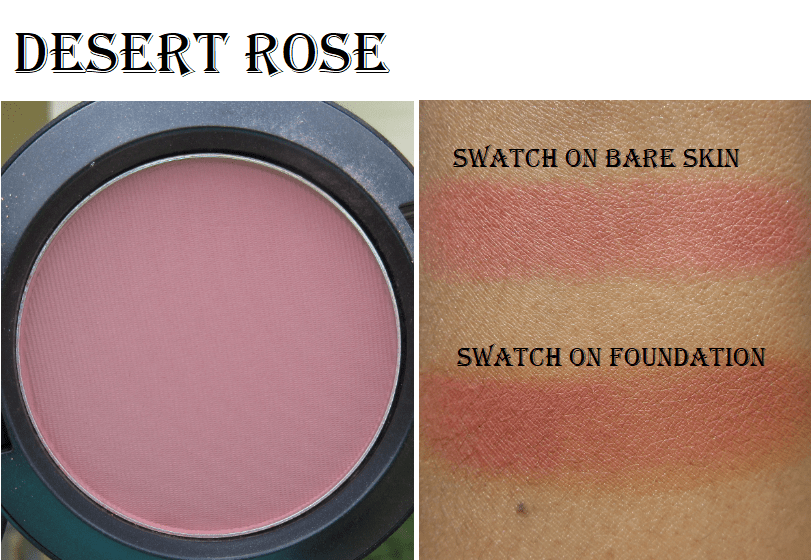
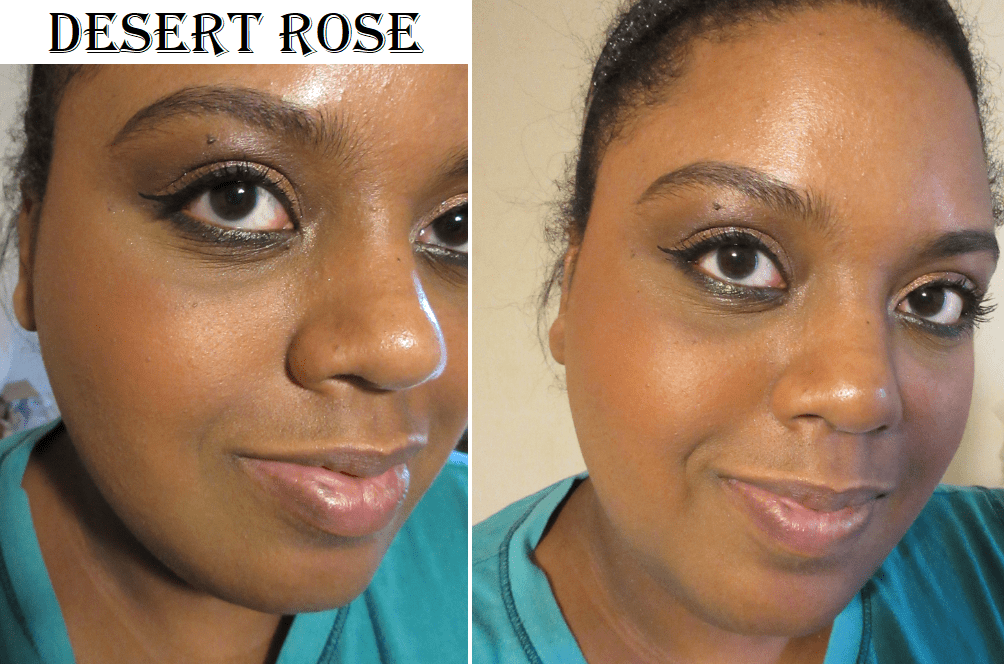
Desert Rose is described as a matte soft reddish-burgundy. This blush is even more pigmented than the others, so I wanted to show how sheer it could be applied. It looks quite cool-toned in the pan, but it warms up when applied over my foundation. I like this shade more than I expected.
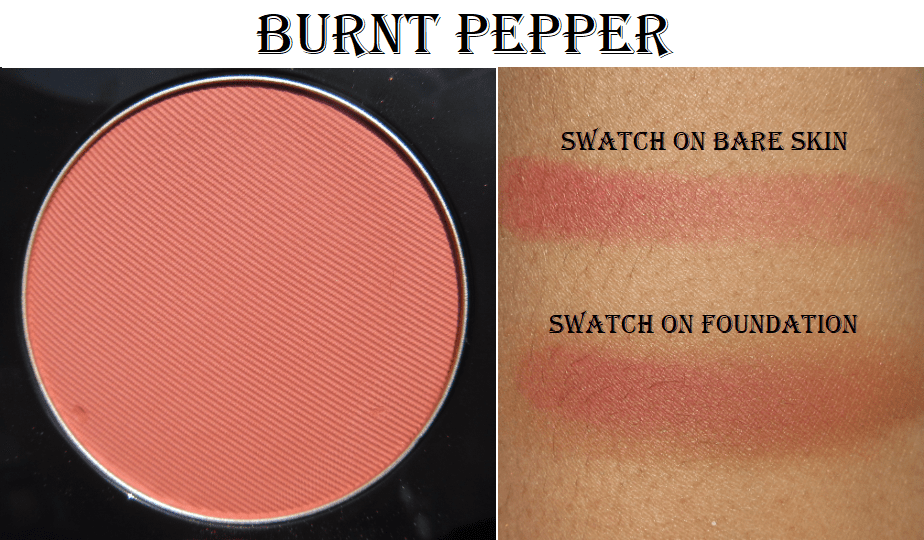
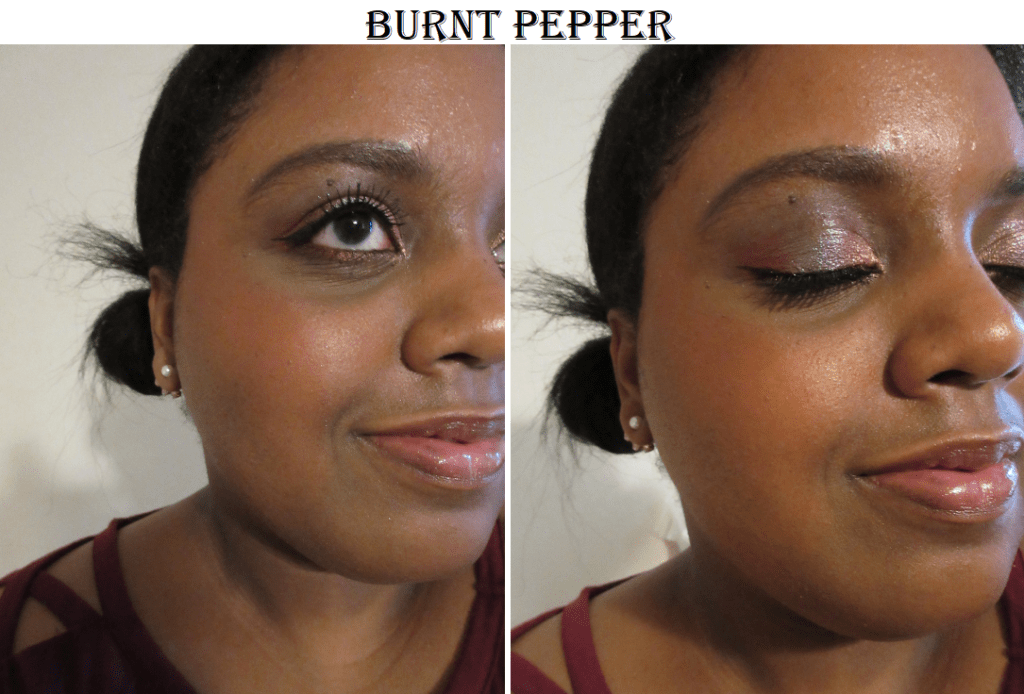
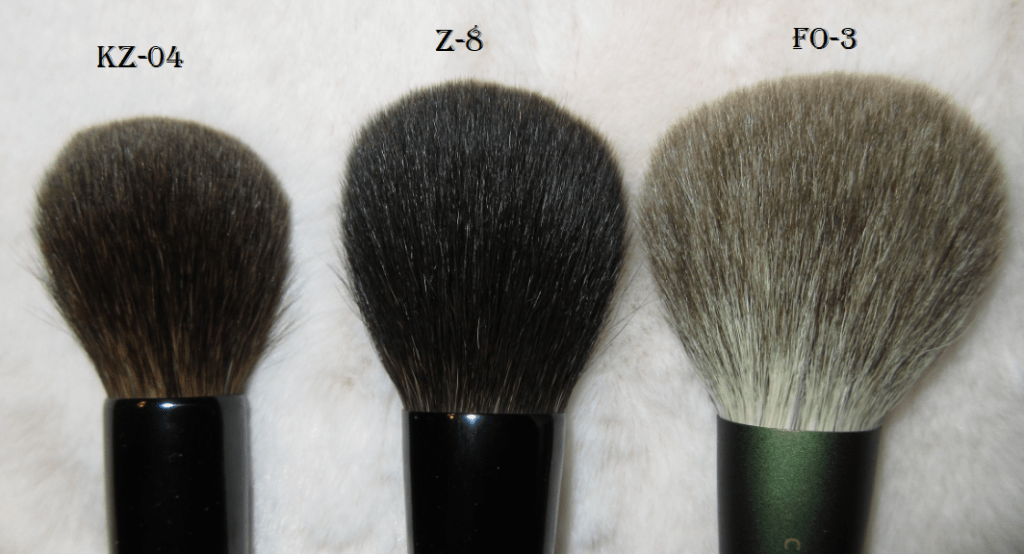
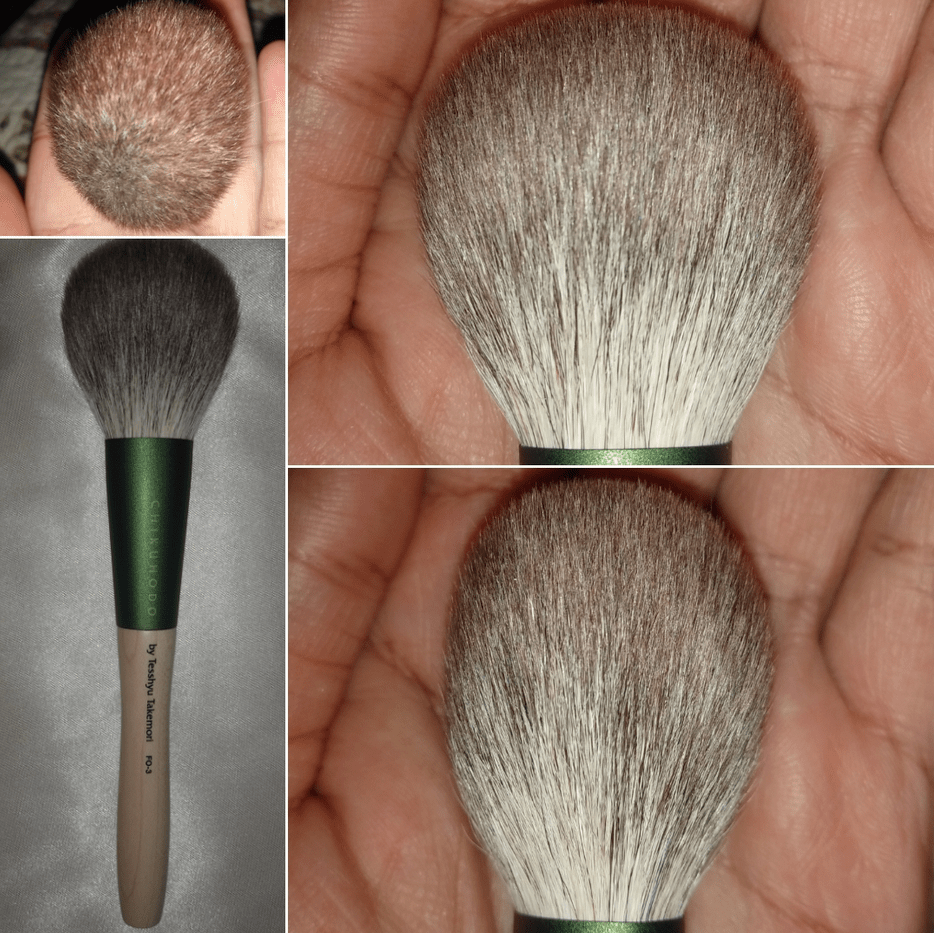
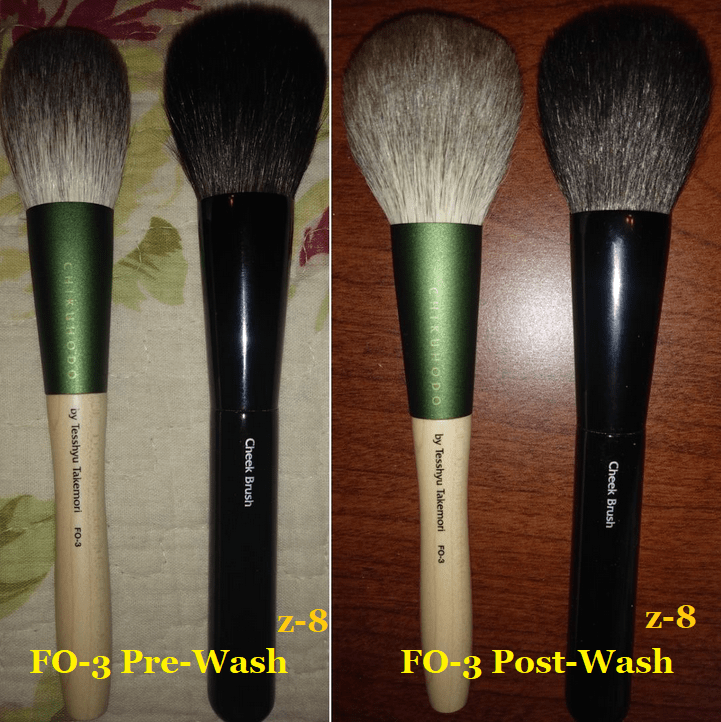
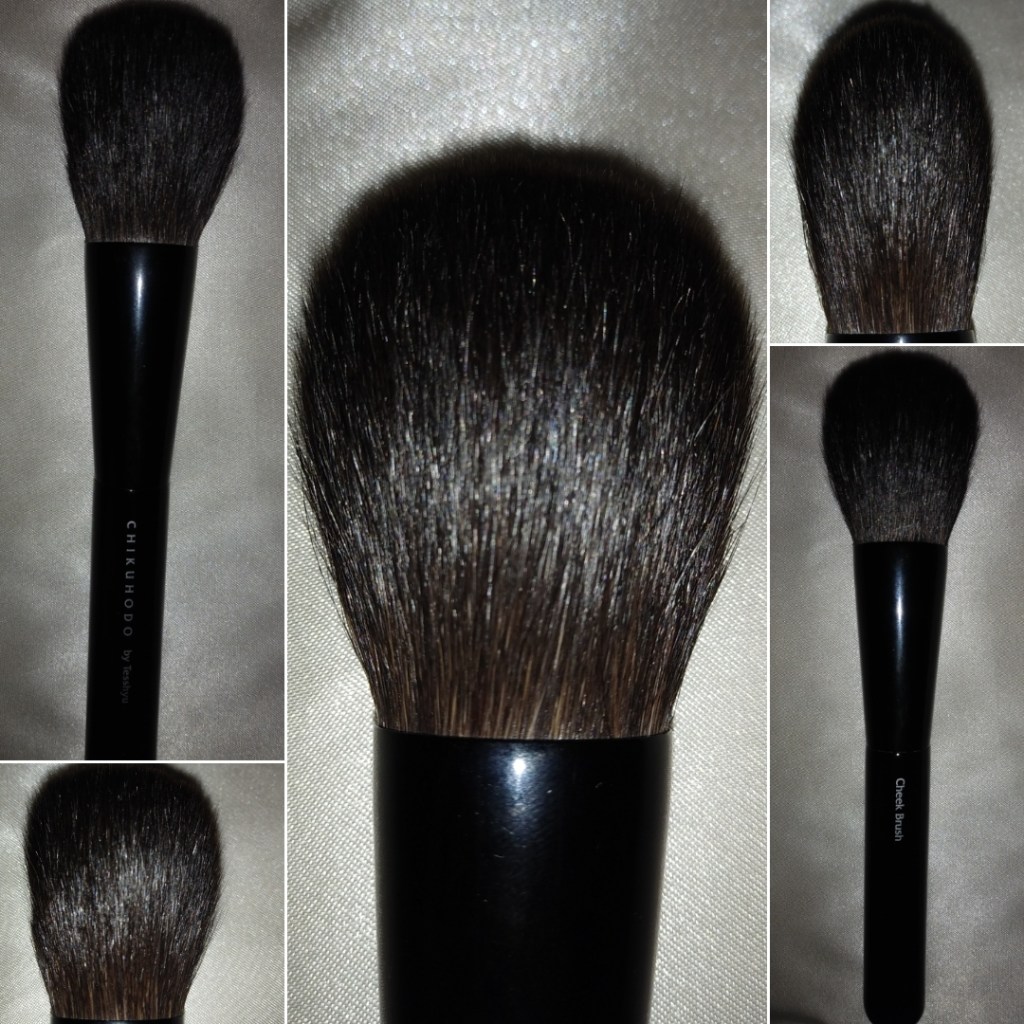
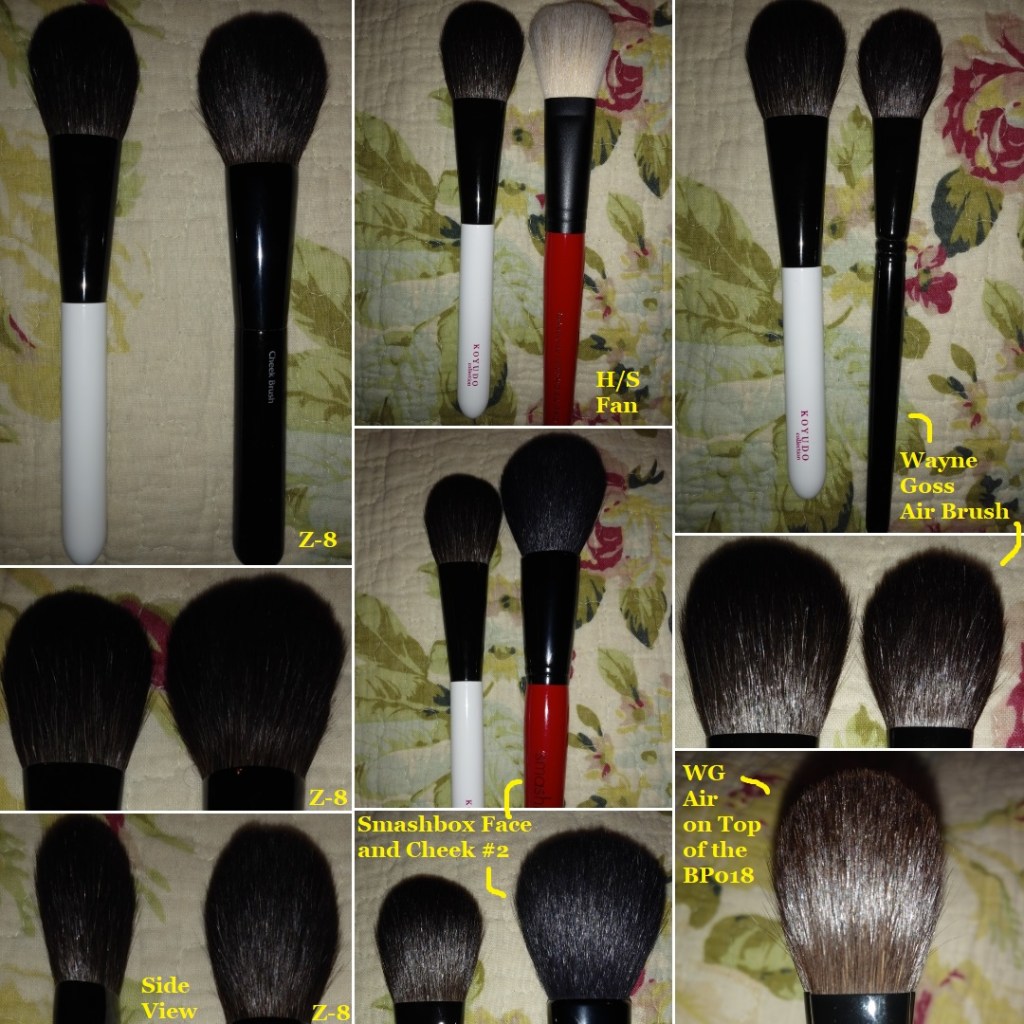
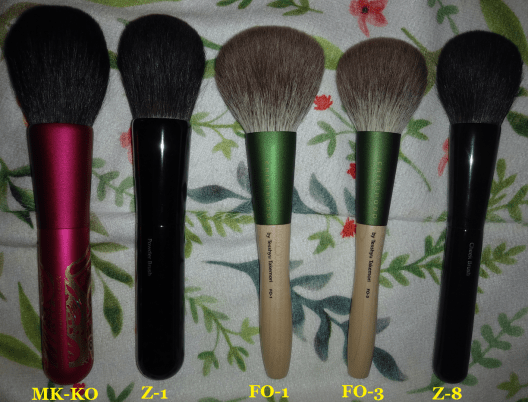
Burnt Pepper is a matte warm rich terracotta. I enjoy this shade with a light application (a little lighter than pictured here). It’s a flattering tone but when built up too much I look like I have a sunburn. I believe I used the Chikuhodo Z-1 brush for this picture, but less dense brushes like the Z-8 and FO-3 are perfect for this blush. They deposit the exact amount of color I want. I do think a sunburnt look can actually be cute, as long as the rest of my makeup is on the minimal or neutral side so I can avoid looking clownish.
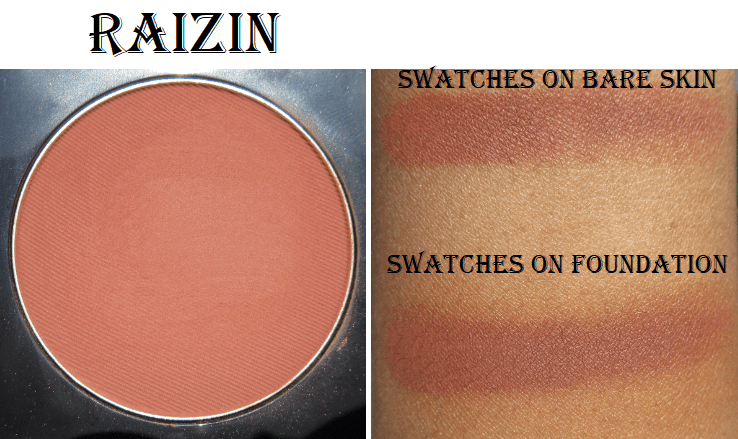
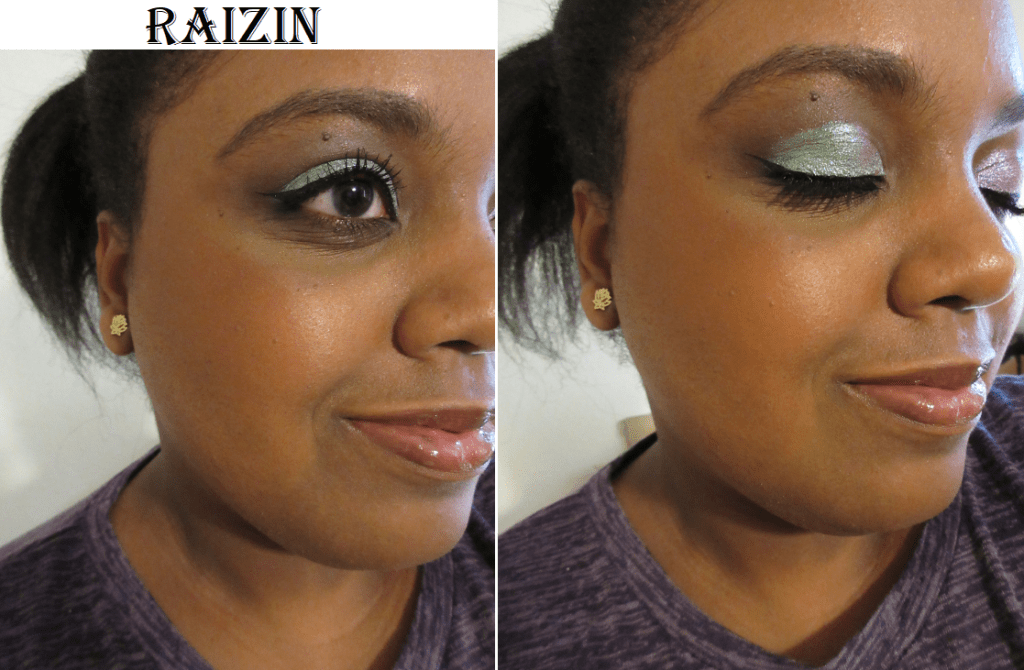
When searching for blushes best suited for dark skintones, Raizin was the most suggested shade I saw. It is a golden reddish-brown matte and very pigmented. I dipped my brush into the pan once and this is the amount of color that was deposited onto my cheek. With just one application!
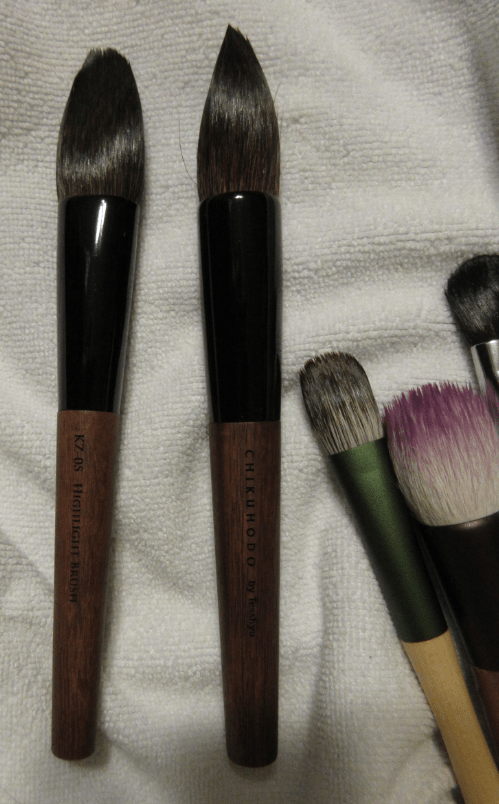
This blush is better suited for someone of a darker complexion than me, but I think it still looks nice as long as I apply it with the lightest hand and a brush that’s not very dense. I used Chikuhodo’s KZ-04 which doesn’t get much airier than that, yet it still deposited quite a bit of product! I will continue to use this blush in the future by applying a sheer layer and then adding a lighter and/or brighter shade just on the apples of my cheeks.
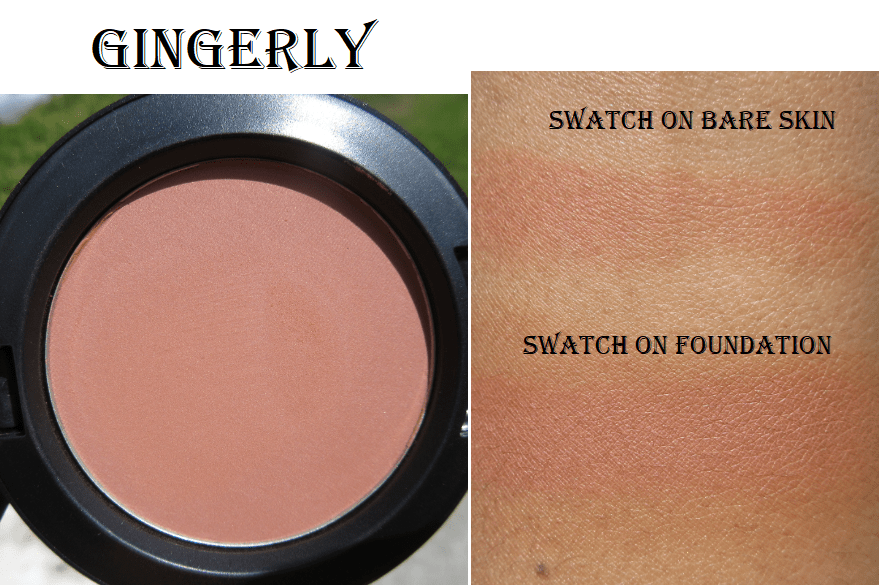
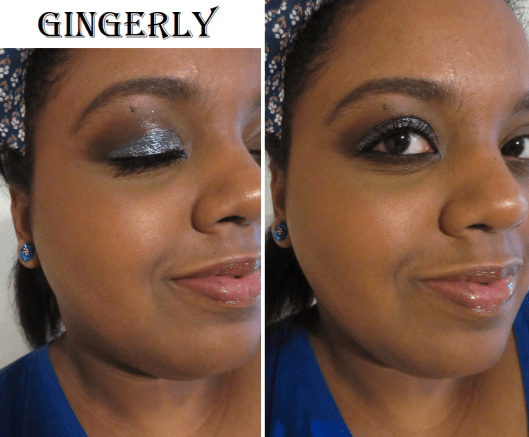
Gingerly is described as a sheertone capri bronze. I have no idea what that means, but in any case, it is another very natural looking blush on me. Although there is a slight difference between this shade and Coppertone, I wouldn’t be able to identify which was which when applied to my cheeks. They’re both matte brown shades that blend into my skin, so if I had to choose between the two, I would pick Coppertone purely because of the pigmentation level. Since Gingerly is the sheerer shade, it takes longer to build to the same pigmentation level as Coppertone. It’s pretty, but because I have so many brown blushes that suit me better, this one wasn’t worth me buying. Those with NC/NW 45 and lighter complexions likely enjoy this blush more than me.
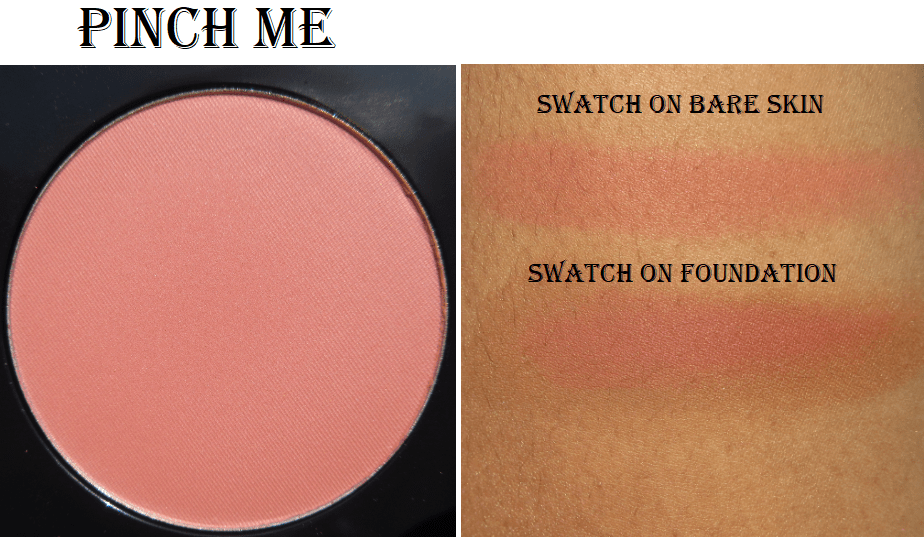
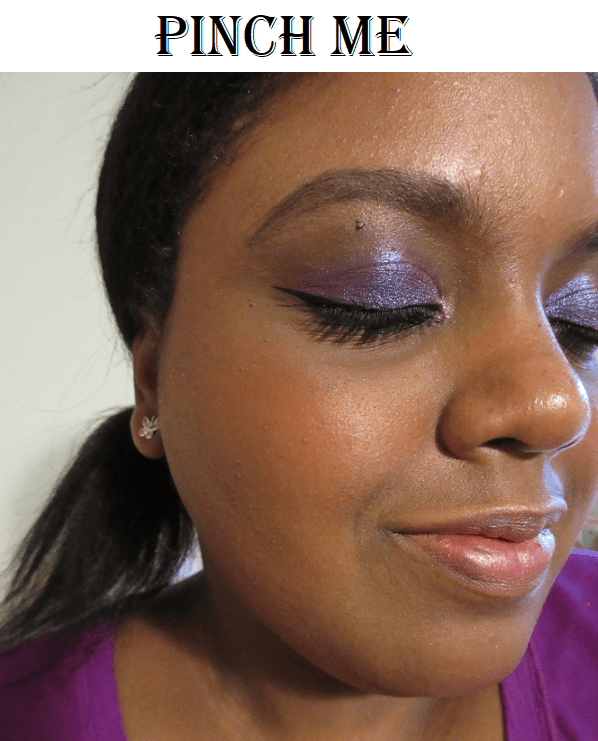
Pinch Me is a sheertone rosy-coral. It’s the most “me” kind of shade as I’m always looking for blushes in this tone. I didn’t buy this shade sooner because I assumed it would be a touch too light. Again, I was tricked by the pan color. It’s also quite pigmented for a sheertone formula.
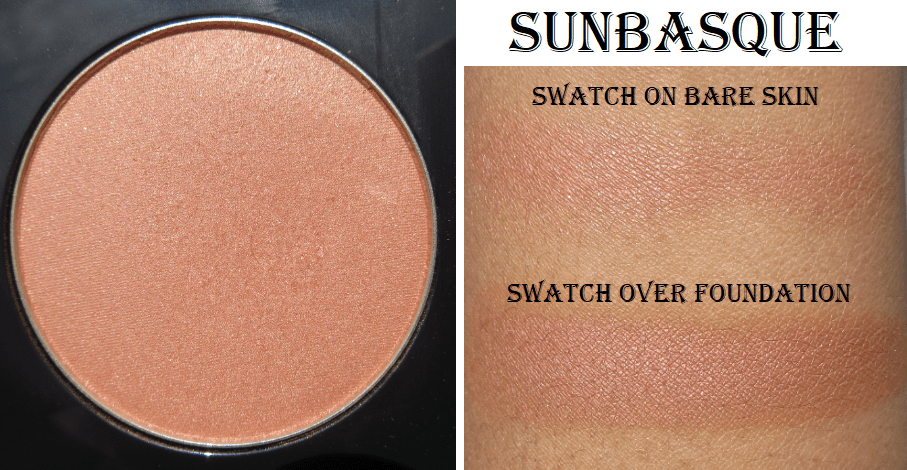
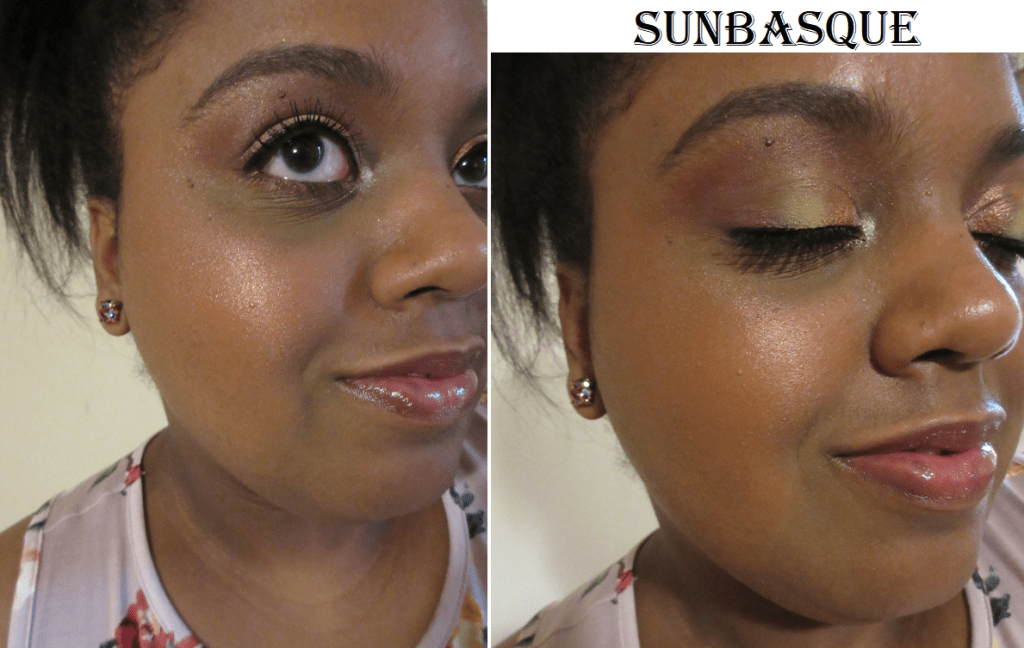
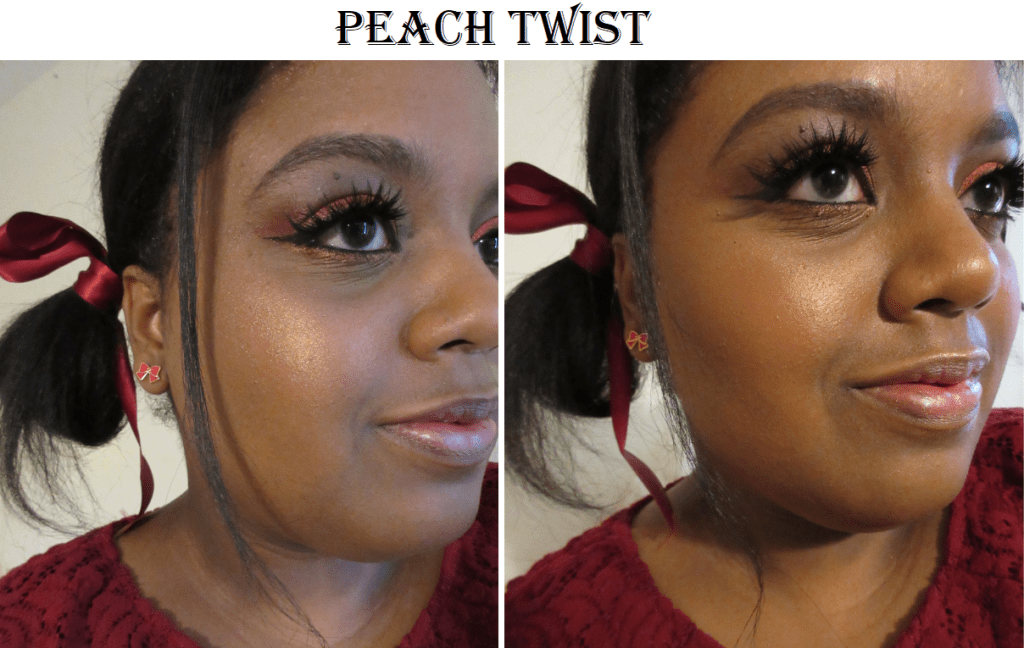
Sunbasque is a “gilded peach with pearl” sheertone shimmer. To me, it’s the shimmer version of Coppertone. While writing this review, I was frequently mixing up their names because the tones are so similar. You can mostly see the sheen as the base color is faint on my skin. Now that I have Peachtwist and Format, I don’t see myself reaching for this anymore.
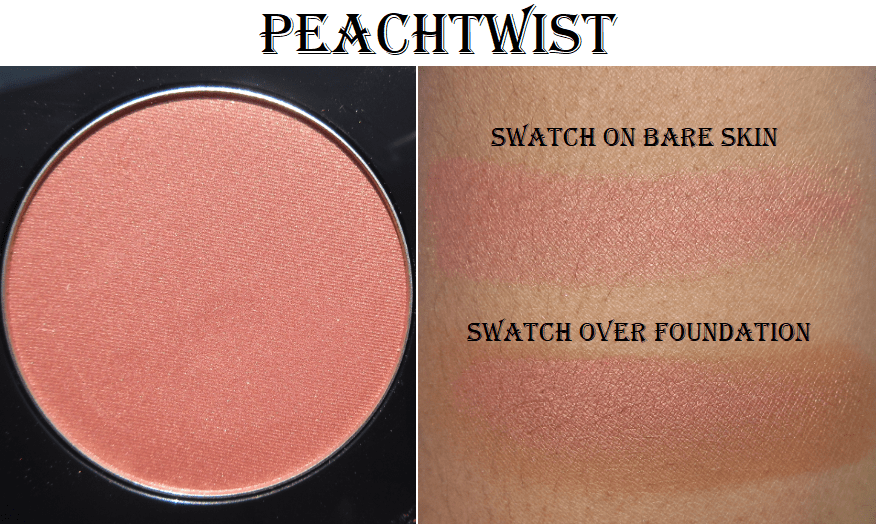
I have Kelsey Brianna Jai to thank for giving Peachtwist a try, because the way it looked on MAC’s website, I didn’t think it would be dark enough for me. It’s another sheertone shimmer blush and described as a light peach with gold pearl. As I mentioned before, I prefer this shade over Sunbasque because it’s slightly darker and I think the gold pearl in Peachtwist compliments my yellow undertone a bit more. This is easily one of my top favorite MAC blushes.
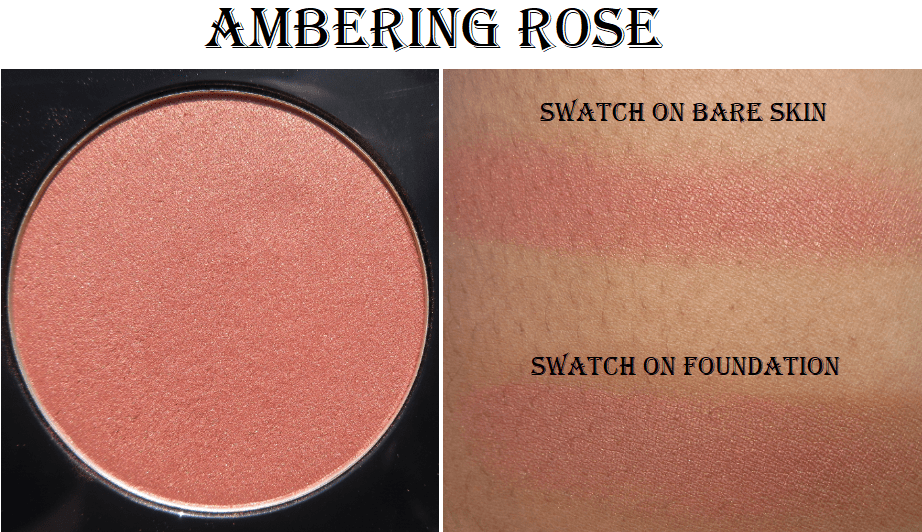
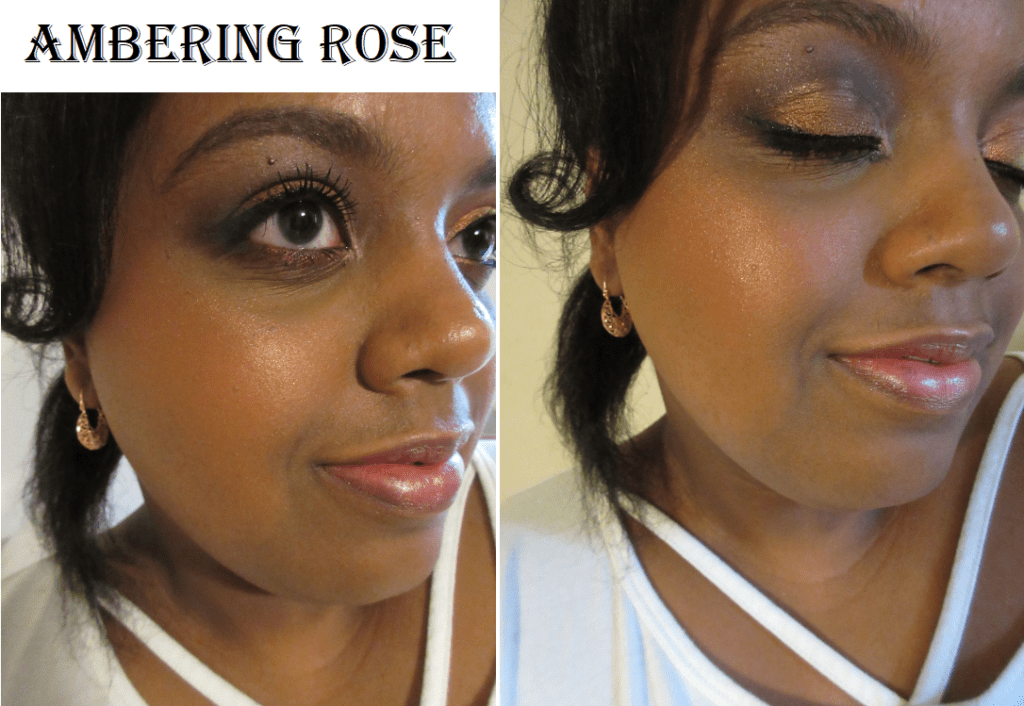
Ambering Rose is a muted rose sheertone shimmer. It’s currently only available as a pro refill and not in compact form. It’s darker than Peachtwist, though it still has that gold pearl. Between the two, I still prefer Peachtwist because I tend to like lighter and brighter blushes over darker ones, but if I use a light application with Ambering Rose, I can see myself continuing to use this.
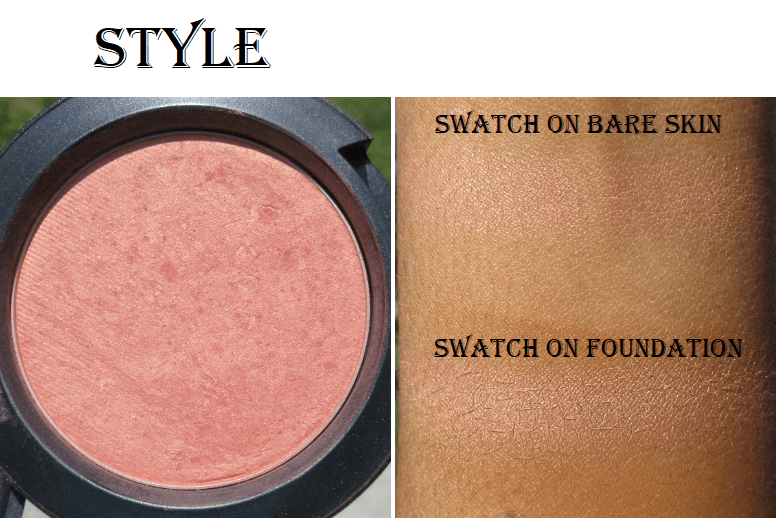
Style is a coral-peach with gold pearl and a frost finish. I consider this shade the shimmer version of Melba. Although it also works as a beautiful highlighter or blush topper, I’ve never worn this alone as just blush in public. It’s definitely not made for my skin tone, but I’m drawn to it anyway.
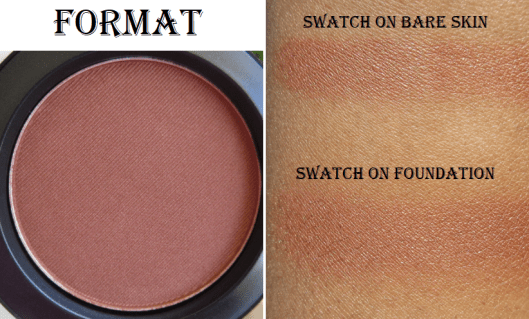
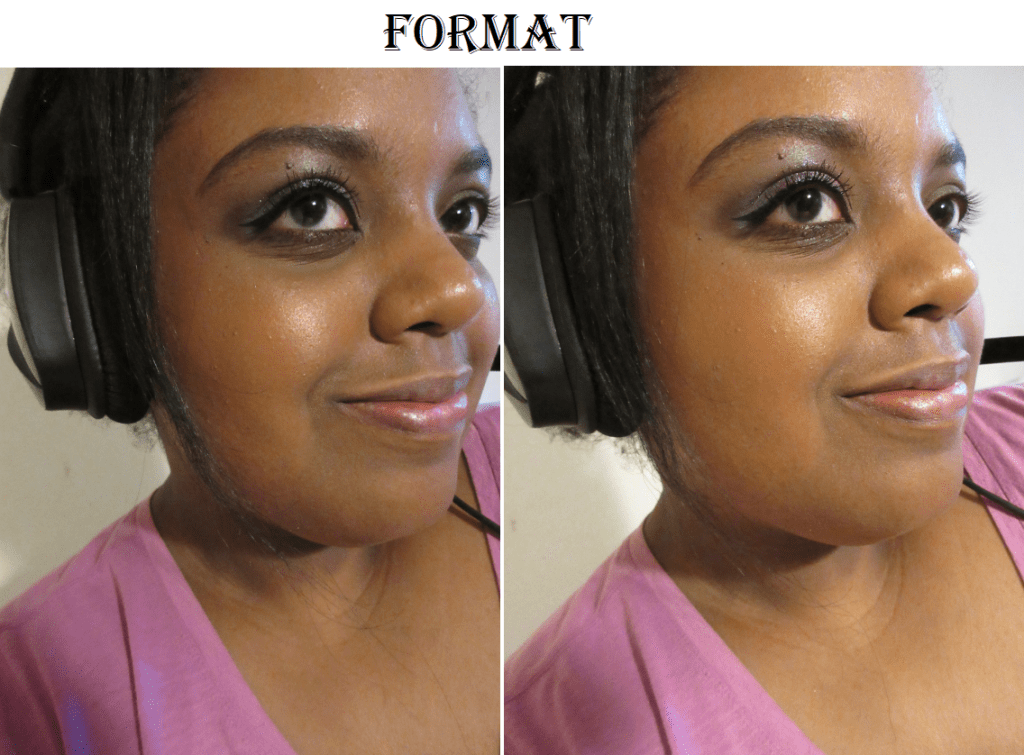
Format is described as a pinkish brown, but I can see golden pearl on my cheeks from this frost finish blush. This blush is only available in the compact form. It reminds me a lot of the Coconut shade in the ELF Bite-Size Face Duos recently released (which I intend to review next month). I would consider this to be a much darker shimmery version of Coppertone.
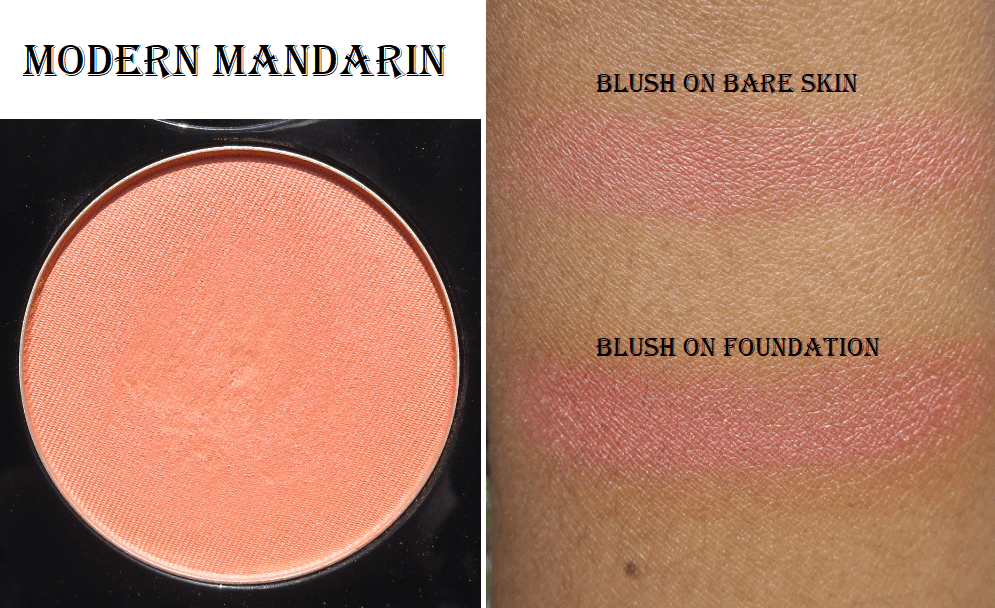
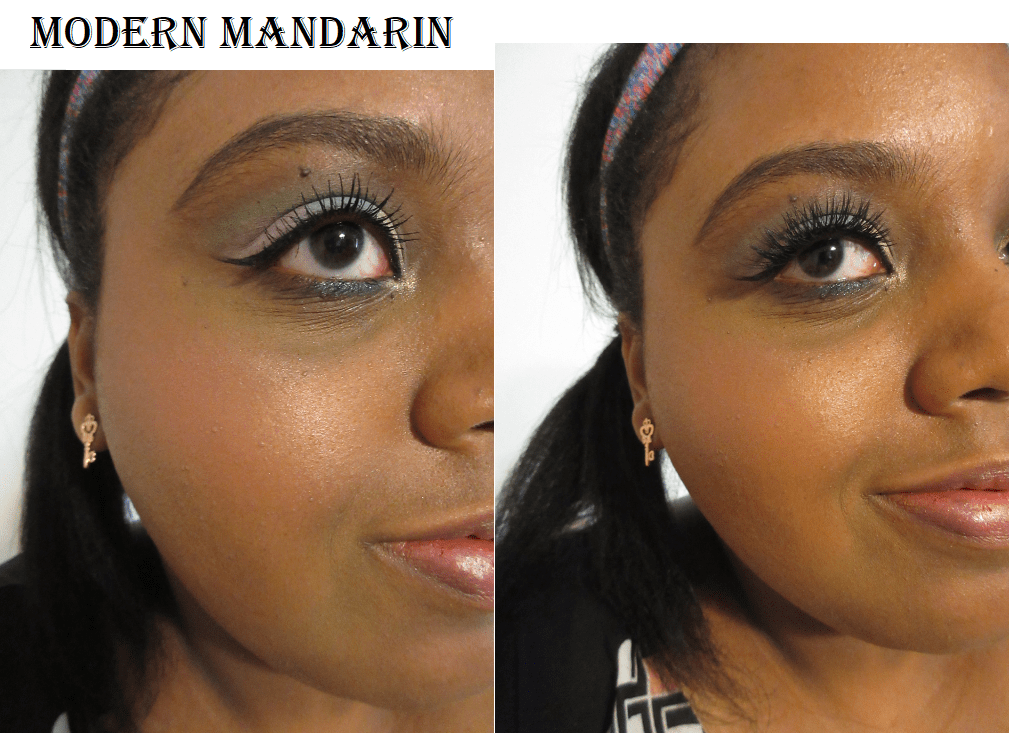
Modern Mandarin is a satin blush only available as a pro refill. It looks light orange in the pan and is described as a red-orange shade, but it looks so pink! I’m not opposed to the shade, but out of the nineteen blushes in this post, I find it to be among the least flattering on me. This is also the only MAC blush that gives me trouble picking up powder on my brush. The scrape marks are visible on the pan where I’ve tried to clear off some of the top in case there was hardpan, but it didn’t help. It continually gets hardpan as it feels like the formula of this particular satin shade is wetter/creamier than the others. I don’t have an issue swatching this blush with my finger, but for some reason, it’s harder with a brush (even when switching to a dense synthetic one).
I want to love it and keep using it myself, but I can’t recommend it due to the formula issue.
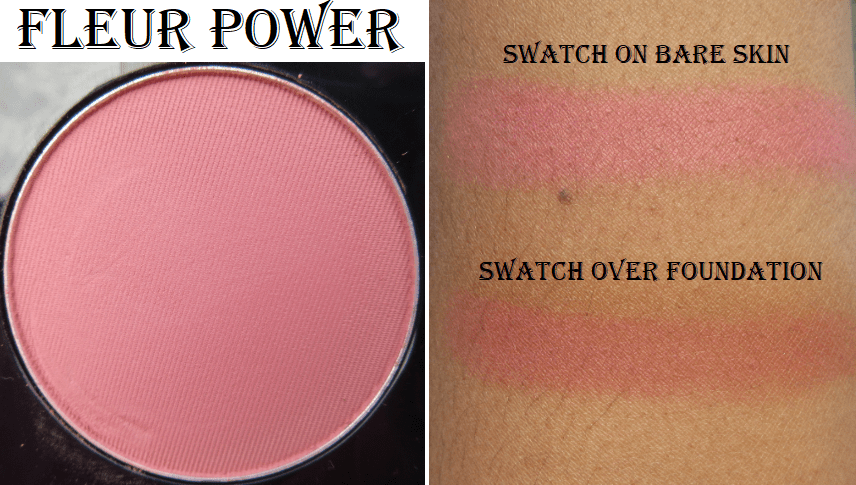
Fleur Power is a soft bright pinkish-coral satin finish. It’s a pretty shade and very pigmented! It looks and performs more like a matte than a satin. It also deepens up a lot when applied over foundation. I made sure to give adequate time for the foundation to set before I put Fleur Power on top (in case it was too wet and therefore causing it to darken so much), but it did not change the result. It deepens the more it’s rubbed into the skin.
It’s the kind of shade that will work on a wide spectrum of skin tones, and works for me, but it’s not particularly exciting. This kind of color is commonplace, though perhaps not usually in a dark-skin friendly formula. Between this and Pinch Me, which has similar tones, I prefer Pinch Me; though it doesn’t change the fact that I still think Fleur Power is pretty and I’m happy to have it in my collection.
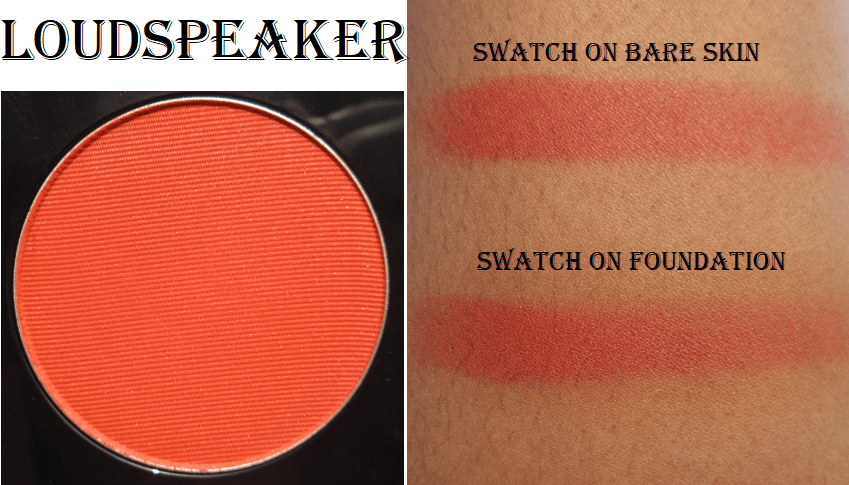
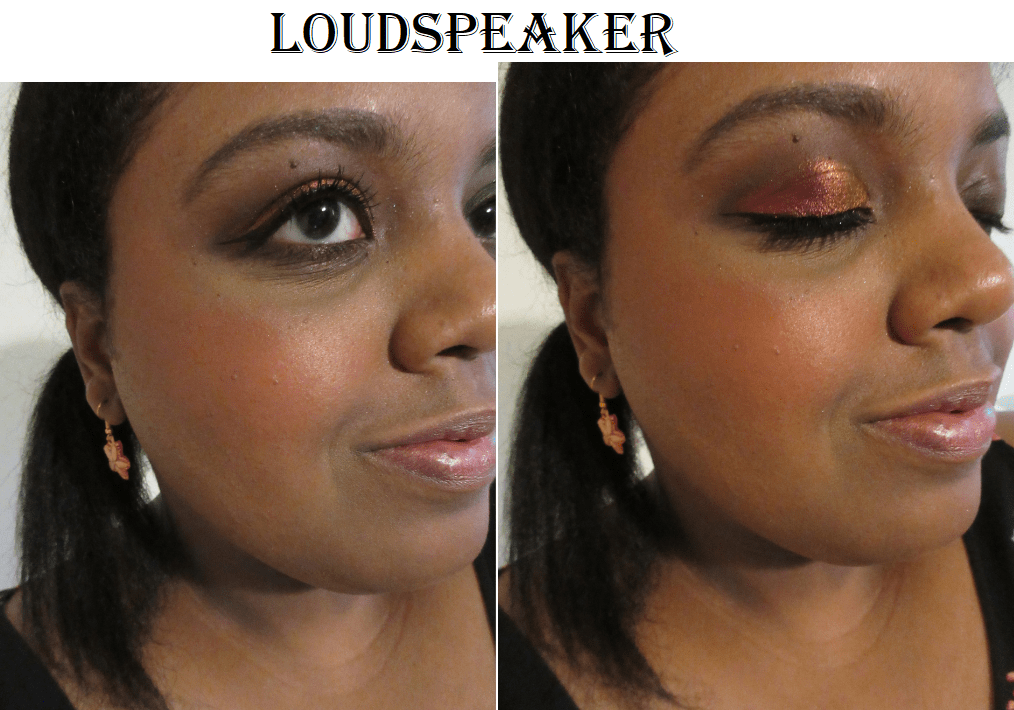
Loudspeaker is described as a bright orange coral satin blush, but it’s definitely a reddish orange color. This blush was formerly named ‘Devil,’ which was among the most recommended shades for darker skin tones. I’ve been looking for the perfect orange that everyone says looks so beautiful on deeper skin, but I’m starting to think whether it’s a lighter or darker orange, orange shades just aren’t a good match for me. So far, I haven’t liked the results of oranges from MAC, Fenty, Natasha Denona, etc. The only one I’ve liked is Benefit’s Majorette Blush (of course discontinued now) which was on the coral-orange side.
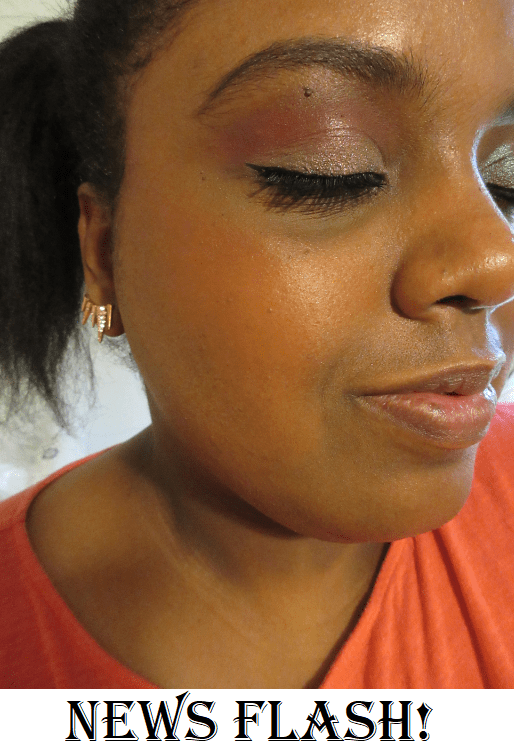
I only used one or two swipes to get this level of pigmentation on my cheeks. I can see the shimmer particles in the pan, though it just looks matte on my skin. I would say this blush is intended for NC/NW 50 and above, but really it’s for anyone who wants to make a statement. I consider this and News Flash to be useful on the more editorial/artistic side and less every day wear (except on deep skin tones).
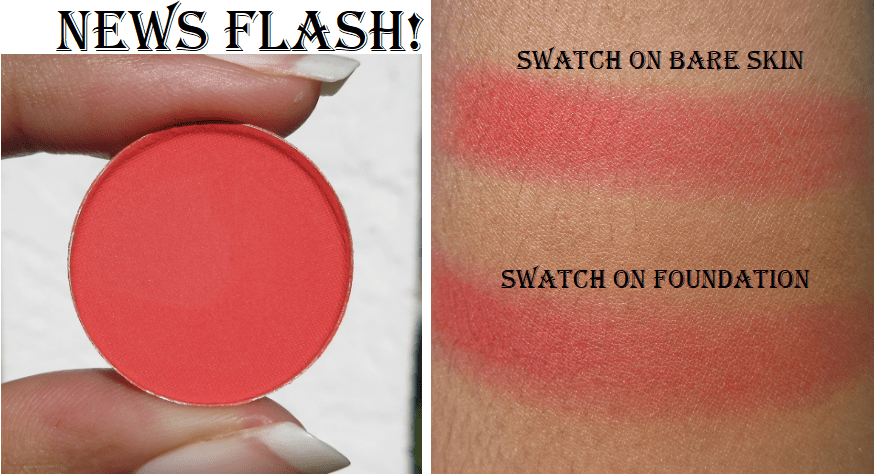
News Flash! comes up as a matte in the search bar, but is referred to as a “red-orange with pearl.” I can’t see any shimmer in the pan or swatches, so the matte description is more accurate. I double-checked to ensure I read the website correctly, as I think the Loudspeaker and News Flash descriptions are reversed. News Flash seems more orange-coral to me with Loudspeaker being red-orange with visible shimmer specks in the pan.
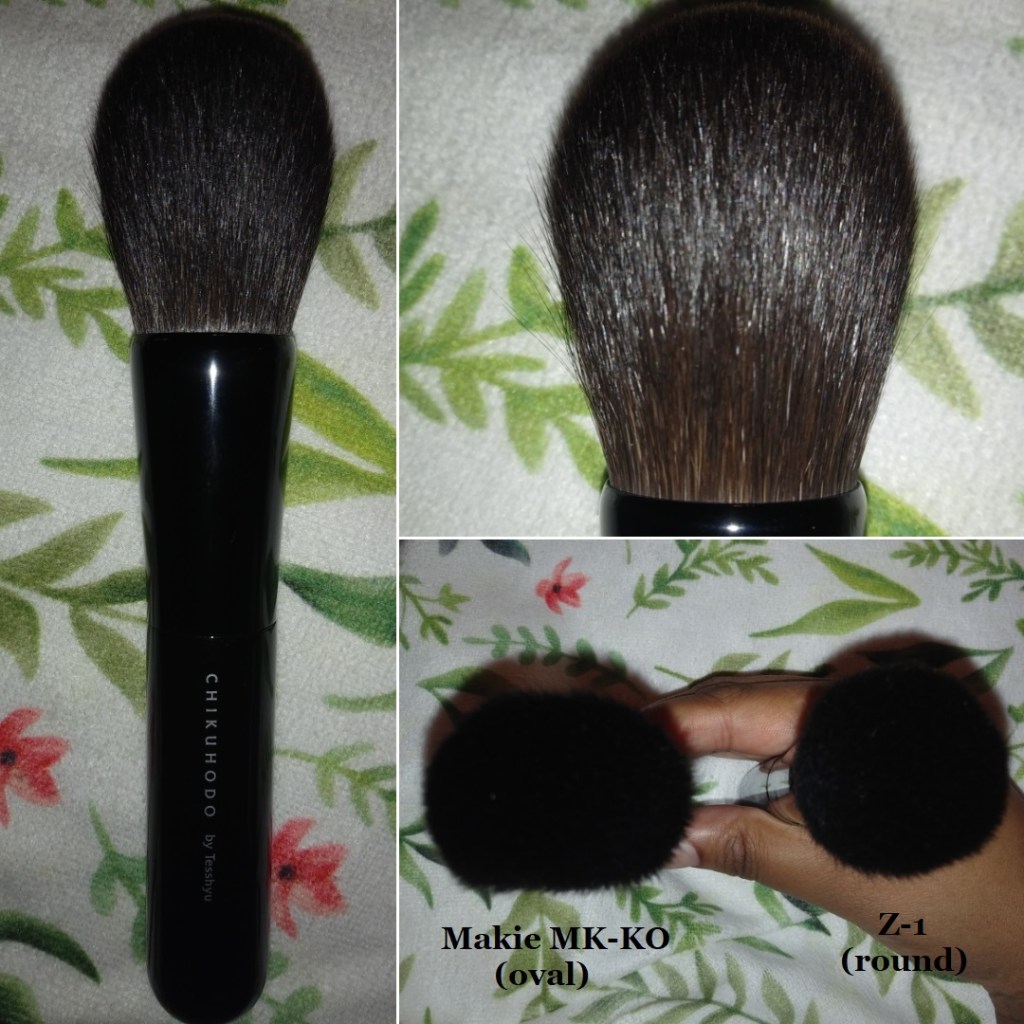
I don’t believe this blush was ever sold in the regular size blush pans. It’s the size of a MAC eyeshadow at 26mm, but it sure does pack a punch! What you see on my cheek is what a single dip in the blush with my Koyudo Somell Garden Blueberry Brush can produce! This shade is so bright that it’s almost neon. I predict I’ll only use this blush on rare occasions, as it’s still a bit much for my tastes.
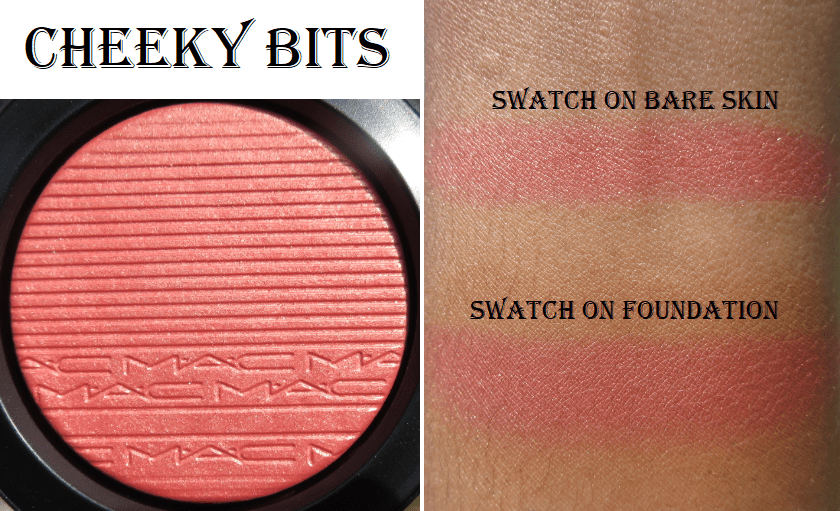
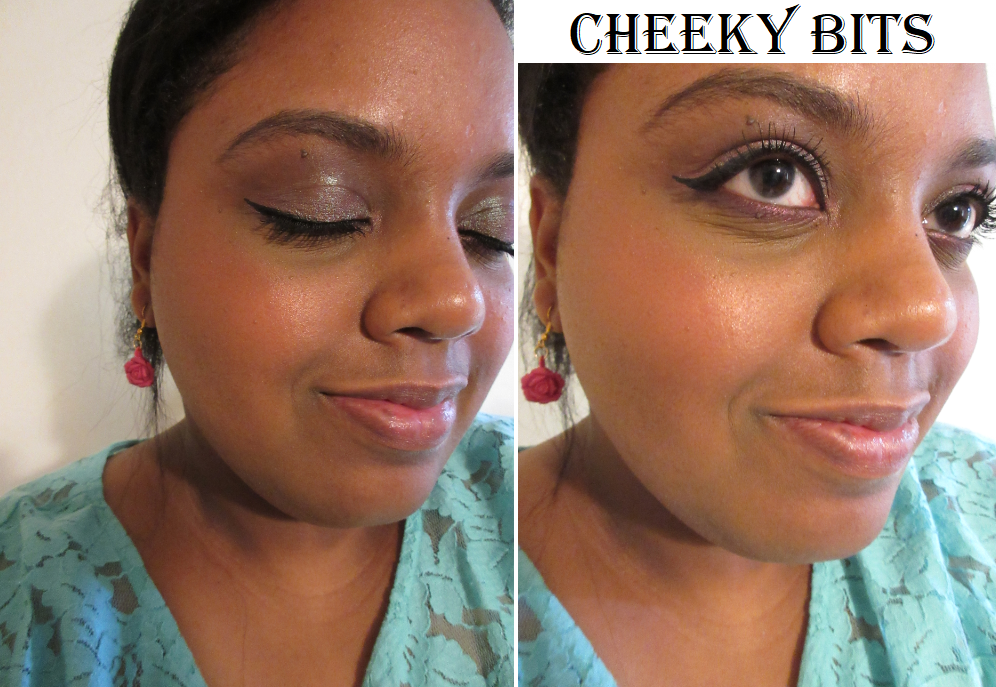
Cheeky Bits is a mid-tone pinky coral in the Extra Dimension finish. I was surprised to see it’s less shimmery than the other sheertone shimmer and frost finish blushes, but perhaps I’m meant to use it on a wet brush for more impact (which I don’t want anyway). Regardless, it’s a beautiful shade and reminds me of a more user-friendly Modern Mandarin.
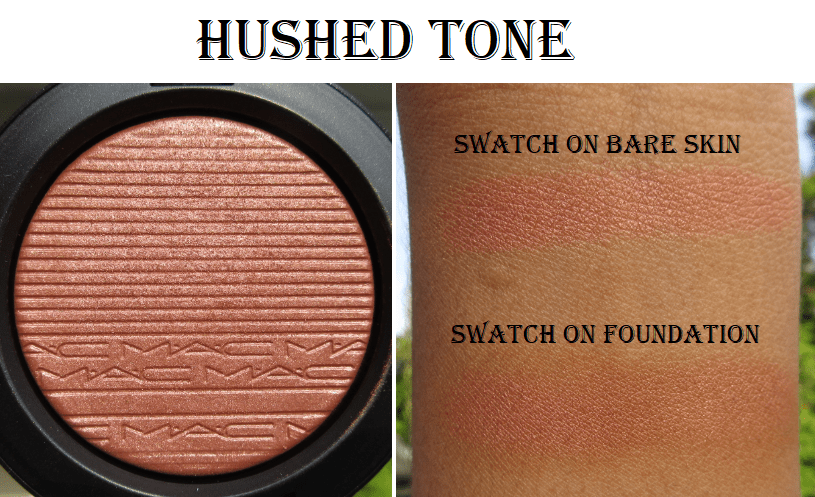
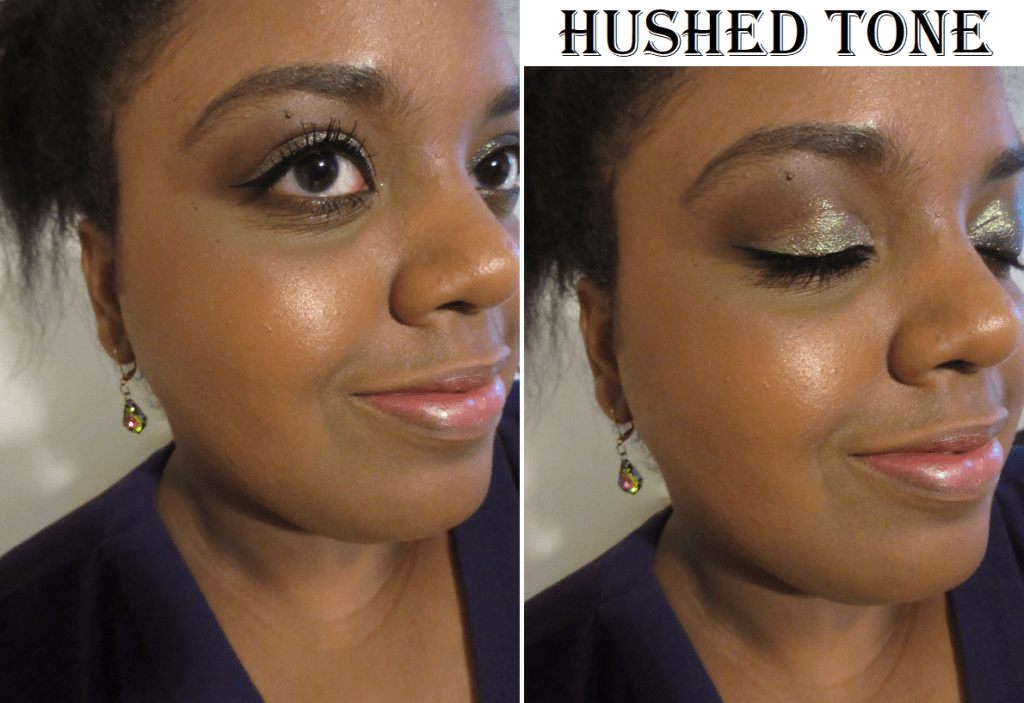
Hushed Tone is described as a neutralized pink peach. It’s like a peachy bronze with just a hint of pink that I absolutely love! It doesn’t make as much of an impact in terms of color, so this is great for a more natural day. What makes it special to me is the gorgeous sheen that it has in person.
Hushed Tone is extremely close to Peachtwist. I find it difficult to properly describe how the shades look similar but the effect is so different. Hushed Tone has more base pigment color whereas Peachtwist has a stronger sheen. The way the glitter reflects is a little different. Hushed Tone’s powder looks like a more refined shimmer and Peachtwist gives a stronger highlighted effect, though I would still call it shimmery, not glittery. For someone with a lighter complexion than mine, the color differences between the two will stand out more. As the shades look similar enough on me, if I had to choose one, it would come down to a preference of sheen. It isn’t subtle for either blush but Hushed Tone is a little more natural-looking because of those finer particles. However, I could not part with either one.
Matte blushes were always my preference, but I’m tempted to try more of the Extra Dimension blushes because I really love how refined the shimmer in this formula is. What stops me (besides having nineteen MAC blushes already) is that this doesn’t appear to be in a pan. If it’s like the Extra Dimension highlighters, then it’s attached to a plastic mesh, and after having so many mesh products fall out, break, or arrive broken on me, I’m trying to avoid buying those kinds of products as much as possible.
BLUSH SIDE BY SIDE COMPARISONS
For an additional resource that helped me decide which blushes I wanted to buy, I recommend The Fancy Face’s MAC Blushes Video.
From what I can tell, Melba is pinker, Gingerly is a little more orange, Prism has more brown, and Coppertone is redder. But Gingerly, Coppertone, and Prism look virtually identical on my cheeks.
Hushed Tone, in terms of color, is a mixture of Sunbasque and Peachtwist though leaning more heavily on the Peachtwist side.
The Sheertone Shimmers are from lightest to darkest: Sunbasque, Peachtwist, and Ambering Rose. The differences are barely detectable while looking at the pans (particularly between Peachtwist and Ambering Rose), but on the cheeks, it goes from too light, then perfect, to too dark.
Fleur Power and Pinch Me are quick and easy to use because they are suited for me, but Desert Rose, Burnt Pepper, Raizin, News Flash, and Loudspeaker all require a light hand.
Even though some of the blushes I own are better suited for the lighter or darker ends of the spectrum, it’s amazing how many I am still able to pull off, and that’s a testament to MAC’s formulas. They really spent time over the years curating the best selection. There are some discontinued blush shades I wish they still offered, but with how many blushes look similar on my cheeks, I know I don’t actually need more.
INSERTS
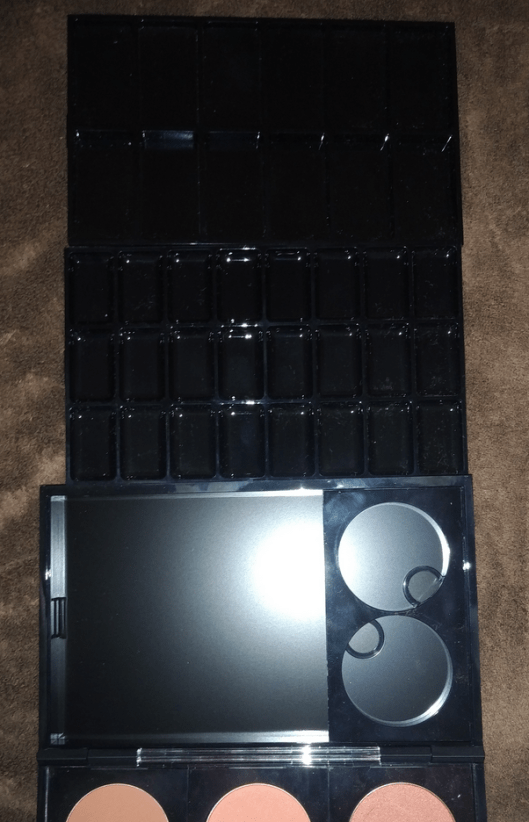
The top 12-well in the picture is the larger insert for creams, gels, lipsticks, etc. Below that is the 24-well smaller insert. Lastly is a two-blush insert inside my MAC double-sided palette. Each side holds three blush inserts for a maximum of six blushes per side. I have one double-sided palette that currently holds MAC blushes. The other I turned into a regular magnetic palette to hold other brands’ products by placing magnetic sheets inside. Some people don’t know this, so I think it’s very important to state that MAC refill products only stick properly to MAC palettes because the refills all have magnets attached to the bottoms of them.
Magnetic palettes (like Z palettes) have a magnet sheet on the bottom that tin eyeshadow pans can stick to. MAC palettes have a metal sheet within the plastic that the magnets attached to the eyeshadow or blush can stick to. I can confirm that my single MAC eyeshadow refill stayed put in a regular magnetic palette if I had it squashed by other tin pan eyeshadows on all sides, but it would otherwise slide and fall on its own.
Also, the refills do stick to the MAC palettes on their own, but the inserts feel a lot more secure, as I believe the inserts have metal in them as well.
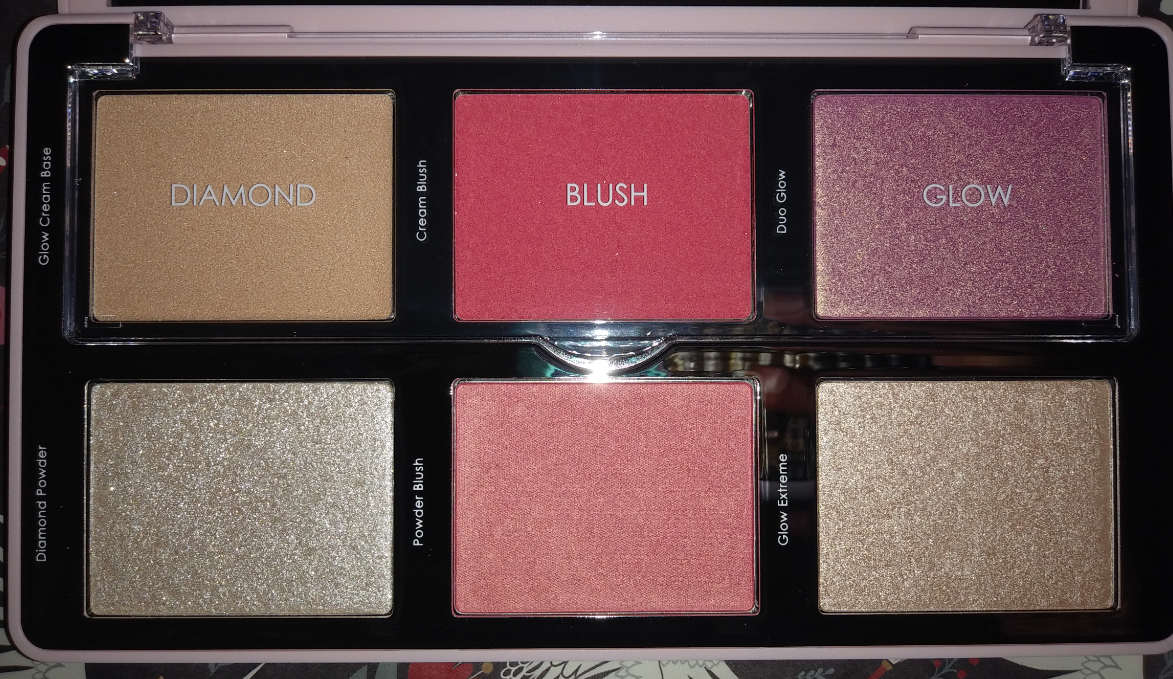
Highlighting Palettes
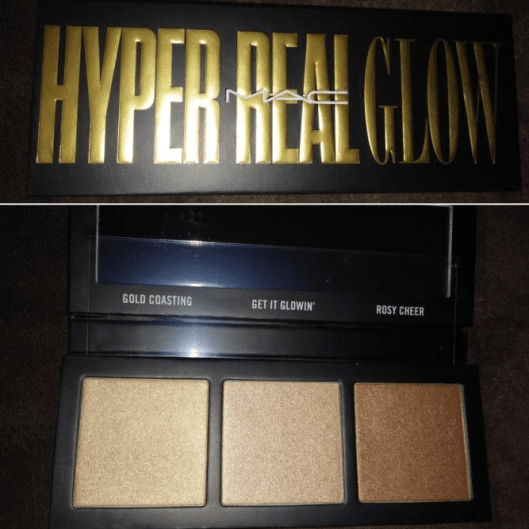
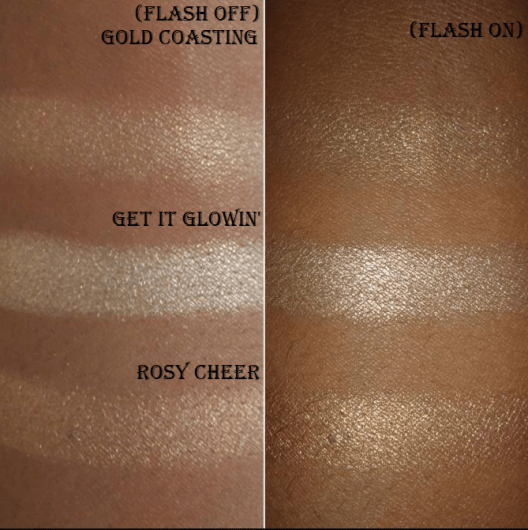
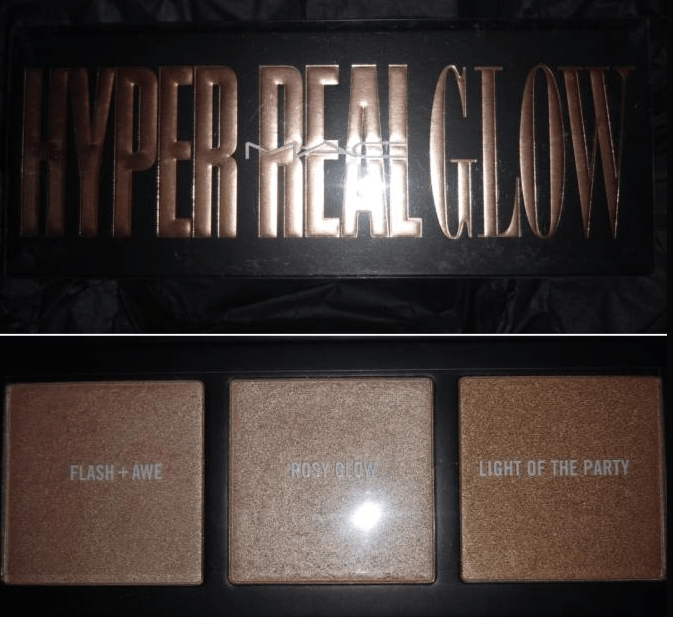
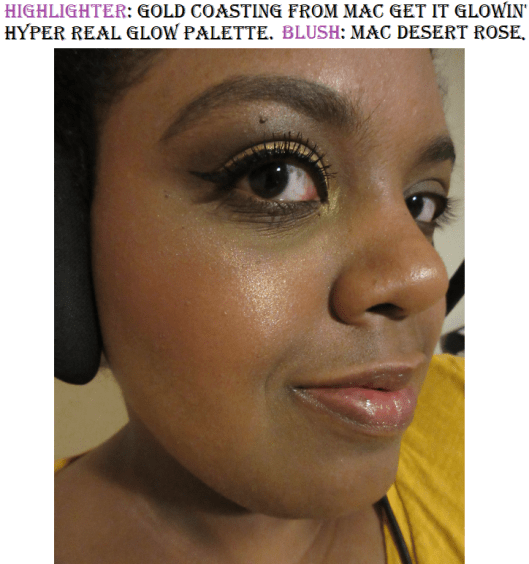
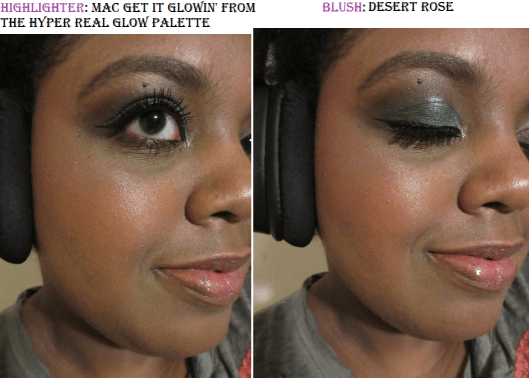
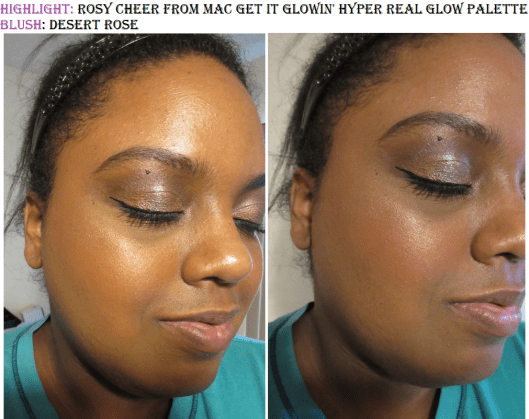
This is the Get it Glowin’ Hyper Real Glow Palette. This trio contains the highlighter shades Gold Coasting, Get It Glowin’, and Rosy Cheer. They are a bit on the golden side. MAC sells a pale pastel version (Get Lit), peach version (Shimmy Peach), and pink version (Flash + Awe). I currently own the latter and will include a photo, but I don’t have swatches as I intend to give this away or sell it.
Although the golds in the Get it Glowin’ palette look distinctly different in swatches, I can’t tell the difference on my cheeks. In fact, spoiler alert, I can’t tell the difference among any of the gold highlighters in terms of the color. It just comes down to how smoothly they apply, how intense they can get, and how sparkly or fine the glitter particles are. Within this palette, I did notice the actual Get it Glowin’ shade was more subtle than the others, despite it being the iciest one that should have stood out the most against my skin tone. Out of the three shades, Rosy Cheer seemed the smoothest and most flattering on me.
Extra Dimension Skinfinishes
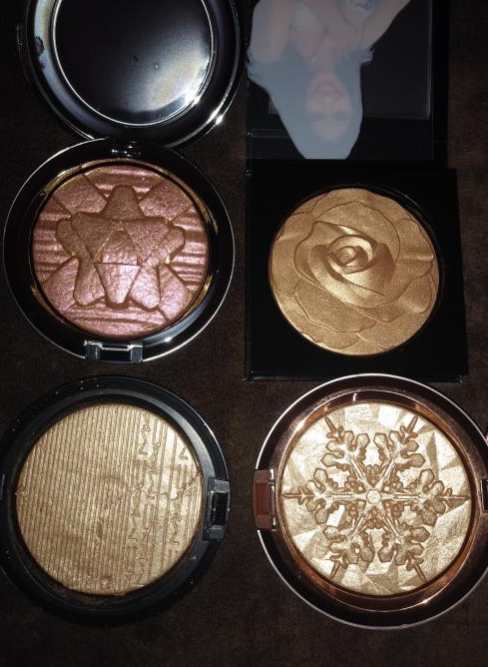
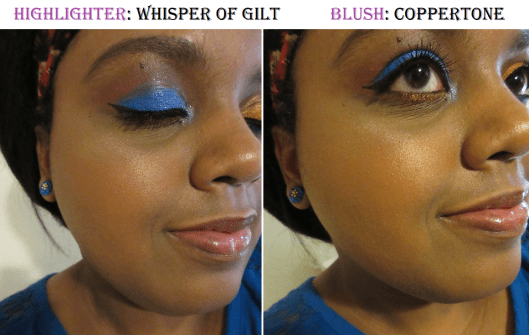
I first owned Whisper of Gilt in the limited-edition snowflake imprint that was a holiday release a few years ago, and now in the regular packaging. I loved the shade but was so worried about ruining the shape that I hardly used it. Now that I have the “less exciting” imprint after including it in my 7 items deal, I will start using this one.
Unlike the highlighting trio, which didn’t appear that much more intensified when applied to wet skin, the formula of this shade allows it to be built up a lot more. But I’ve never been interested in rocking a blinding highlight, so I’ll continue to use it dry the way I normally do. I would describe the shade as a light gold, but MAC says it’s a, “light soft white with shimmery sheen.”
I don’t think it looks the best on me on camera, but I love how it looks in person and will keep wearing it whenever I won’t be taking pictures.
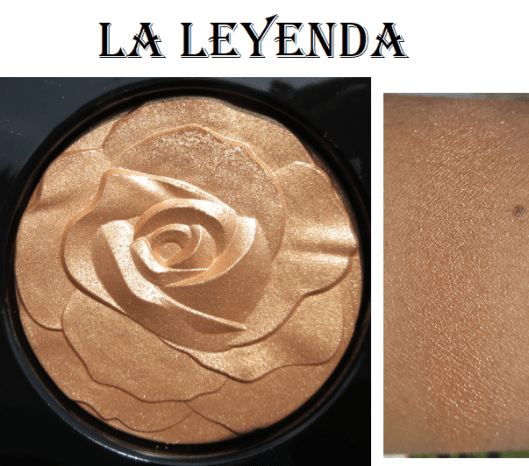
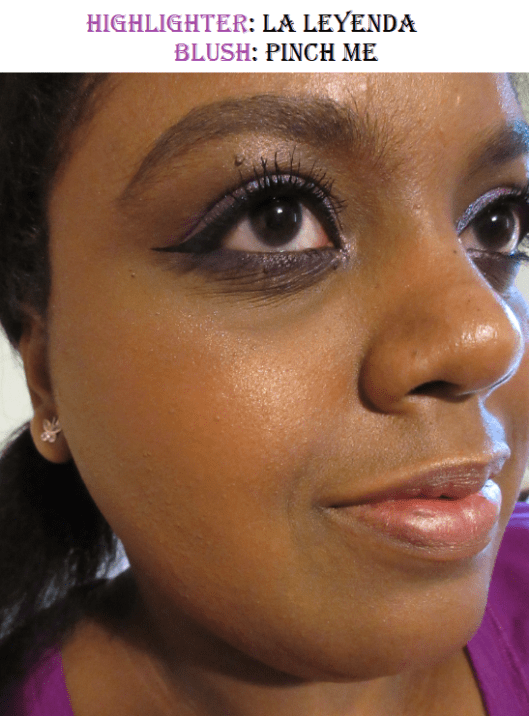
I used the tiniest amount of La Leyenda because I didn’t want to ruin the rose. I mostly collect MAC highlighters for the limited-edition packaging. There are so many other highlighters that I love, that I don’t feel like MAC’s formula is so amazing that it needs to be used, except perhaps Whisper of Gilt, which is the standout for me. I don’t have much to say about La Leyenda other than it is fine as a highlighter but stunning for packaging, presentation, and representing Selena.
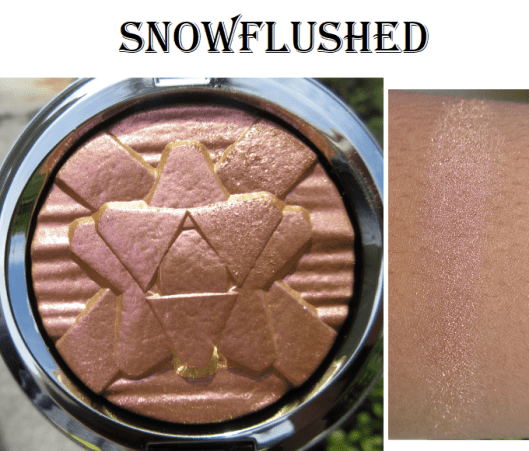
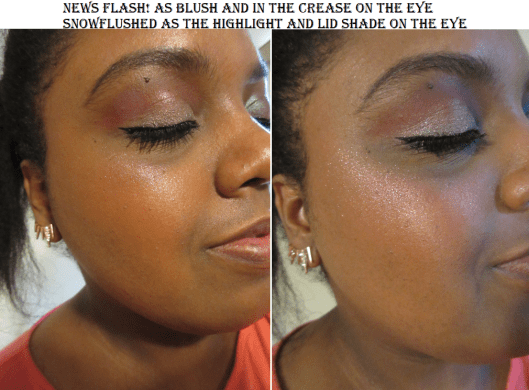
MAC had a gorgeous holiday eyeshadow called Stylishly Merry (version 2, not the original purple one) that I missed out on getting. So, when they released the Snowflushed highlighter the following year, it was the closest dupe I could find. It has a beautiful coral pink to gold shift in the pan but it is unfortunately too glittery for my taste as a highlighter. I wore it as a lid shade in the same photo, and the color shift doesn’t translate on my cheeks or eyes, so that’s a little disappointing. However, it still makes me happy to own for collector purposes.
Mineralized Skinfinishes
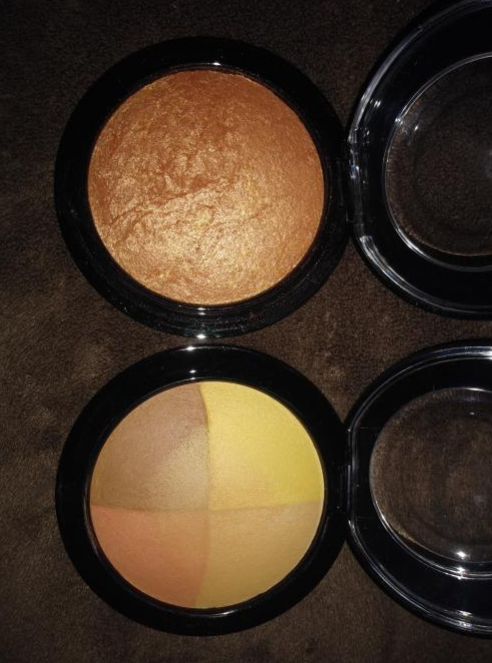
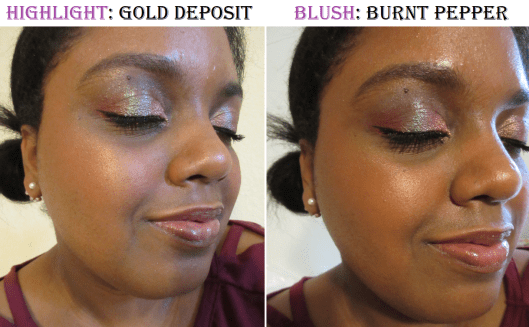
Gold Deposit is a golden-bronze shade I wanted for so long, but when I finally bought it, I only used it a few times because I found it to be too much for me.
When testing it out again for this post, I’ve realized that I can get a more subtle application when I use my Kumano-fude brushes. It still makes quite the impact, but it’s toned down enough for me to feel more comfortable wearing it in public.
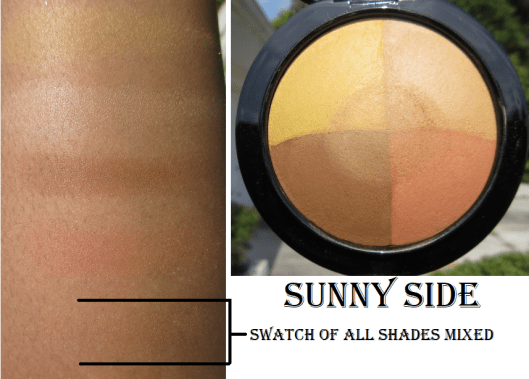
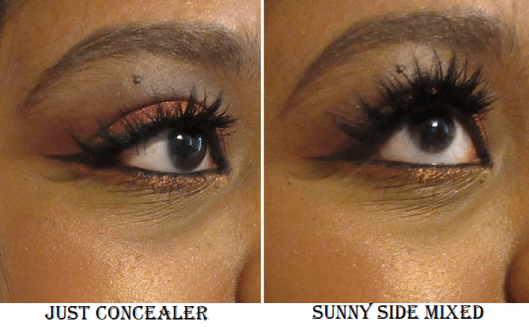
The best use for Sunny Side I have found is as a color-correcting setting powder under my eyes. As I’ve gotten down to the last bits of my Tarte Shape Tape concealer, it hasn’t been covering my dark circles as well. This powder is perfect for brightening up and covering up darker patches. I’m not sure how well I captured it in the photo, but it’s a very noticeable difference in person.
Also, although it is in the normal Mineralize Skinfinish packaging, this particular shade was limited edition.
Limited Edition Powders
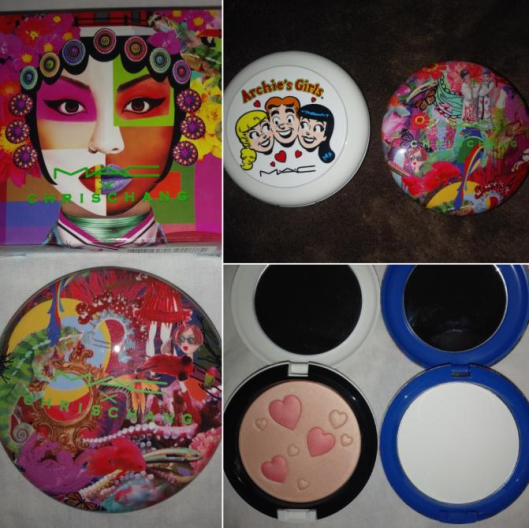
The Archie’s Girls Collection Flatter Me Pearlmatte Face Powder and MAC x Chris Chang Prep + Prime Transparent Finishing Powder are both items I purchased purely for packaging. In fact, I even bought a second Chris Chang compact (each compact is unique in pattern) so I could remove the actual product inside and put one of my DIY blushes or highlighters inside. That way, I could keep one in nearly pristine condition (the original translucent powder was too stark on me), and the other I’d be able to use without worrying about damaging it.
FINAL THOUGHTS
I will list my favorite blushes and highlighters from this post, but this list is purely subjective because it comes down to my own personal preferences. The quality of MAC’s permanent collection is of very good quality and I would confidently recommend them to anyone. It’s just about finding which ones suit your needs best. Although there are plenty of shades I enjoy in my collection, my list will include the blushes and highlighters that if they disappeared today I would repurchase immediately.
BLUSHES: Hushed Tone, Coppertone, Peachtwist, Burnt Pepper, Pinch Me, and Format. I would be tempted to, but probably not immediately repurchase Melba, Desert Rose, Fleur Power, and Cheeky Bits. The blush Style is so beautiful that I would probably repurchase it for blush topper/ highlighter purposes.
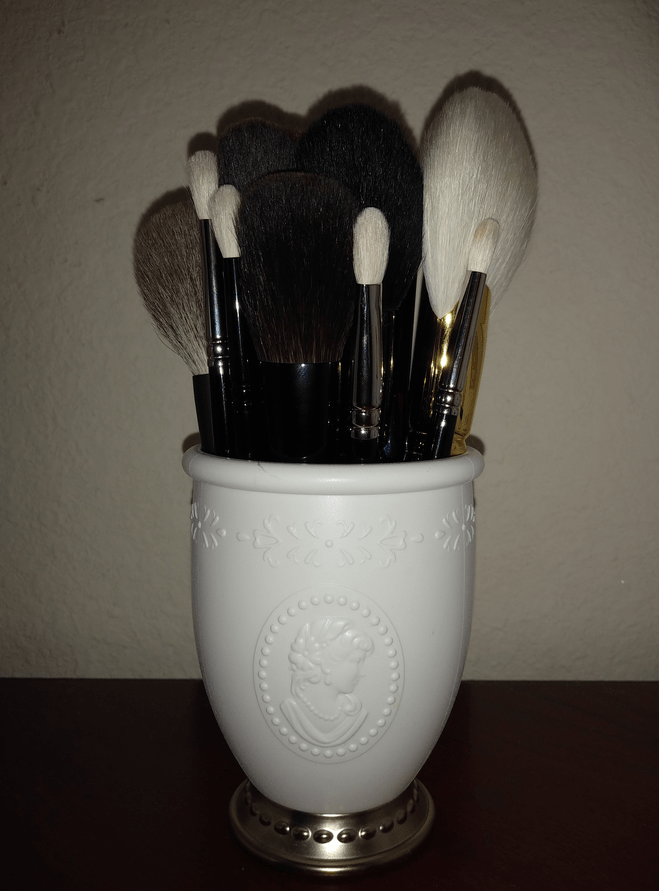
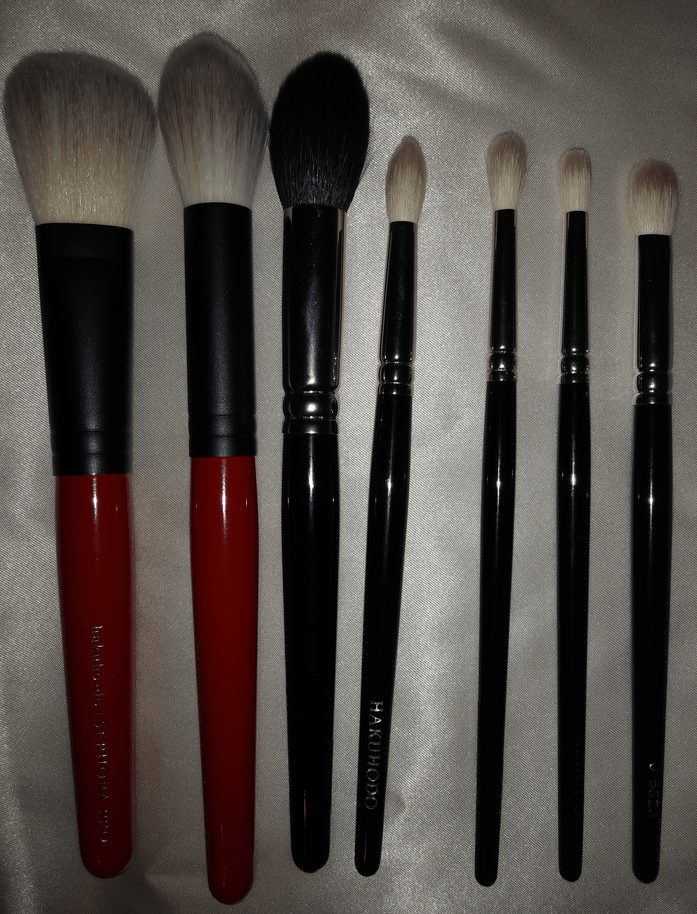
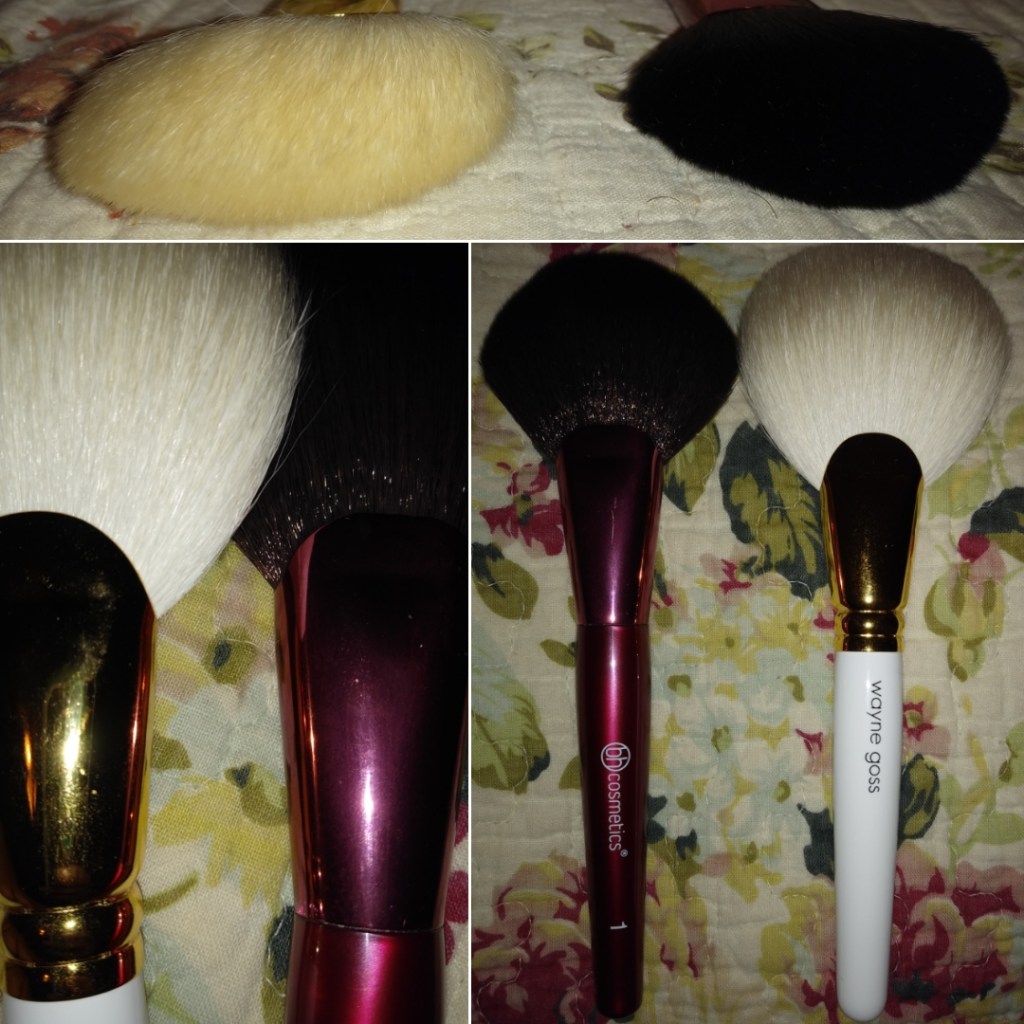
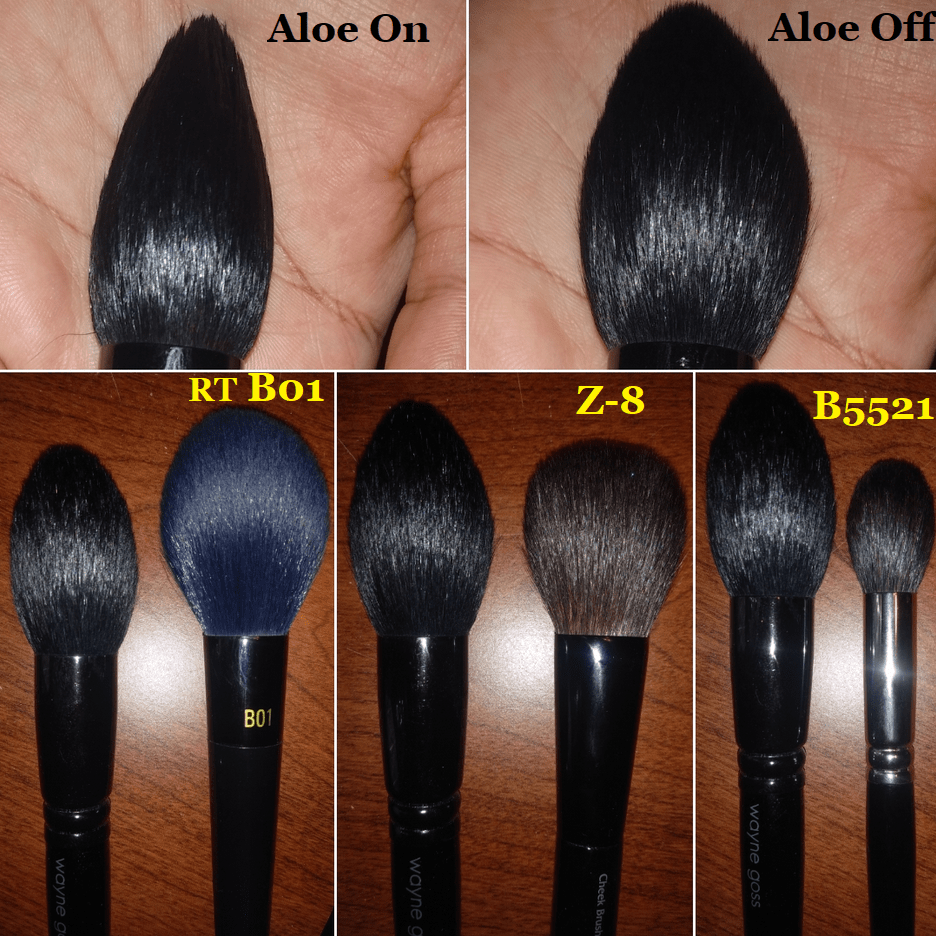
I have made so many changes to my brush collection since my previous Fude discussion that I felt the need to create a second post. And for consistency, the barebones information presented here has been updated to that post as well, so it can continue to be a single resource for all things Fude related from my end!
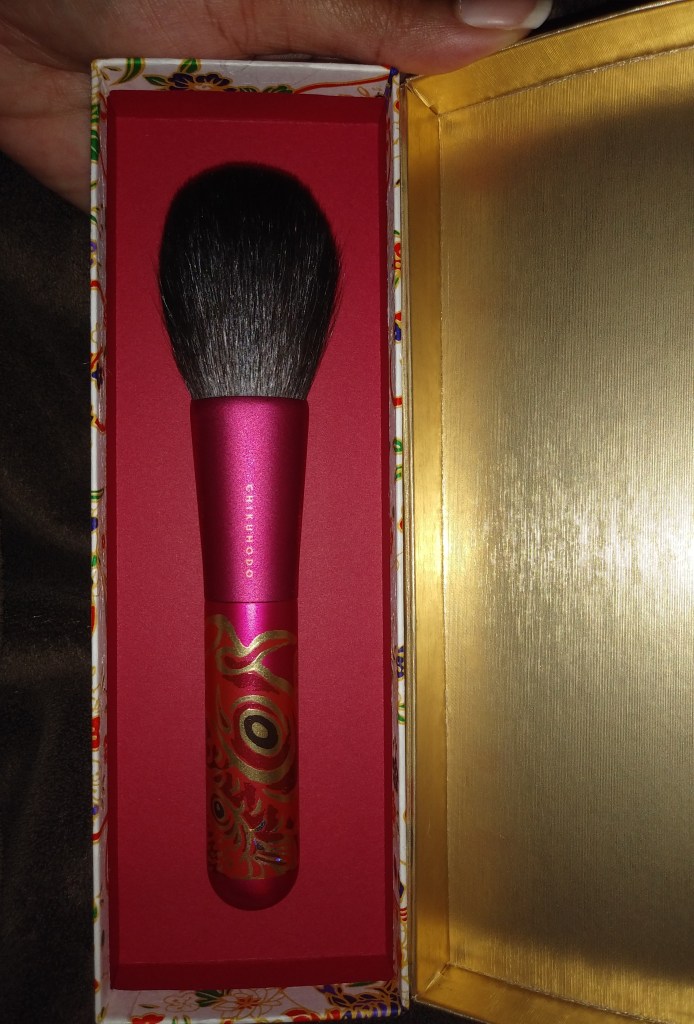
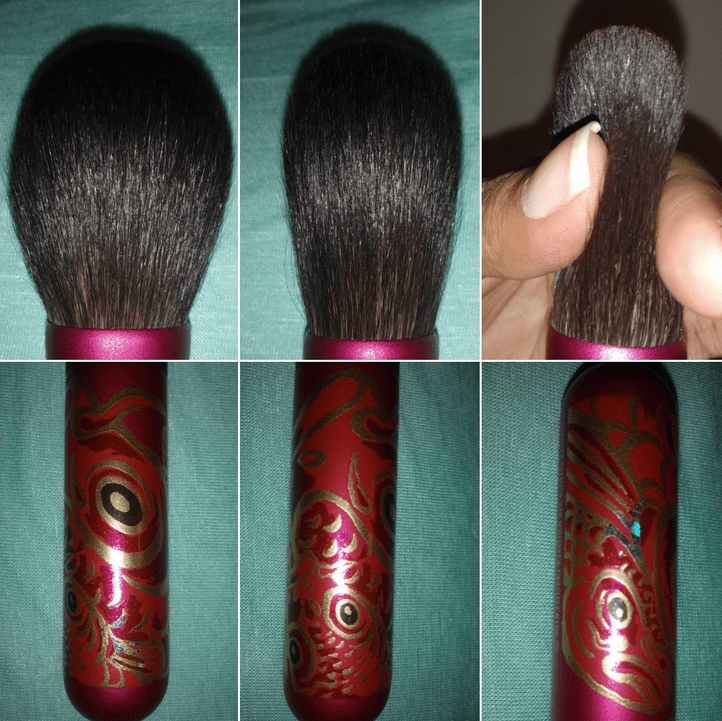
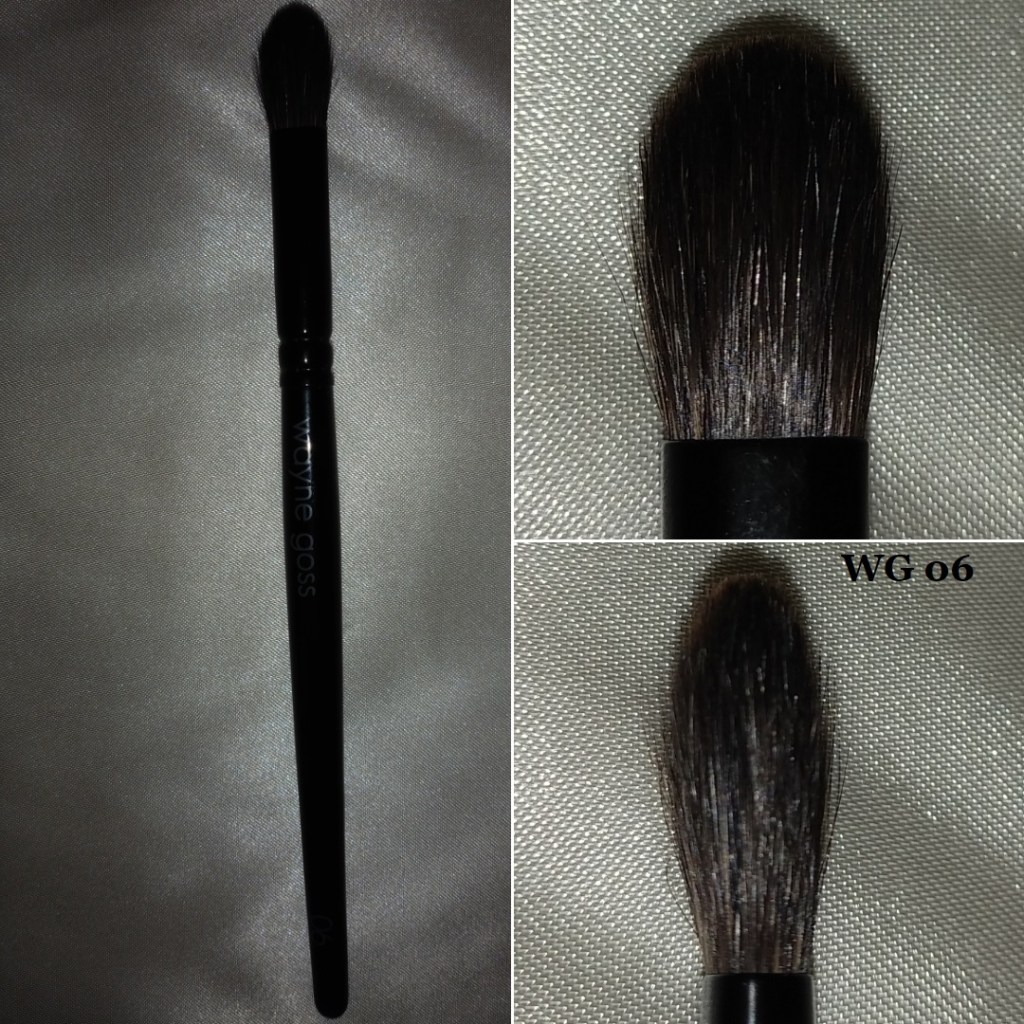
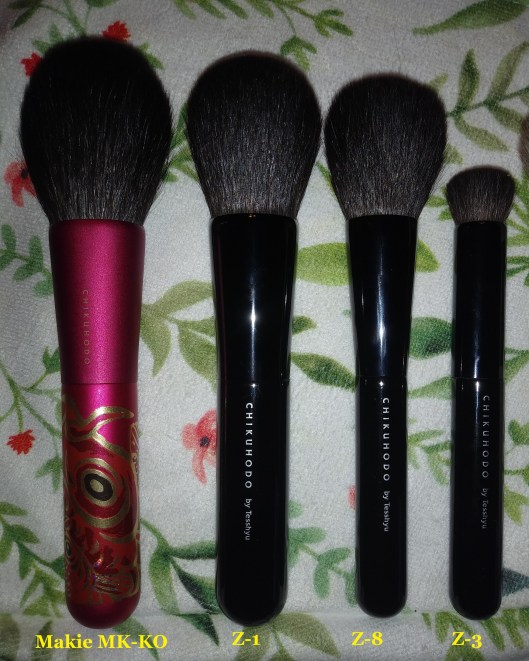
I’ll start with the most exciting update: Chikuhodo’s Homare “Honor” Kazan Squirrel series!
According to VisageUSA, “Not only is Kazan squirrel hair the rarest and softest of cosmetic brush materials, its slight wave in texture allows for greater efficiency in picking up and distributing powder products.” The Grandillo wood handles are exquisite! I absolutely love the way they look and feel but Visage does not offer an engraving option on them. Perhaps this is because the brush is already engraved with the brand name on the front and brush name on the back.
This series is extremely popular, as it has gone back and forth between being in-stock and back-ordered from CDJapan and VisageUSA. This isn’t a limited edition collection, but quantities do appear to be in limited stock.
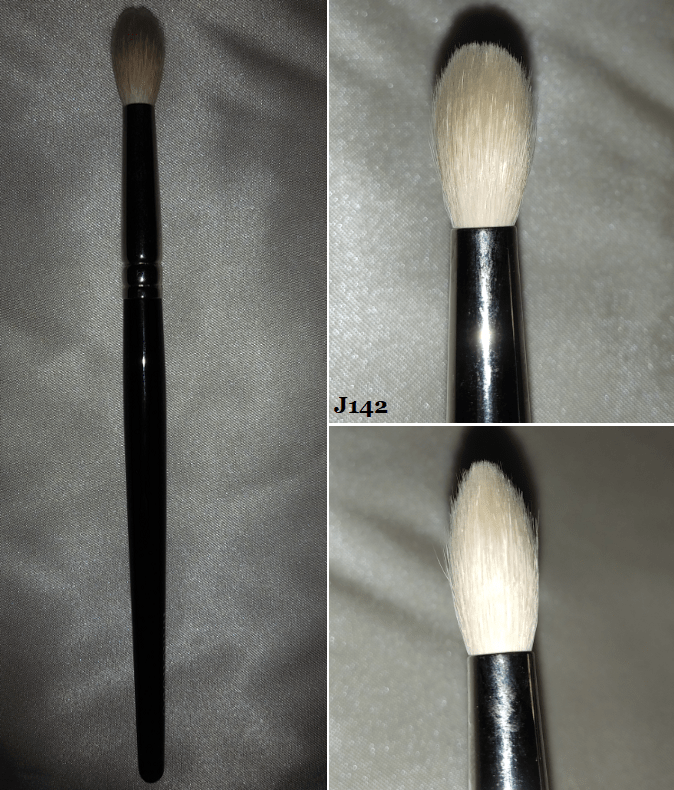
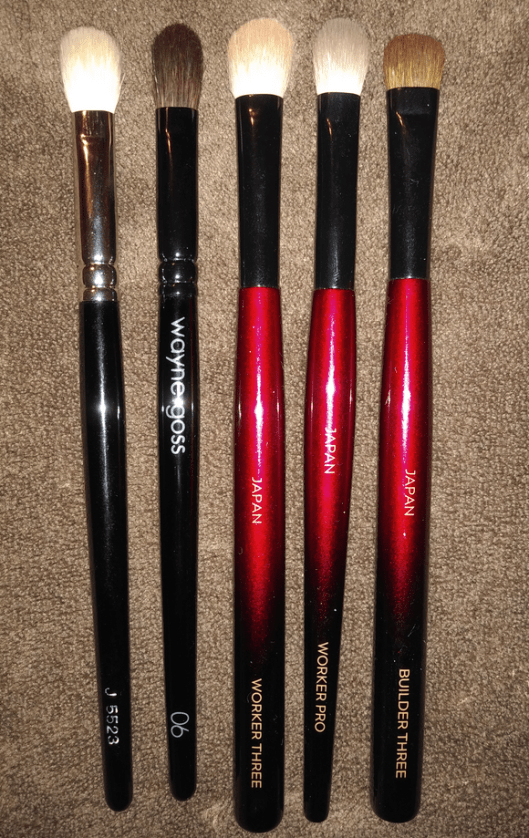
Chikuhodo KZ-04$100
Full Length: 150mm / 5.9 in
Hair Length: 35mm / 1.4 in
Hair Width: *30mm / 1.2 in
Bristle Type: Kazan Squirrel
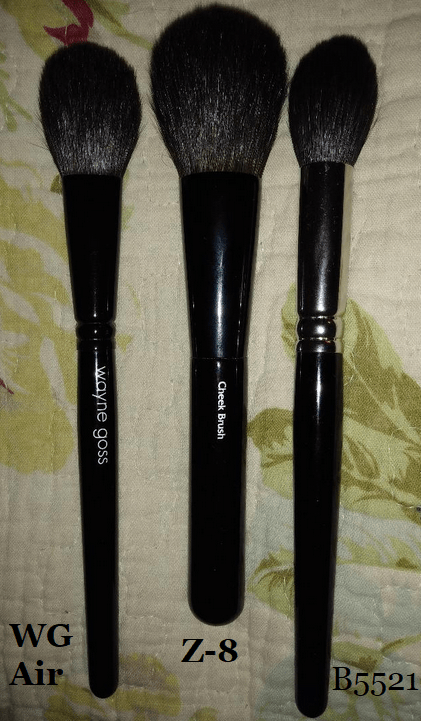
This brush head is completely round-shaped. I incorrectly assumed it would be the same width as the Z-8, but it’s much smaller. Although the shape is round and can be used in a circular buffing motion, the bristles aren’t very dense and flatten enough to feel like the kind of brush you’d use to sweep on blush instead. This makes the brush trickier to use the way I like to apply, as I have to hold it further back on the handle to have the bristles not squish flat from regular pressure, yet firm enough to still buff. I am impressed, though, with how soft the bristles are. I do find it to be slightly softer than grey squirrel hair, although I don’t know how much of a factor brush head density plays into that. At least this brush doesn’t flatten the way synthetic bristles with no substance do; I can still feel how springy the fibers are when bounced on the skin.
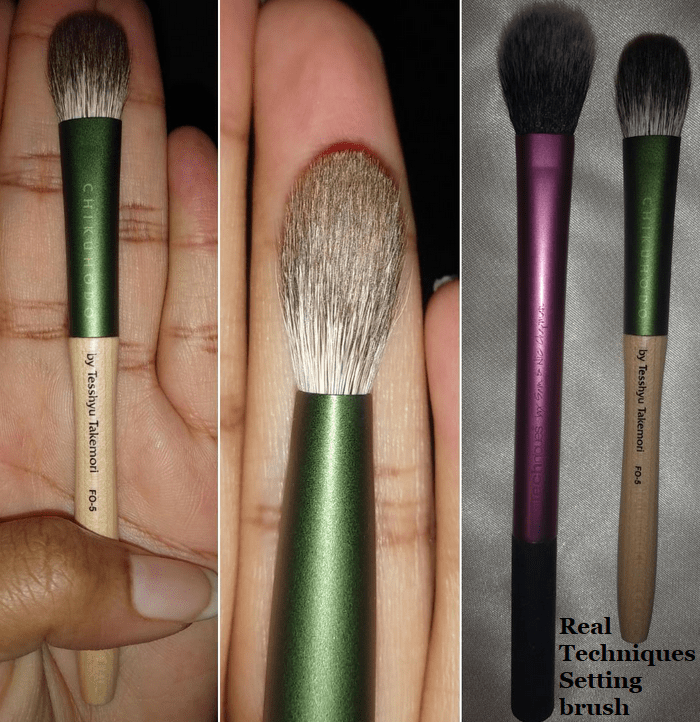
This brush is definitely made for just loose or lightly pressed powders. My favorite uses for this are with blush and bronzer. I like it and enjoy it, but the FO-3 is still my favorite blush brush in my collection. This brush is 5th place based on size and thickness. If softness was the only factor, it would be #1.
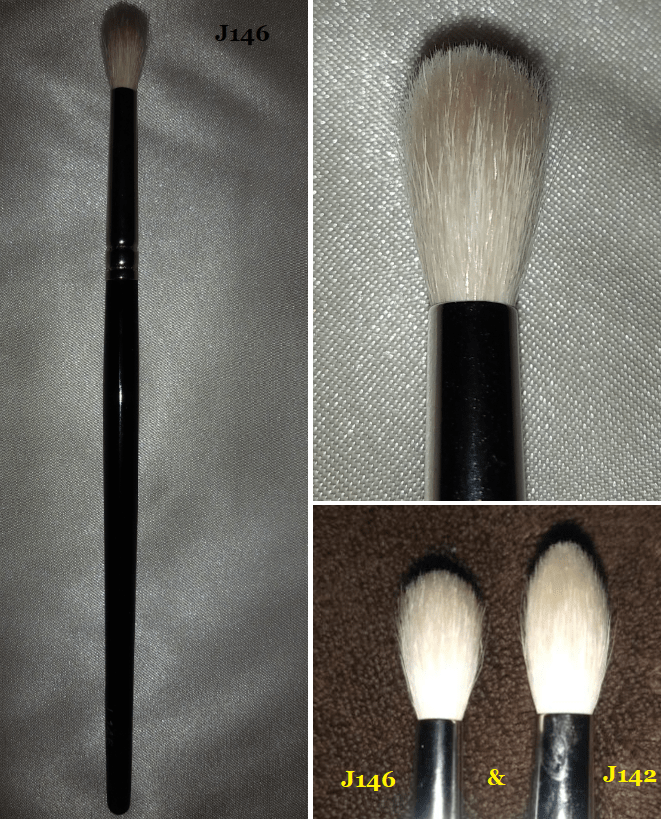
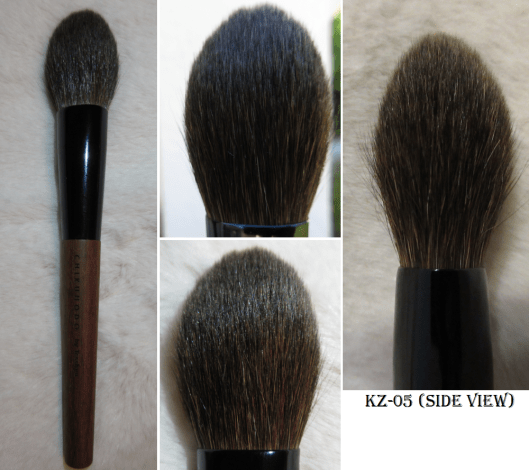
I have a photo of the KZ-05 and KZ-04 while wet after being washed. It shows a better idea of the amount of hair in each brush, and I was shocked to see how much thinner and more tapered the blush brush got than even the highlighter brush!
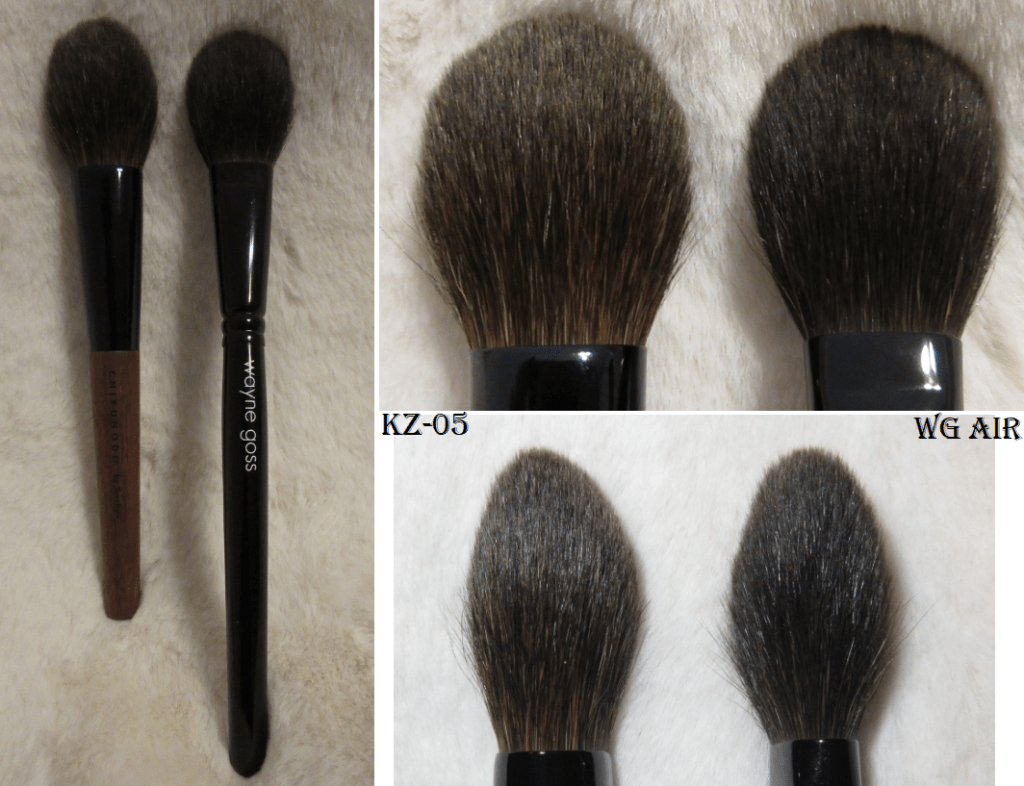
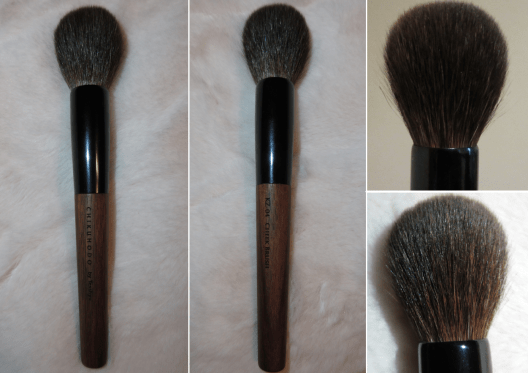
ChikuhodoKZ-05 $90
Full Length: 150mm / 5.9 in
Hair Length: 35mm / 1.4 in
Hair Width: *25mm / 1 in
Bristle Type: Kazan Squirrel
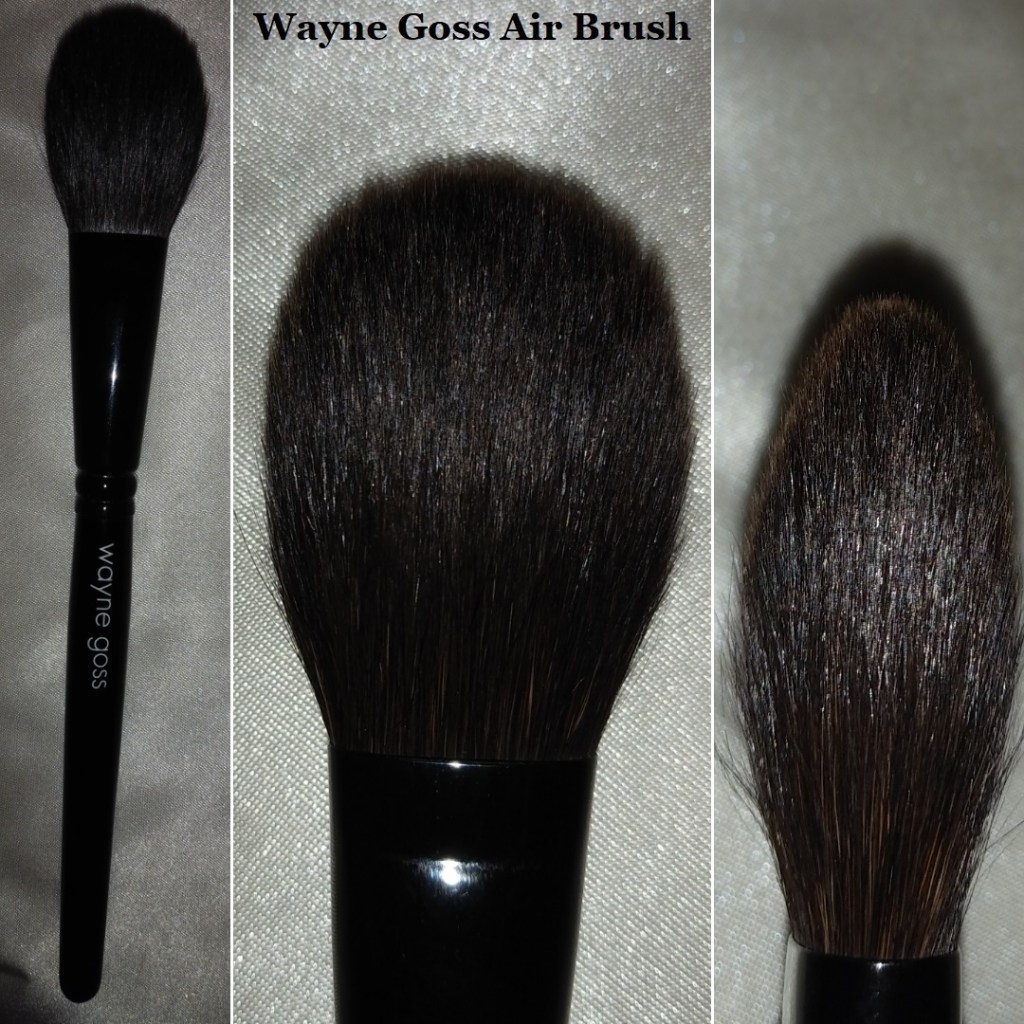
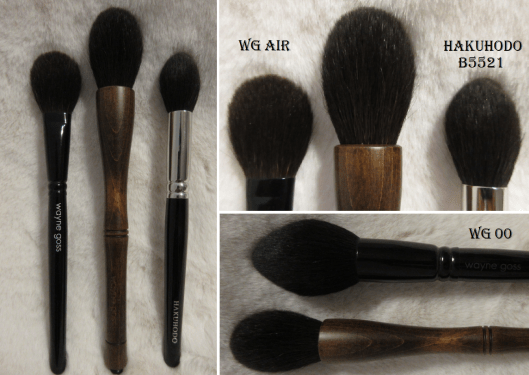
I debated between getting the candle-shaped KZ-03 or this less strongly tapered KZ-05. Because I have the Wayne Goss 00 brush, and already know it’s not a “must-have” in my collection, I decided to go with the KZ-05 instead. There’s also a $50 difference between the two. I don’t have the width stats, but the KZ-03 is 10mm longer than the KZ-05.
Upon first glance, the brush head size reminded me of the Wayne Goss Air Brush. That brush is made of blue squirrel for $35 versus Kazan squirrel for $90. The Air Brush is a few millimeters smaller in length and width, but when I squished the bristles, the Air Brush is about half as dense as the KZ-05. If the Air Brush was double the density and twice the price, it would still show the large price gap between the two squirrel hair types.
Even though this is called the highlighter brush, I don’t actually like it with highlighter. However, I like a very natural contour, which this brush is perfect for creating because of that tapered tip. It’s also nice for bronzer.
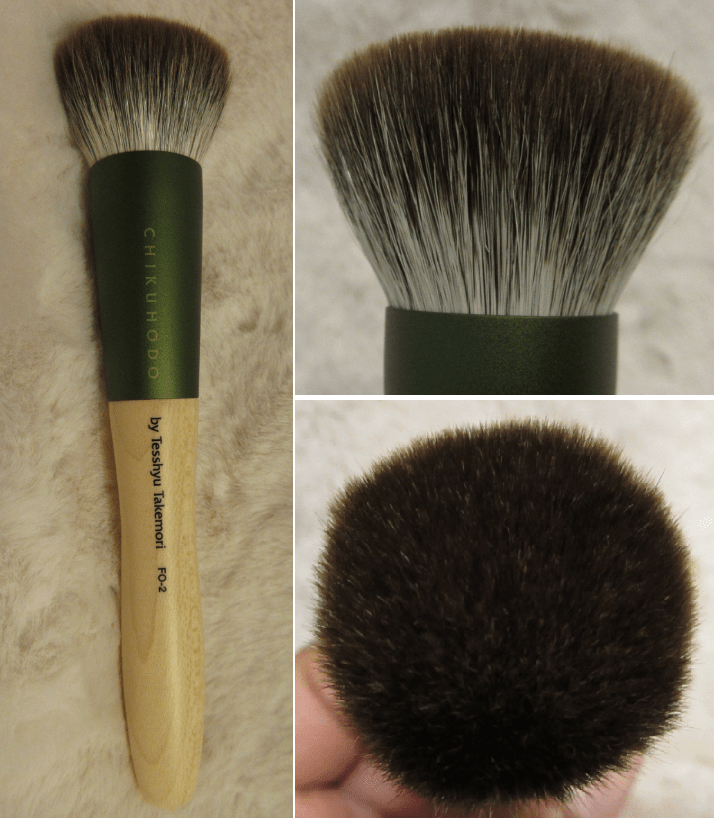
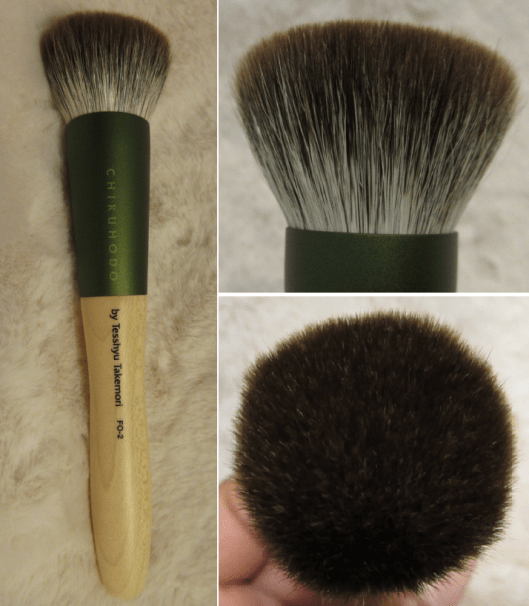
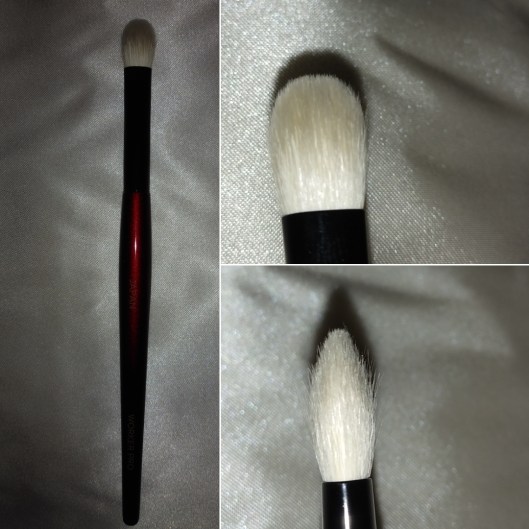
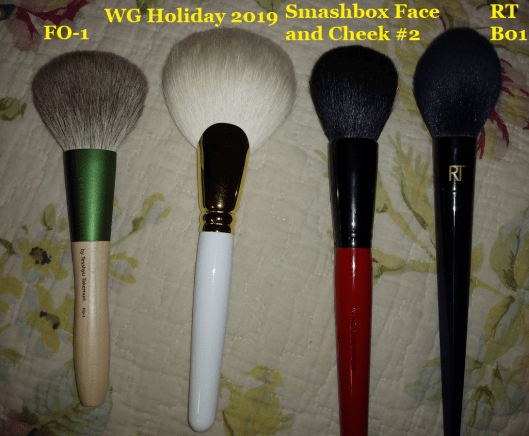
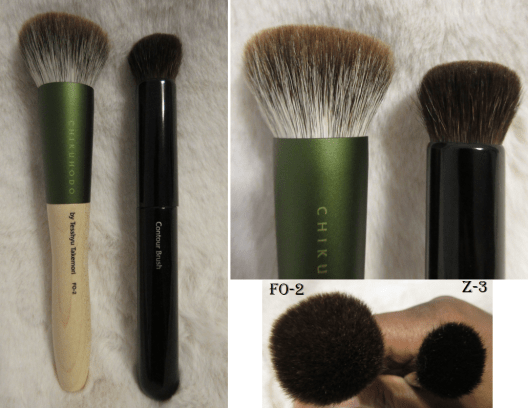
Chikuhodo FO-2 $100
Full Length: 131mm / 5.2 in
Hair Length: 21mm / 0.8 in
Hair Width: *29mm/ 1.1 in
Bristle Type: Silver Fox
Flat tops are not my favorite style of brushes, but I decided to buy this one to use as a buffing blush brush, and I’m so glad I did! It’s especially handy when I have a sheer/buildable blush that I want to quickly pack onto my cheeks. It’s also nice to blend out (not apply) powder contour. Applying it would deposit too much color at once and in too large of a surface area. The Z-3 Contour brush would be better to apply with and then use the FO-2 to blend out for a quicker and more diffused look.
Although this brush is intended for foundation, I don’t want to take the chance of ruining the bristles from my liquid foundations (I don’t use powder or cream foundations), so I will not be using it for that purpose.
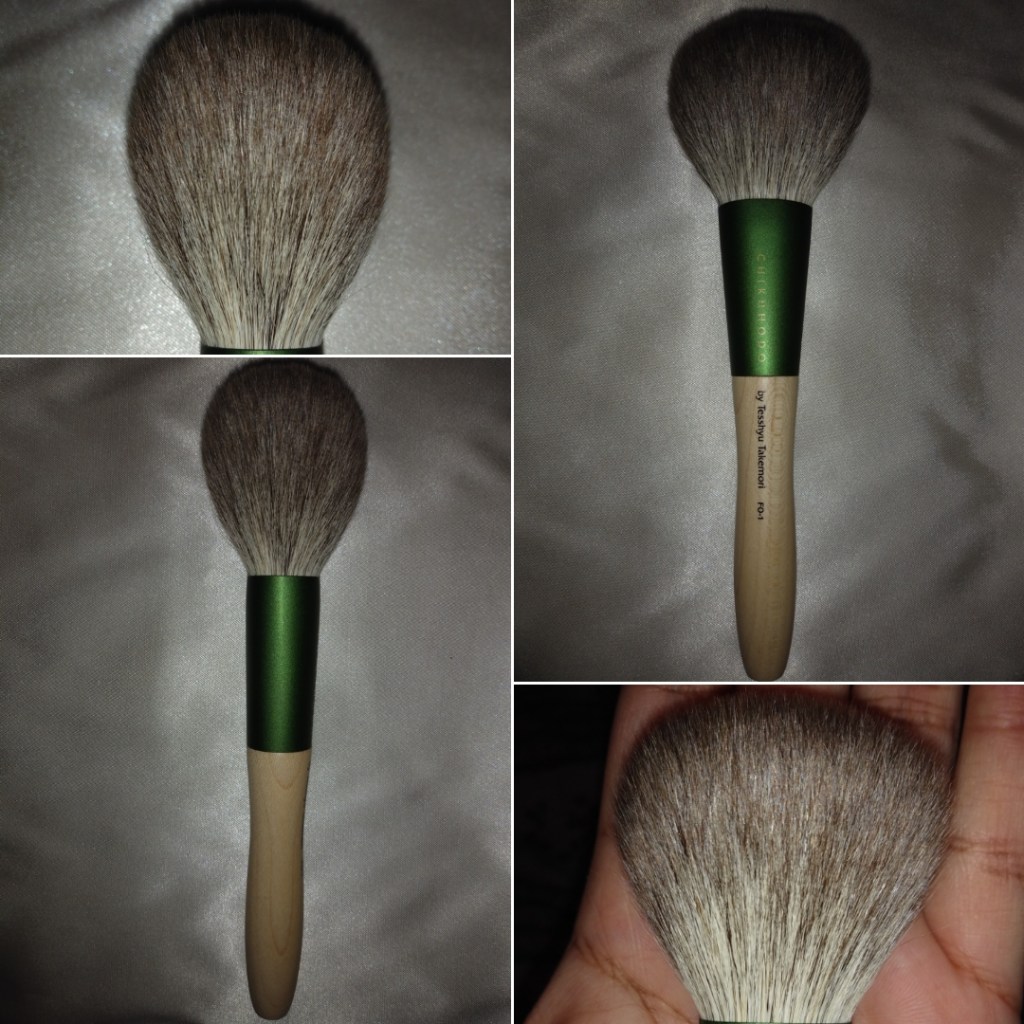
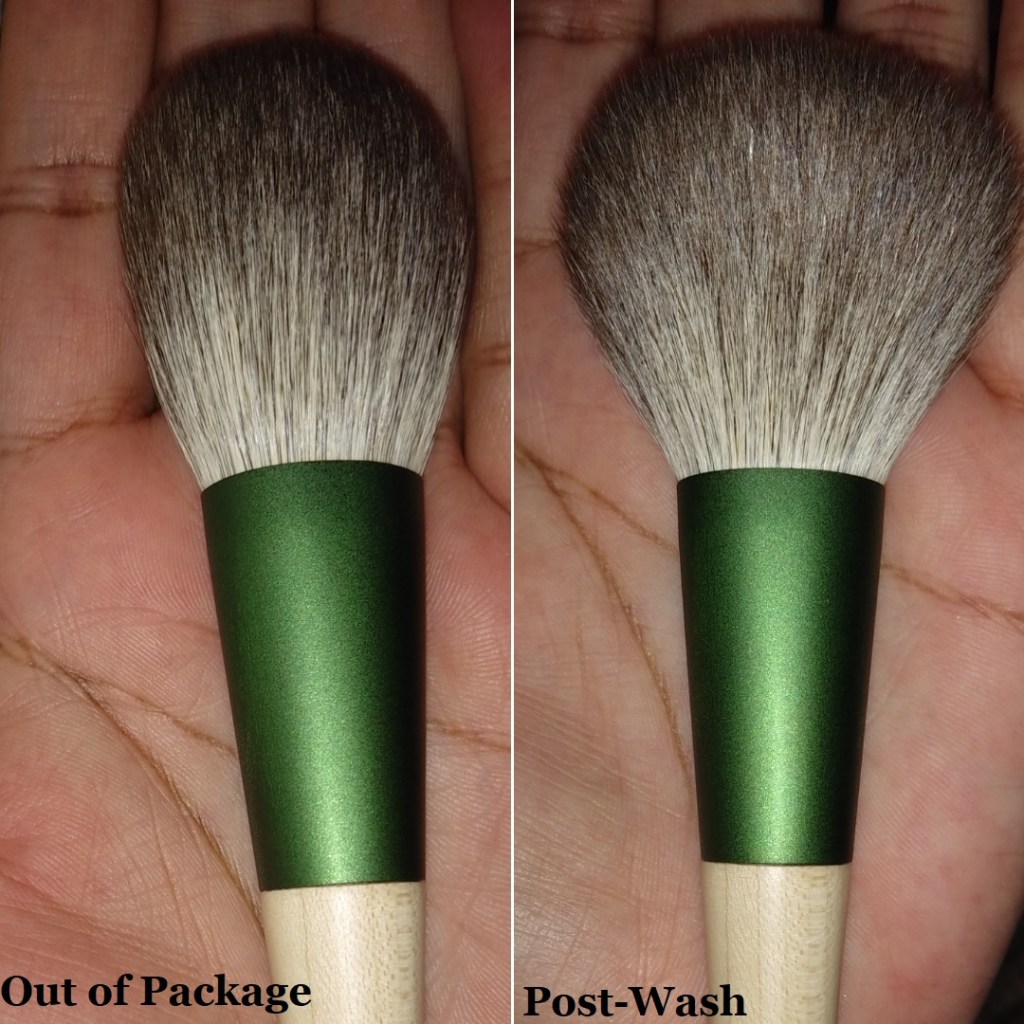
The VisageUSA summer sale was the perfect time to get an engraved FO-2, and while I was at it, I purchased engraved FO-1 and FO-3 brushes. I have since sold the ones I originally had, in addition to the FO-5 which I didn’t like enough to keep.
I don’t know if I ever mention this but my given name is Lian (Lee-Ann) but Lili is my nickname. I had a difficult time deciding which one I wanted to use for the engraving, but I decided for the FO-series to use Lian and any other series in the future, I’ll probably go with Lili.
Chikuhodo E-4 Nose Contouring $20
Full Length: 133mm / 5.2 in
Hair Length: 18mm / 0.7 in
Hair Width: *18mm / 0.7 in
Bristle Type: Horse
CDJapan has a softness scale rated 1-10. This brush has a softness degree of 3, which surprised me when I felt the bristles because it’s not that rough. However, when I used it on my face, I could feel that the very tips where it tapers slightly inward was a bit scratchy.
This brush was made specifically for contouring the nose, but I didn’t like the results when I tried it. Something about the way this is shaped prevents it from performing evenly. The tips create a harsh line, which takes so much longer to blend in.
Because it’s so scratchy, I don’t want to use this brush for any purpose other than one-and-done eyeshadow looks. The flat side picks up a lot of product and lays color on the eye beautifully, without having to feel the sharper ends.
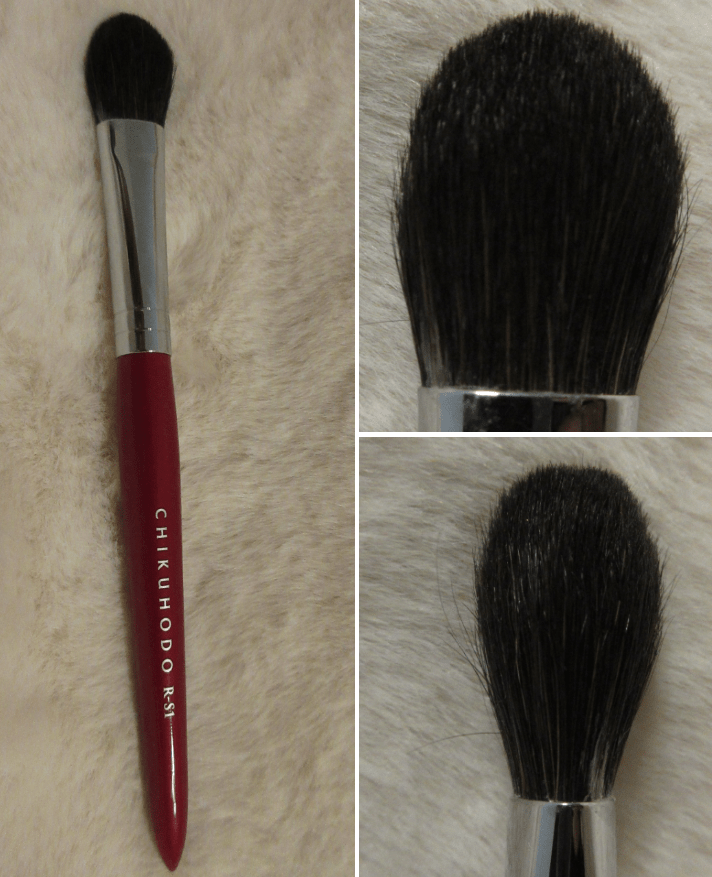
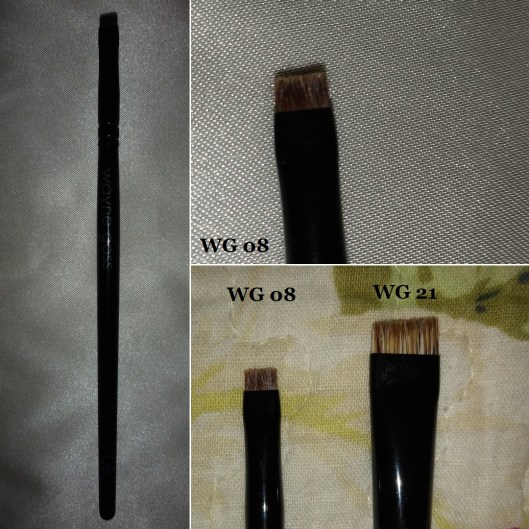
Chikuhodo R-S1/RR-S1 $16
Full Length: 140mm / 5.5 in
Hair Length: 20mm / 0.8 in
Hair Width: *15mm / 0.6 in
Bristle Type: Horse
The R stands for “Regular” series. The brushes in this series come in either red or black handles. In order to distinguish between the two when purchasing, red handle brushes have an additional R written on receipts, though not on the actual brushes.
Unlike the previous horse brush, this one was noticeably rougher on my finger before even applying to the eye. It’s rated 2 out of 10 for softness on CDJapan, so it’s even lower than the E-4. Unfortunately, I also find it to be a less useful brush. The bristles are longer than the E-4 and flop around in multiple directions when I try to blend with it. One of the things I love about squirrel, fox, and goat hair brushes from Chikuhodo is the way the bristles glide perfectly in the direction of the movement of the brush. Even though this is made from horsehair, I thought it would move the same way as the others, but it does not. This also doesn’t pick up as much product as the E-4, so it’s not even as efficient for the one-and-done eyeshadow looks.
It does make a nice precision highlighter brush on the cheekbones and under the brows. I like the way this brush picks up shimmers.
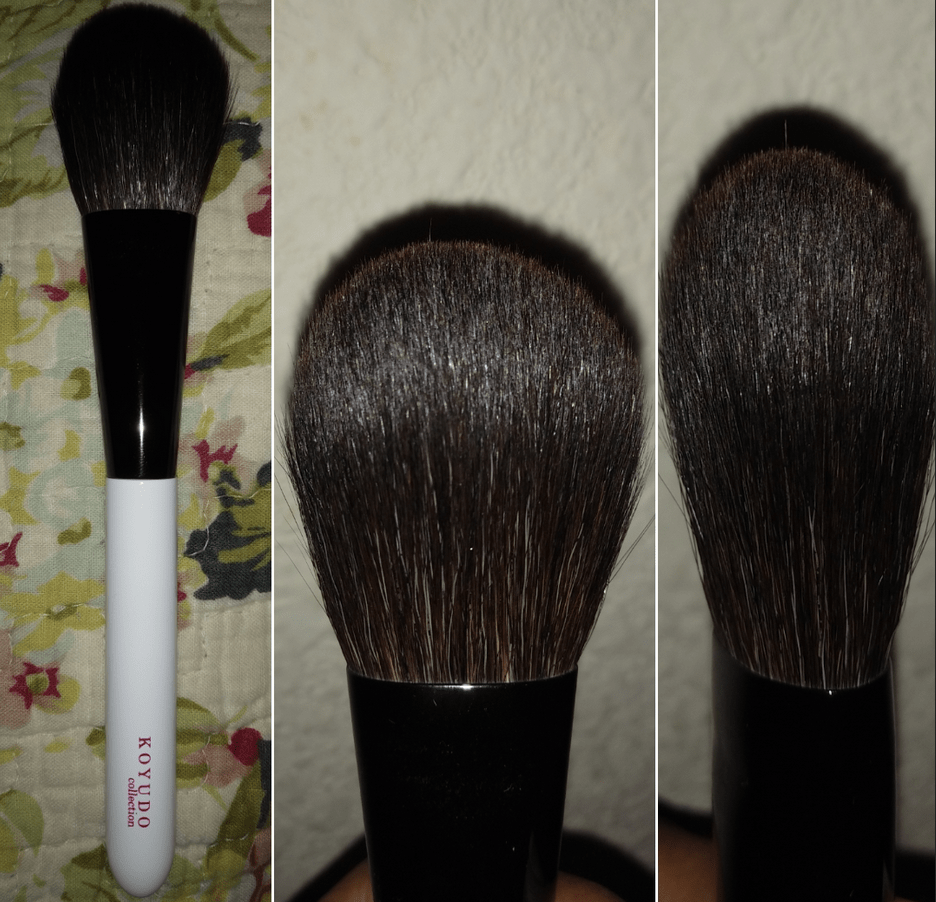
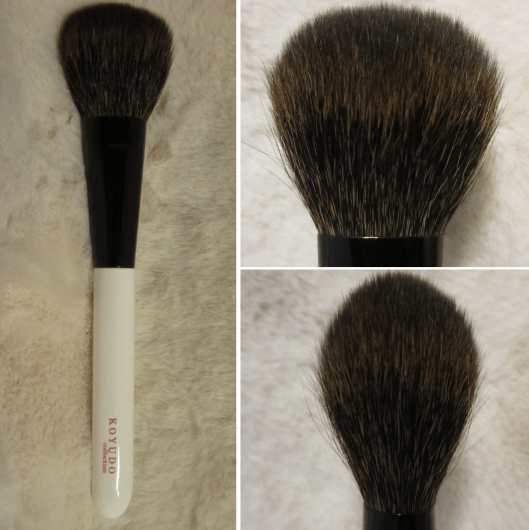
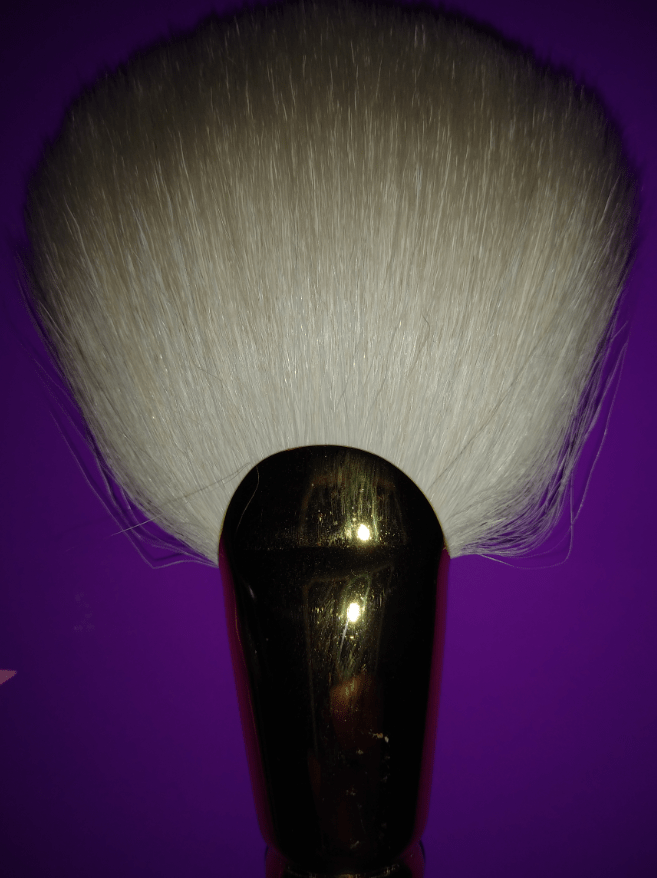
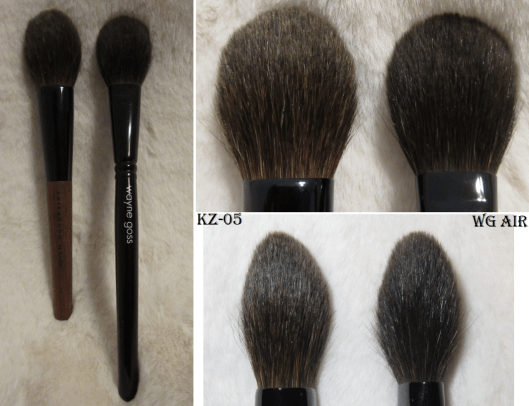
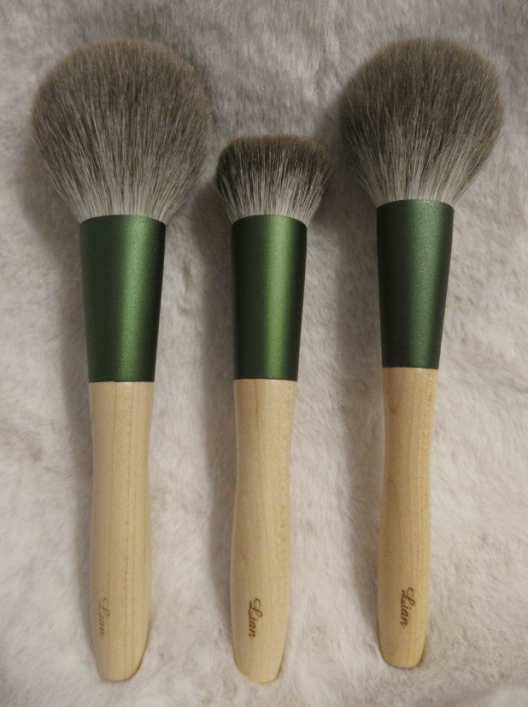
Koyudo BP Series BP017 Blush Brush $65
Full Length: 162mm / 6.4 in
Hair Length: *37mm / 1.5 in
Hair Width: *38mm / 1.5 in
Bristle Type: Pine Squirrel
This purchase was made entirely on the recommendation of TheFancyFace. I have been curious about the feel and performance of pine squirrel, but I was waiting to find the right brush first and this became the one! I purchased this from Beautylish, as I was surprised to see this brush was slightly cheaper from them than CDJapan and FudeBeauty (plus free shipping).
My curiosity was always about how pine squirrel performs, and was never about the looks, as I think the bristles are quite ugly. I’m guessing this will be an unpopular opinion, but I just prefer dark sleek mostly solid-colored bristles.
I’ve used this several times now and I haven’t noticed it being any better or worse than my other squirrel brushes despite the 6 out of 10 softness degree vs the typical 9 out of 10 grey squirrel brushes get. I can feel slight texture when I feel the bristles on its side but when touching the tips I don’t notice any difference. Perhaps it’s slightly less soft than the others, but it still feels extremely nice on the skin. I really like the shape and size of this and the way my blush looks when I use it. I’m very happy I bought it and I do use it exclusively for blush, as the size prevents it from being as versatile as the others.
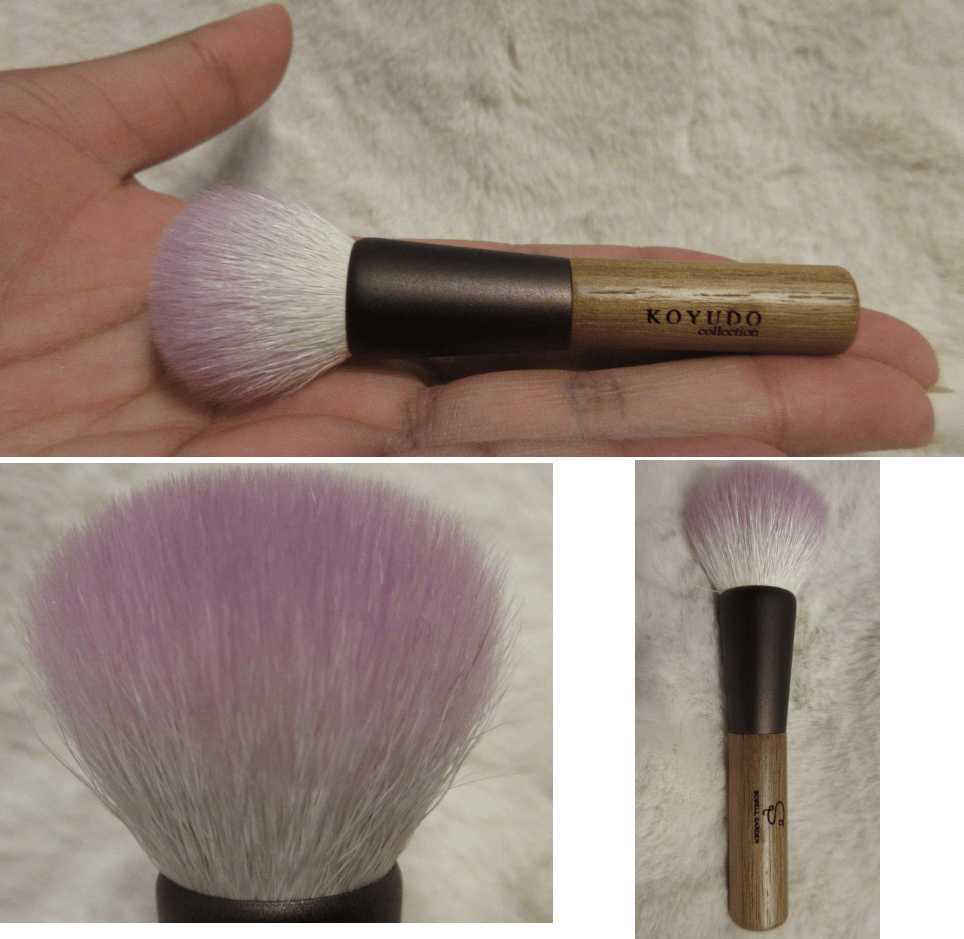
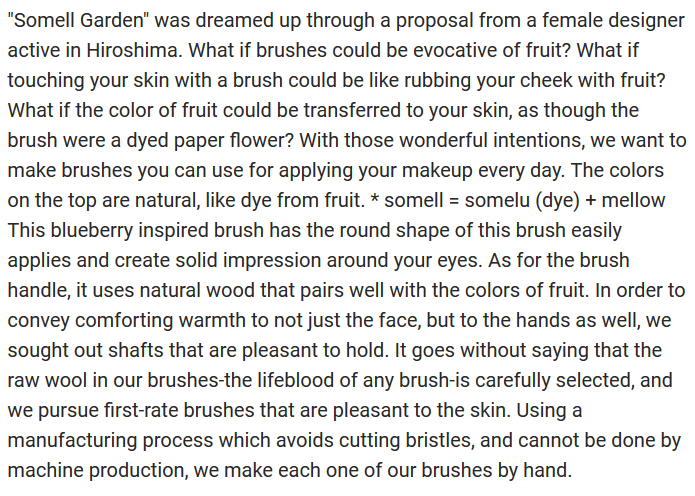
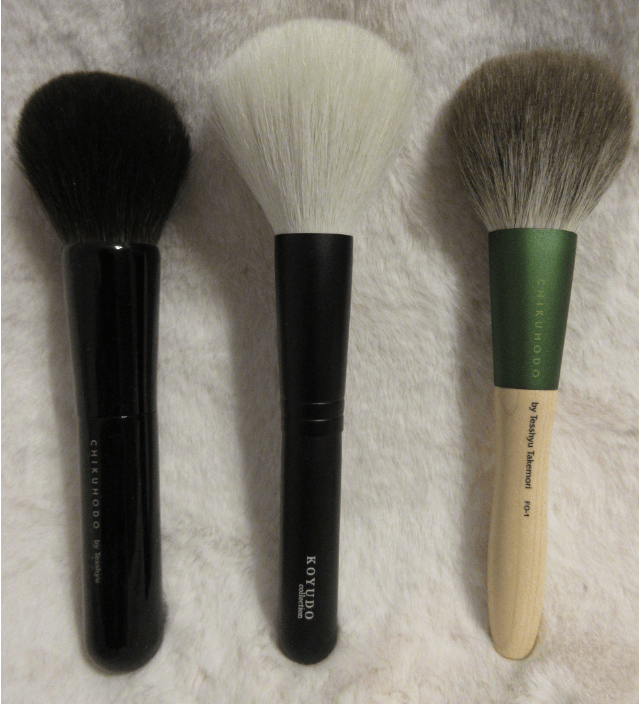
Koyudo Somell Garden Bluberry x Walnut Highlighting Brush $30
Full Length: 97mm / 3.8 in
Hair Length: 27mm / 1.1 in
Hair Width: *30mm / 1.2 in
Bristle Type: Hakutotsuho Goat
This brush is TINY! I should have paid attention to the dimensions listed on the website. From photos alone, I assumed it would be an average size highlighter brush. Despite being so small, this brush is very useful! Once again, I don’t use it for the intended purpose. The bristles are packed densely in a round shape and the head is quite wide considering the overall size of the brush. The surface area applies a wider patch of highlighter than is my preference, but this is perfect for packing a concentrated amount of color to one area, like blush. It gives a sheer blush more impact with one application or it can be used as a buffing brush.
The softness degree is 6 out of 10 on the website, which is still quite nice. I have some goat hair brushes that are so rough I use them to dust off my figurines and other products. I’m not even joking. Since I know what a 2 out of 10 brush feels like, I think some of the roughest brushes in my collection would place in the negatives, if that was possible. And now that I know what a 6 out of 10 feels like, I would say anyone looking for a non-scratchy brush should aim for 6 and up.
Before I move onto the next brush, I have to show the concept (as sited on FudeJapan and CDJapan) behind the Somell Garden series because it’s pretty fascinating.
Koyudo Saikoho Powder Brush [OUTLET] $54 ($78)
Full Length: 162mm / 6.4 in
Hair Length: 50mm / 2 in
Hair Width: *48mm / 1.9 in
Bristle Type: Saikoho Goat Hair
This brush was released June 16th at the discounted price. I assume outlet means it just wasn’t able to sell well, so CDJapan got ahold of some stock at a cheaper price the way some mid to high-end makeup brands end up at TJMaxx? The alternative meaning is if “outlet” products have a cosmetic flaw, but something like that would normally be noted on the website, so I believe it’s the former.
Saikoho goat hair at this size for that price is a fantastic deal! It’s so large that the only product I’d use to apply with this is powder all over my face. My favorite use though is as an all-over finishing buffing brush because it’s fairly dense with durable enough bristles to sustain me using it a little rougher.
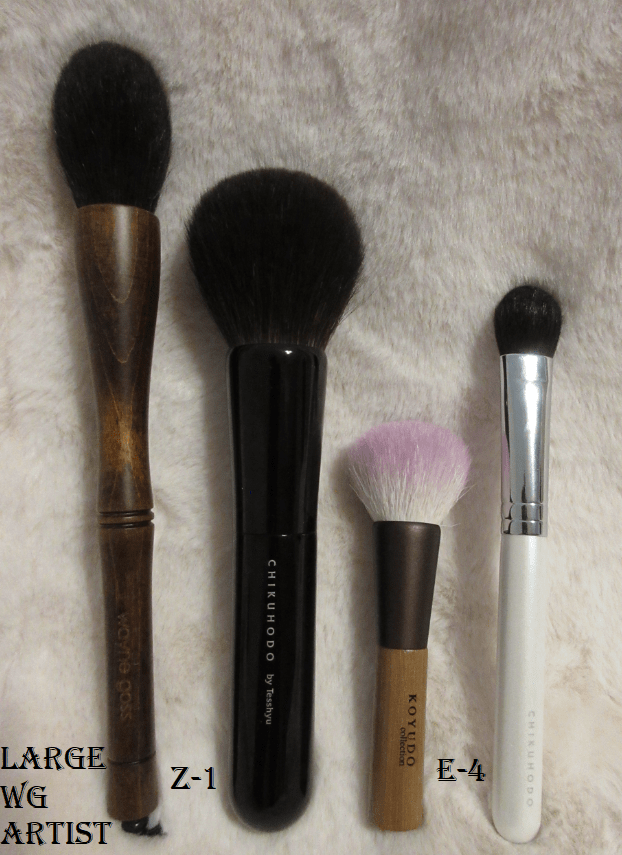
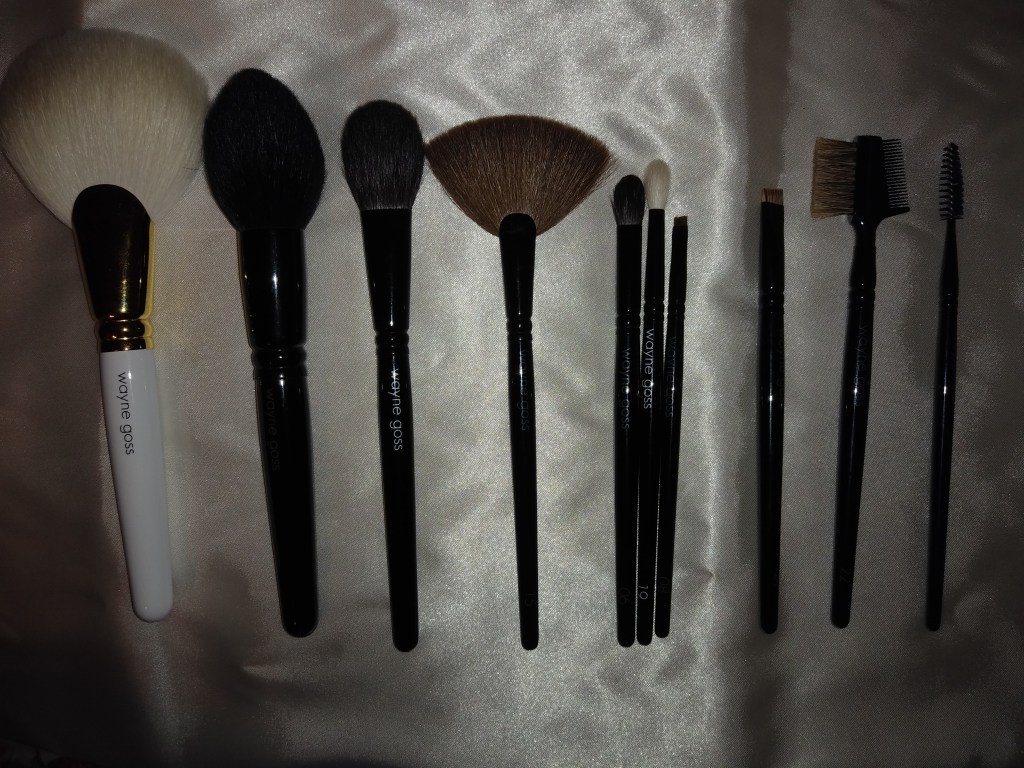
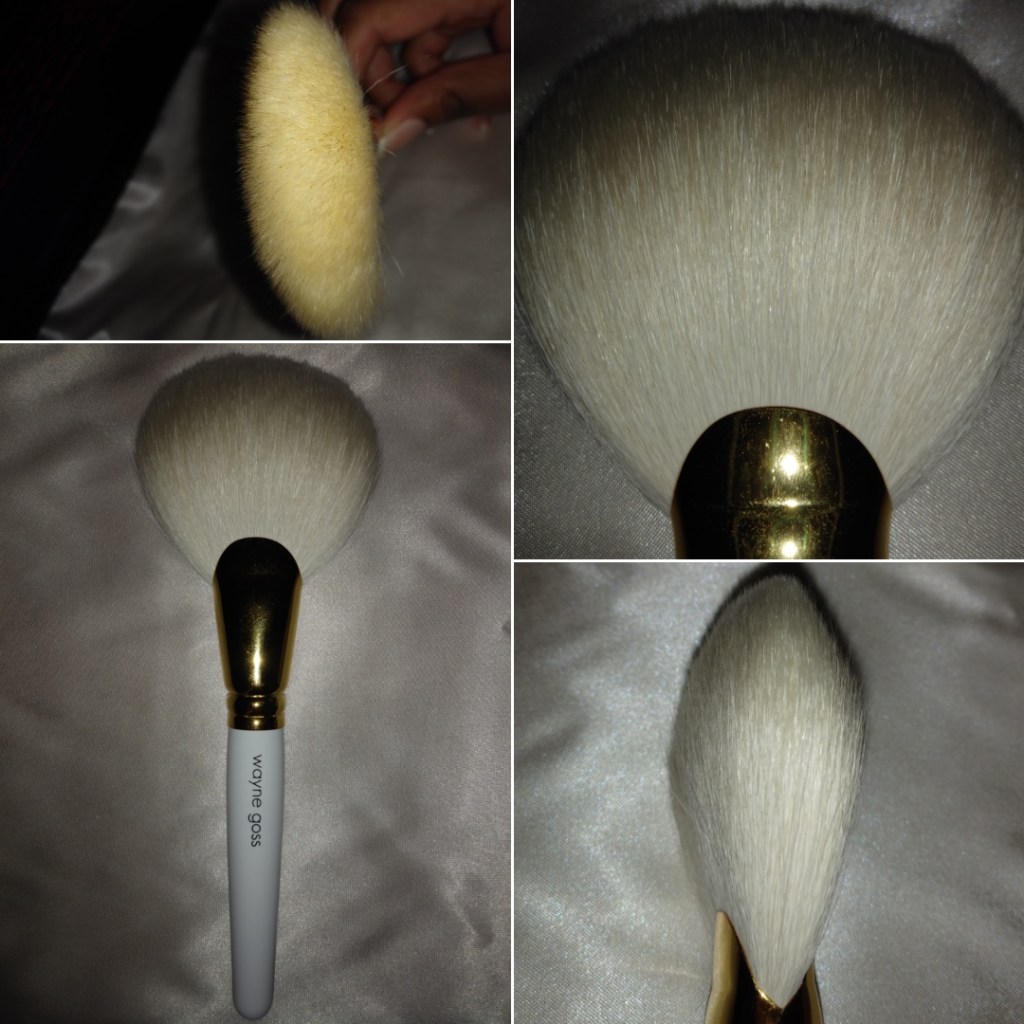
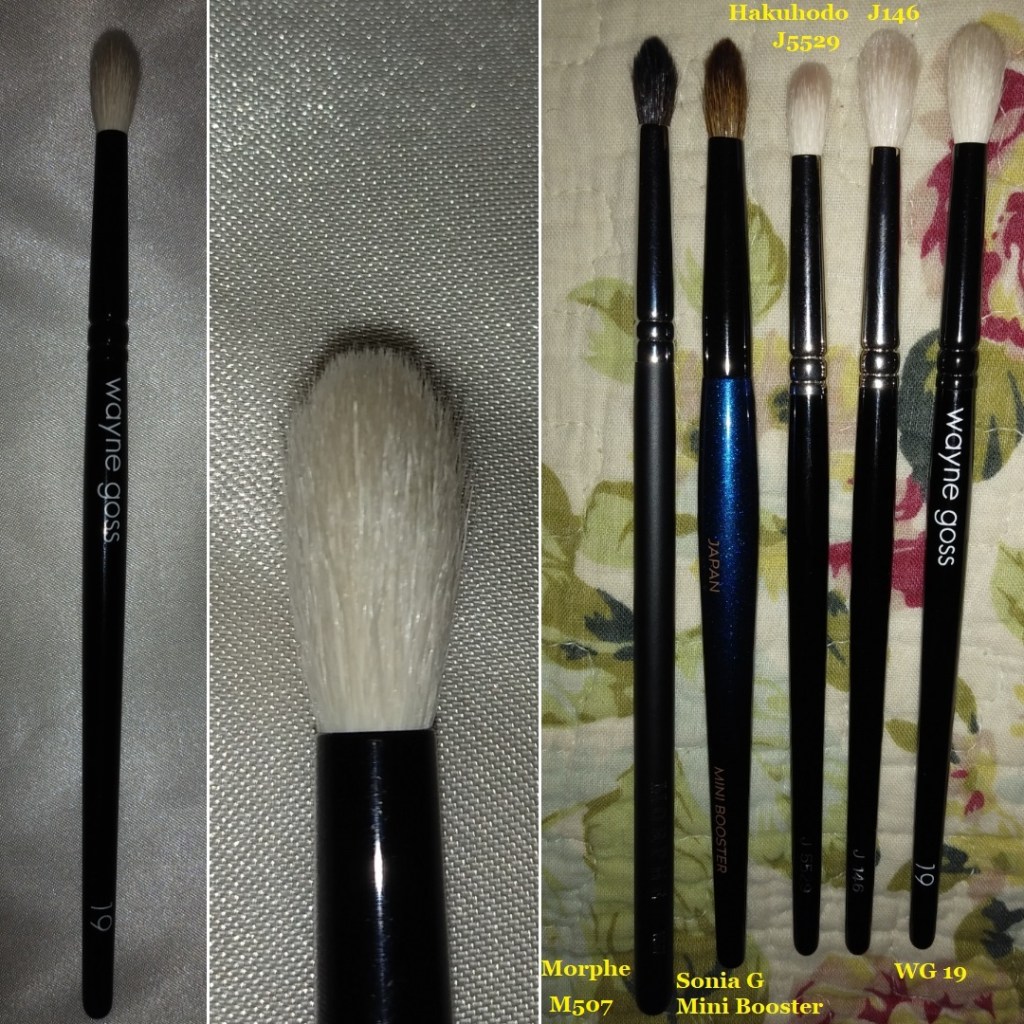
Wayne Goss The Artist Large
Full Length: 7.24 in / *184mm
Hair Length: 1.5 in / *40mm
Hair Width: *28mm / 1.1 in
Bristle Type: Grey Squirrel and Saikoho Goat
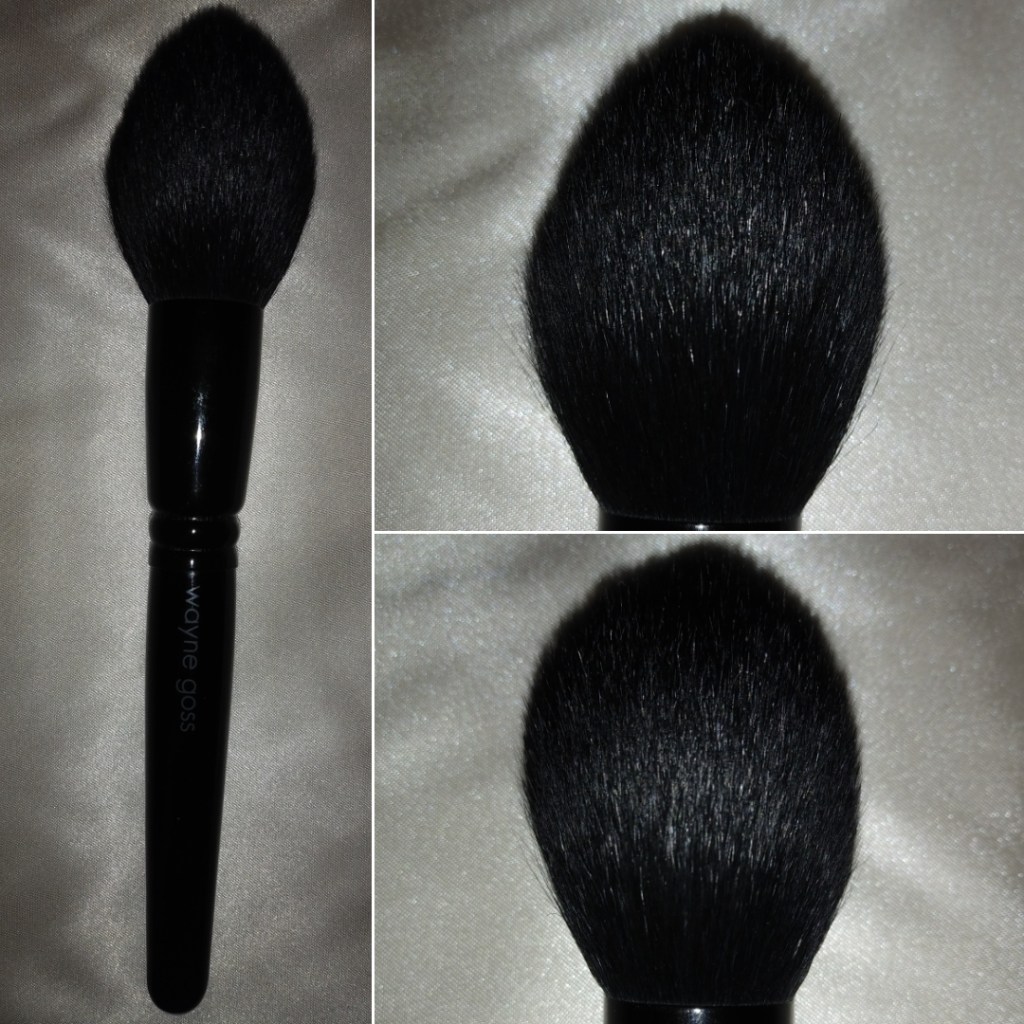
I purchased this brush from a reseller, as I did not want to buy the full Artist Collection set. I figured if the brushes were sold individually, it might be priced at $80-$85 for the large, $60-65 for the medium, and $30-$35 for the small. The large brush was the one I knew I’d get the most use from, as I despise brushes that are too pointy (like the medium and small), but I wanted to have at least one of them for collector purposes. Even though I predict the brushes will be sold individually in the future, I didn’t want to wait for that. So, I purchased the first one of the three that happened to fall into what I considered a fair price range.
This brush is way more useful than I thought! It might have actually surpassed the Wayne Goss Air brush as my #1 favorite bronzer brush.
The bristles pick up a lot of product, but the application is still sheer because the bristles don’t deposit the powder on the skin all at once. Every time I used it, I would blend until I didn’t think there was anything left, and then I’d look at the brush and see certain spots that still had colored powder on it. This can be seen as a good thing depending on your needs. It nearly guarantees that overapplying won’t be an issue. It’s amazing for bronzer and contour, both products I’d want to build up and blend for an airbrushed finish. It also deposits the perfect amount of highlighter, but it’s time-consuming with blush. The shape of this looks good for precision blush work but I’d rather use other brushes for that purpose. Three standout uses is still impressive and worthy of being called a multi-tasker brush. I can even set concealer with powder under my eyes, though it’s a smidge too large to get into the very inner corners.
I have to note, though, that there are a few strands within this brush that feels a little sharp. I can’t feel it when I touch the brush with my fingers, but I feel it on my face when I move the brush back and forth. I’m guessing the goat blend is the portion responsible in this goat-squirrel combined brush. Saikoho isn’t meant to feel anything but soft, but maybe a few other types of goat strands were mixed in. I’m not sure, but I still really like this brush.
Sonia G Jumbo Blender $38
Full Length: 160mm / 6.3 in
Hair Length: 15mm / 0.6 in
Hair Width: *11mm / 0.4 in
Bristle Type: Brown Saikoho Goat Hair
This was a preowned purchase, as I was tired of waiting for the restock. The brush’s condition is in like-new state as the owner took very good care of this (unlike my Chikuhodo Z-8). The size makes it great for applying a single shade quickly, as it covers a large area of space, but I can also blend with it.
The Jumbo Blender works as well as the other Sonia G brushes of this shape; it’s just bigger. It’s everything I wanted the Chikuhodo FO-5 to be, but better.
NEW BRUSH ACCESSORIES
Chikuhodo MKC-1 Makie Box $30-40
Material Surface Coating: Urethane Resin
Basis Material: Phenolic Plastic
External Dimensions: 215mm x 100mm x 50mm (8.5″ x 3.9″ x 2″)
Inside Dimensions: 200mm x 85mm x 30mm (7.9″ x 3.4″ x 1.2″)
This box is also available in red and beige.
I realized that my brush holders, although beautiful, weren’t very good for my large brushes, as they leaned on one another and the bristles kept getting misshapen. I bought this box to at least house my most expensive brush, the MK-KO, but laying it flat was encouraging the flattened shape that I don’t particularly like. It houses my Wayne Goss Large Artist brush instead. For my other brushes, the item below was necessary.
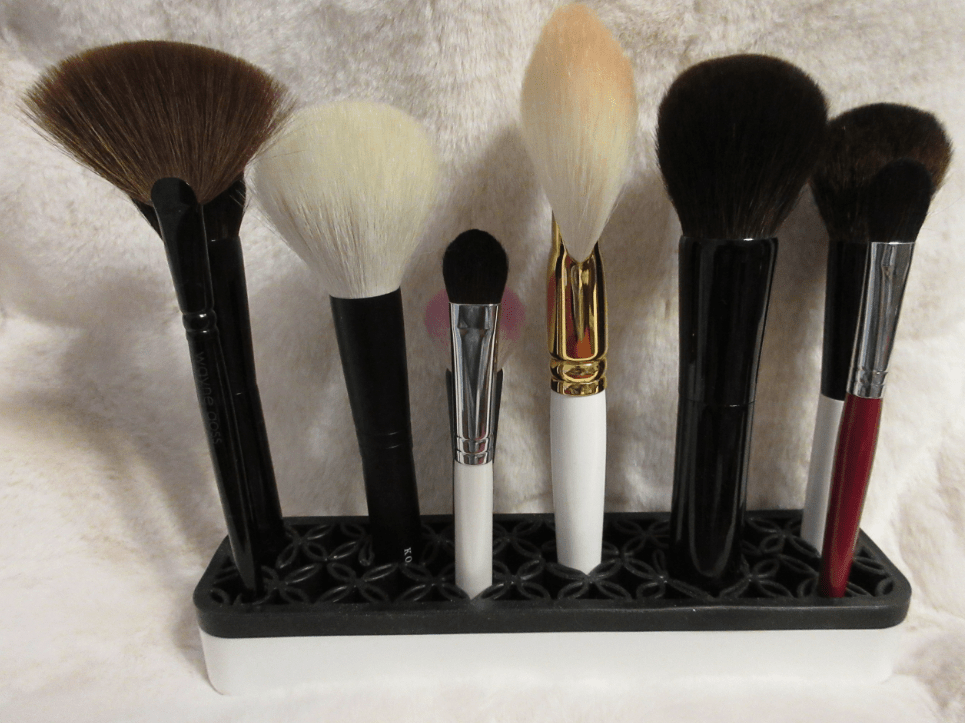
Brush Stand $8.88
I watch some of Jaybirdwalking’s videos and I’ve always admired her brush stand. I assumed it was something created by one of the Fude brands, which how I discovered the Makie Box in the first place. Later, I realized it’s called a BRUSHBAR from Kit + Hooks but Amazon sells a similar item for significantly cheaper. This finally provided me with the solution of keeping my brushes in a position that wouldn’t cause any disturbances to the hair shape. These brushes are quite the investment, and I want them to last as long as possible (but not pay for a $25 stand).
I’m really happy I was able to provide this same discovery with The Fancy Face! I hope she finds them useful!
EDIT: After prepping this post to publish, I realized she mentioned liking it in her Melt She’s in Parties palette review! I’m so glad!
FUTURE WISHLIST
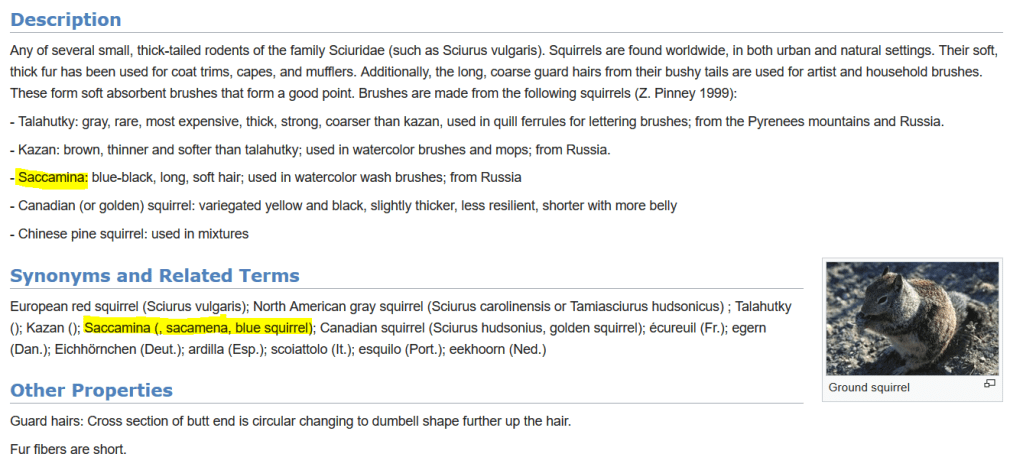
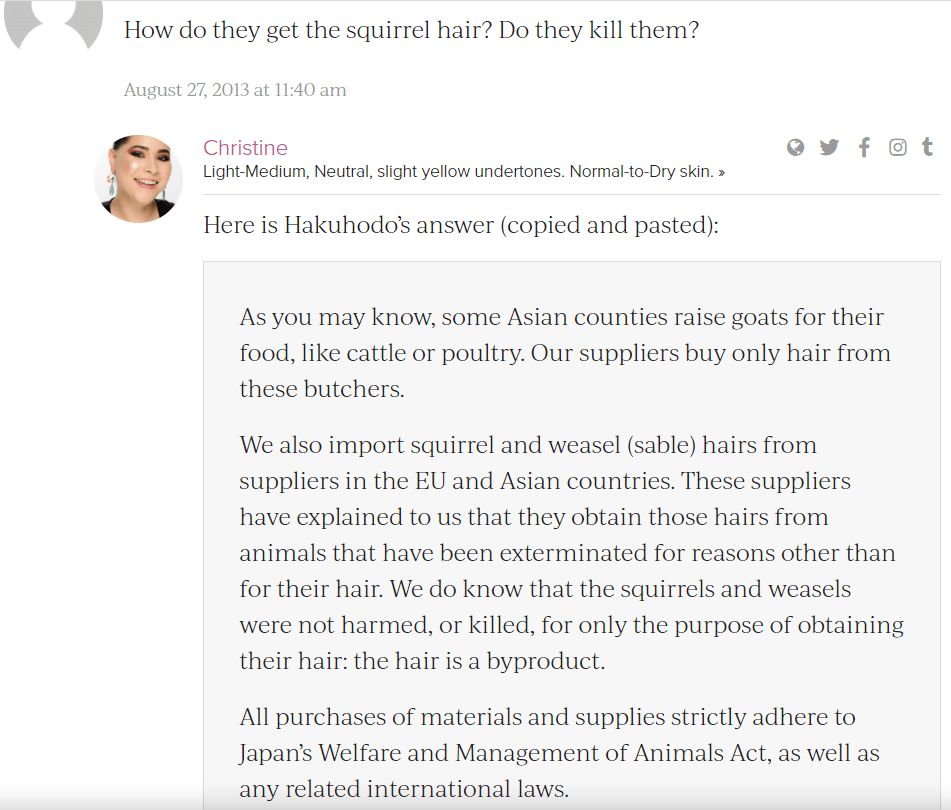
A month ago I tried to get this Koyudo Kolinsky brush. Because of COVID-19, the only shipping option available to me is DHL. What I learned, after speaking with customer service when I was unable to check out, is that this brush is unable to ship by DHL or FedEx because it’s prohibited by the Washington Convention. So, I looked into it and found an articlethat explains it far better than I can.
The best I can summarize the situation is that both the US Fish and Wildlife Service and the Convention on Intentional Trade in Endangered Species of Wild Fauna and Flora had a hand in the decision to ban Mustela sibirica. Even though the Siberian Weasel is nowhere near an endangered animal, the proper documentation and guidelines must be adhered to for importing and exporting.
A supply of kolinsky hair was improperly documented when imported to China, and because it’s impossible to know which brushes were then made using that particular supply of hair, all Siberian weasel brushes were banned from being imported to the US.
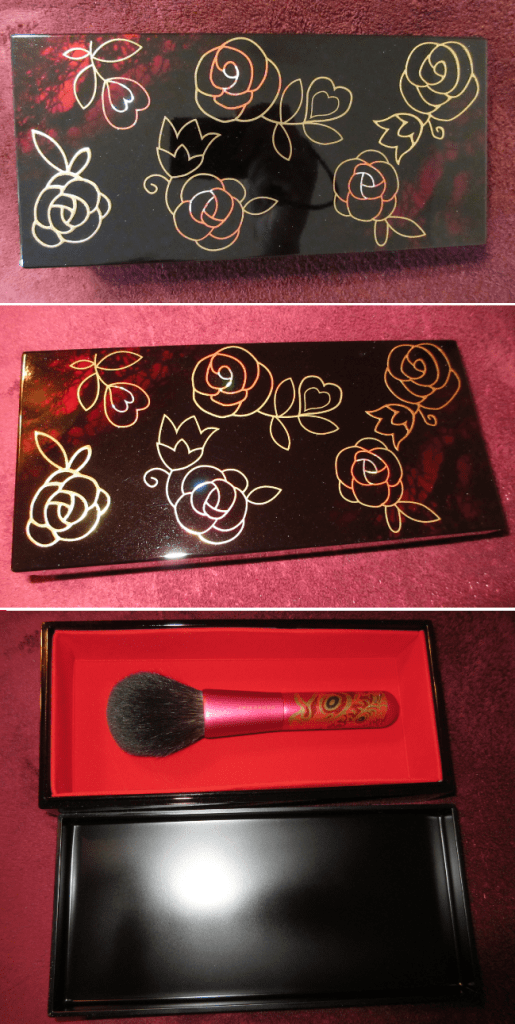
This probably accounts for why Beautylish doesn’t have the BP031 on their website with the other brushes in that series, but I don’t understand why it would have been okay for Japan Post and the other international options from CDJapan to send it here.
I’m also not sure why, a month later, I’m suddenly able to check out with this brush in my cart using DHL as the shipping method. Has the ban finally been lifted? The article I cited was from 2014, and CDJapan specifically told me it was the “Washington Convention” and not the C.I.T.I.E.S. So, perhaps it was a different issue entirely.
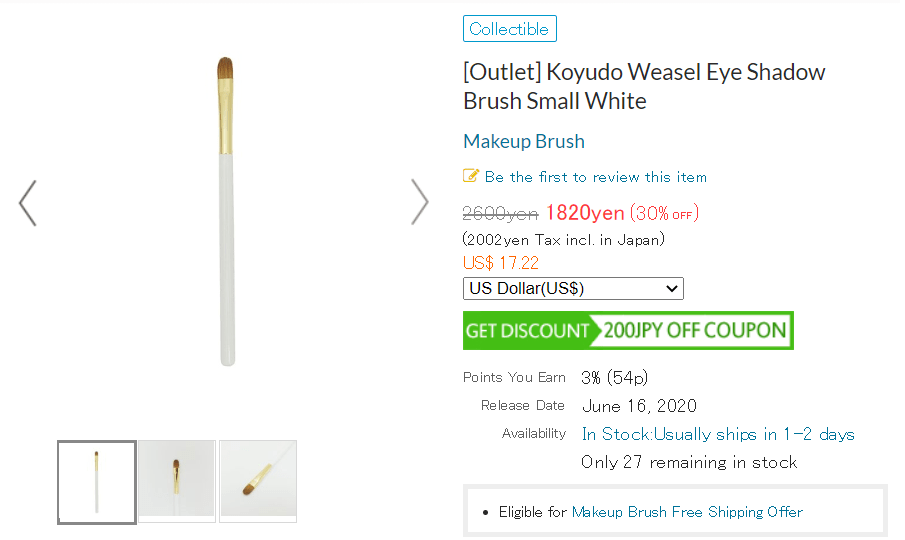
Even though this brush says Weasel, not Kolinsky, I was unable to get this brush shipped to me a month ago either. Between the two brushes, I’d rather get the BP031, so if it’s in stock during my next CDJapan order, I’ll definitely be adding one and updating my original Fude post with a mini review!
That concludes this update on all things Fude related! Thank you for reading!
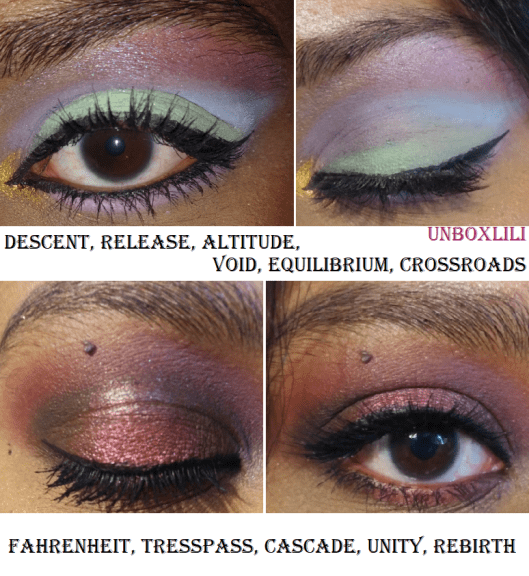
After the excitement of getting my hands on the special pink chrome mirrored packaging of Divine Rose II, I felt inspired to take a closer look at all the Pat Mcgrath palettes in my collection. I don’t have many, but I’m very happy with the selection I own, as these are color stories that suit me without there being too many repeats or similar shades, as PMG has been known lately to do.
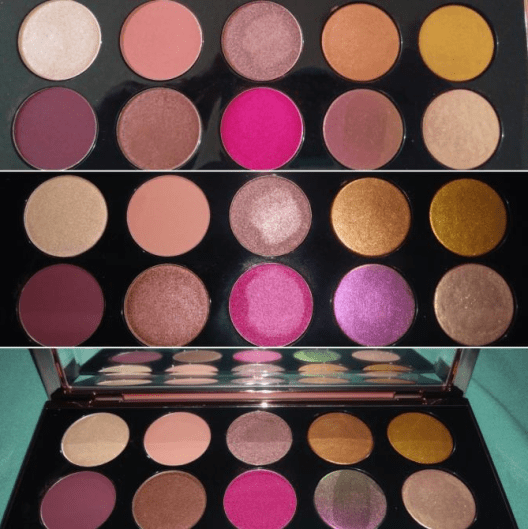
MOTHERSHIP VIII: DIVINE ROSE II
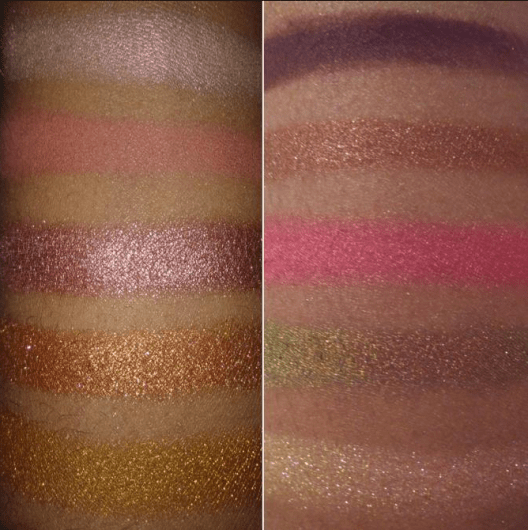
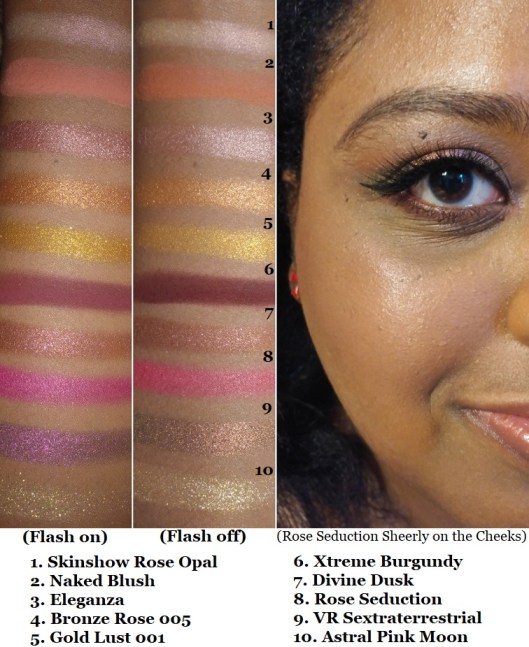
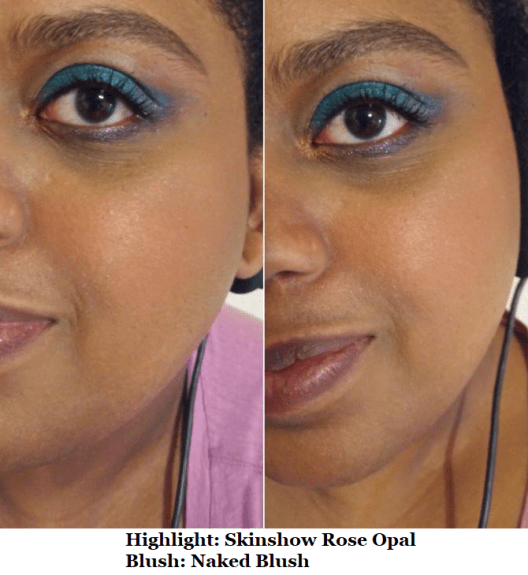
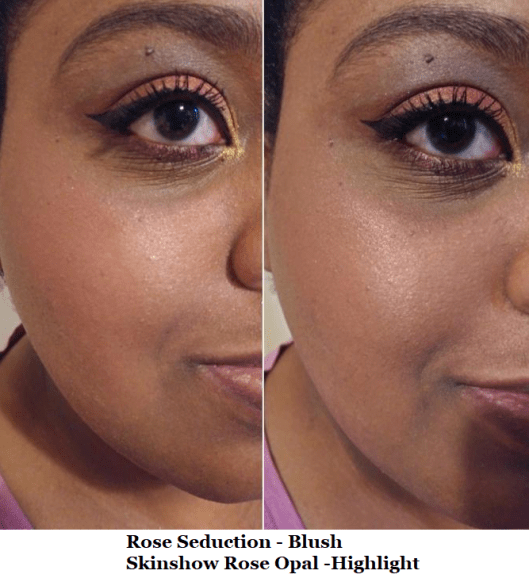
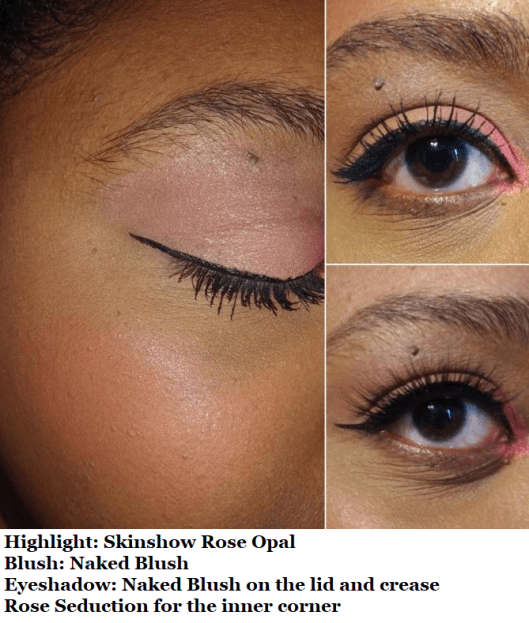
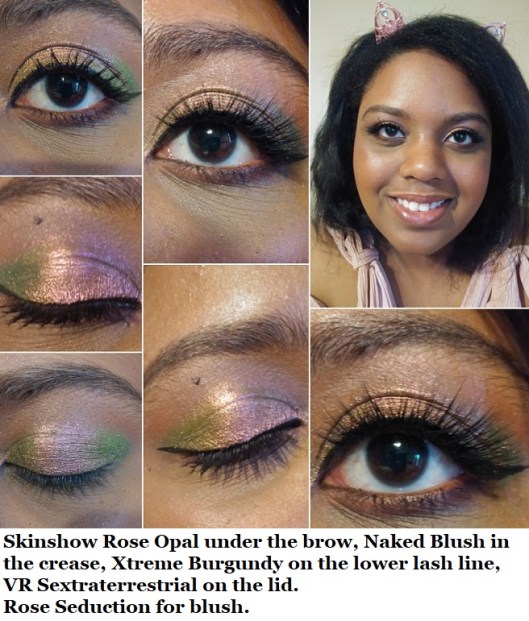
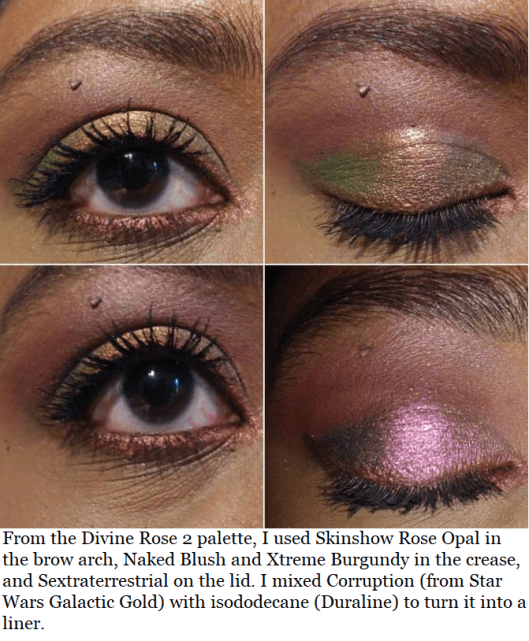
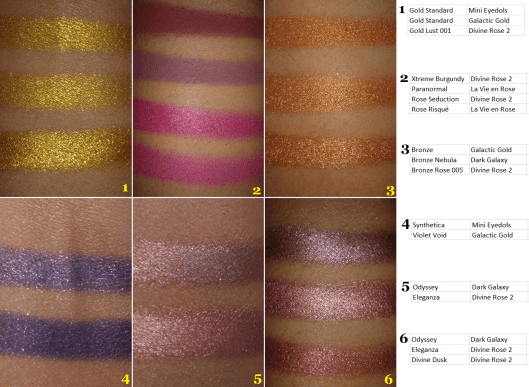
This palette somehow turned me into a pink eyeshadow lover! The shade Rose Seduction is considered safe in the EU, which is often ahead of the US in terms of cosmetic safety, but the FDA hasn’t updated their stance on eye-safe pigments, so this is an “artistry” palette rather than an “eyeshadow” palette. What sold me on trying this out is that Kinkysweat on Youtube suggested that Naked Blush and Rose Seduction could be used for blush, Skinshow Rose Opal as a highlighter, and Astral Pink Moon as a highlight topper. It turns out that both Rose Seduction and Naked Blush work as a blush for me since Naked Blush deepens up when applied to the skin. Rose Seduction also looks like it would be far too bright, but it’s subtle looking on my cheeks with my Chikuhodo blush brushes. I don’t like Astral Pink Moon on the cheeks because of how glittery it is, but Skinshow Rose Opal makes a fun pinkish gold highlight.
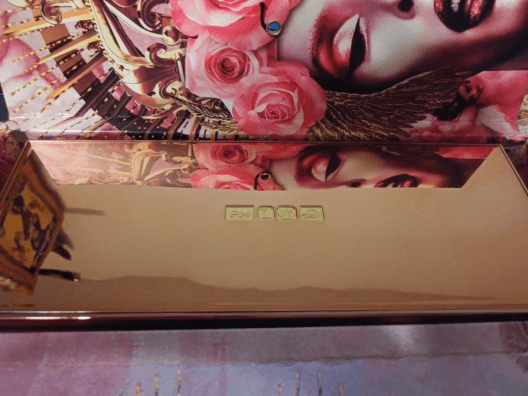
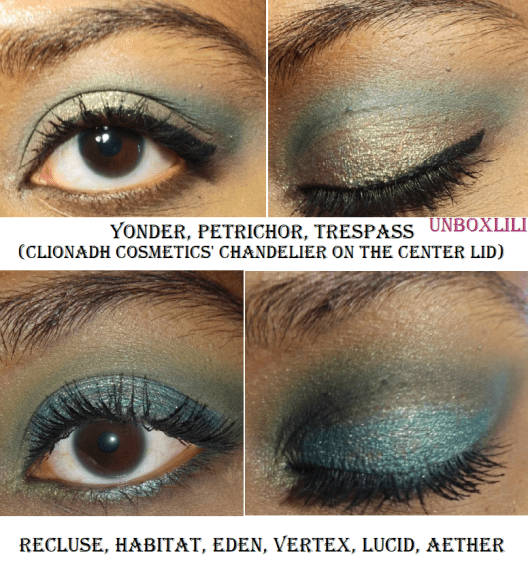
As I mentioned in my Eyeshadow Tag post, despite how nice the quality of these eyeshadows are, I still feel they’re a bit overpriced. However, the multi-purpose shades, the Sextraterrestrial Trichrome, and the limited-edition packaging made this palette worth getting. I am obsessed with the Sextraterrestrial eyeshadow! Clionadh Cosmetics’ Forge multichrome is a close dupe for the shade, though that one packs more of a punch based on the photo comparisons I’ve seen. Ironically, the color never interested me when I placed my Clionadh orders, yet when I actually tried Sextraterrestrial on my eyes, I suddenly saw the beauty and allure of the shade combination. At some angles it looks neutral on me but then the light catches it and suddenly BAM! You’re hit with a gorgeous color shift. It doesn’t pick up the best on camera but it’s so stunning in person. You can even see the shift depending on the lighting within the pan (and how it is reflected in the mirror of the palette).
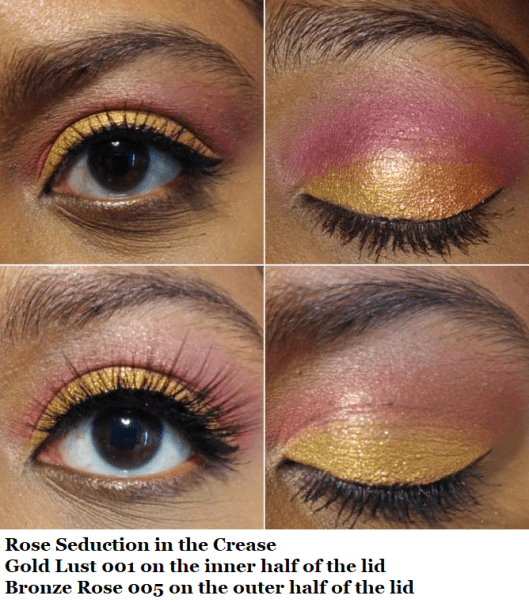
The only disappointment I have is the addition of both Bronze Rose 005 and Gold Lust 001 because the differences in those two shades aren’t distinct enough on my eyes. Considering how specific this color story already is, and being limited to ten shadows, I would have liked the gold eyeshadow (which she has plenty of across all her palettes) to be replaced with something else. Also, Eleganza and Divine Dusk look similar next to each other on my lids as well. Regardless, I’m still glad I bought this.
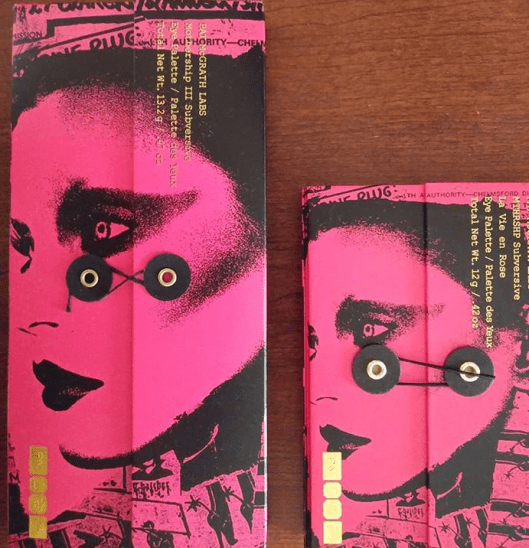
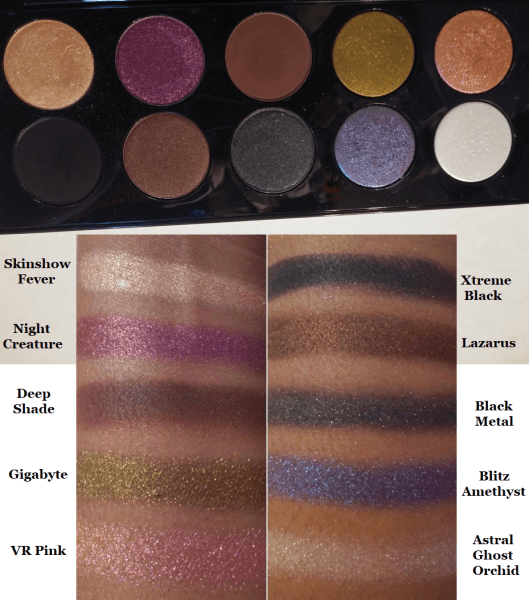
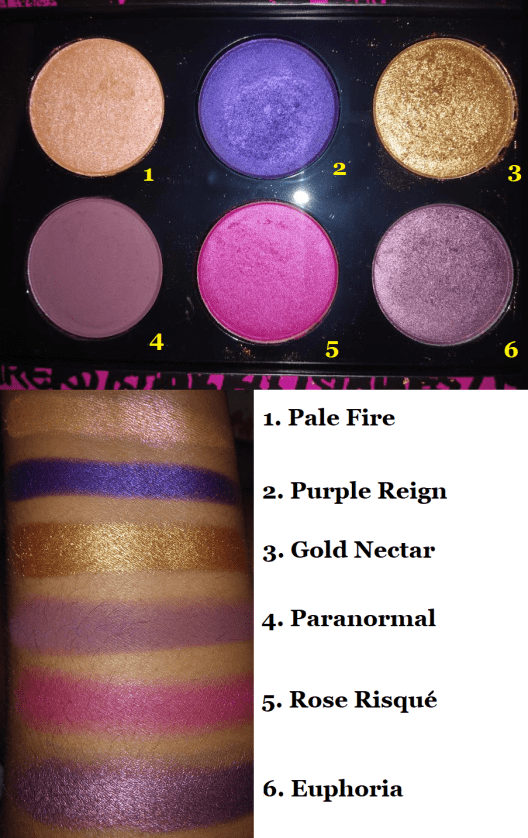
MOTHERSHIPIII: Subversive and MTHRSHP Subversive La Vie En Rose
I’ve discussed the Subversive palette in my Eyeshadow Tag post, so I will just update that I’m still enjoying it very much. This was a new purchase this year, but I bought the smaller palette several years ago. La Vie En Rose is starting to near the end of its usability, as the shadows are starting to get crumbly. It smells fine, but textural changes are indicating it is time to stop using this soon. It was a limited edition product, so I cannot repurchase it. Purple Reign is the only color I would miss, but I do have extremely similar purples from other brands.
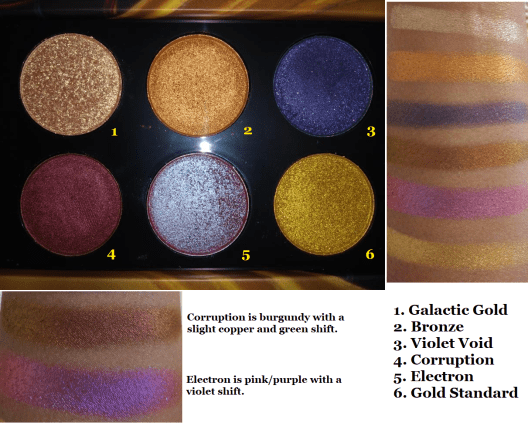
Star Wars Galactic Gold and Dark Galaxy
Aside from swatches when I first bought this, I haven’t done looks with the Star Wars palettes until this post. I originally felt a bit disappointed since the shades didn’t look how I expected in person, and I didn’t know how to pair these colors together. However, when I originally swatched them, it was on bare skin and I have since learned that several of Pat Mcgrath’s best eyeshadows require a sticky/tacky/wet base to show the true impact of the shade. I didn’t realize the shifts in some of these until I started working on this post. Now I am so glad I bought Galactic Gold! The duochromes make it a better purchase than Dark Galaxy because the shades in that palette aren’t the type I reach for that often and aren’t particularly memorable. These palettes were limited edition but anything limited edition with a high demand always comes back from this brand.
Also, I like that these palettes don’t have the flap top that the other 6 pan condensed palettes have because it’s easier to store, open, and keep open.
As for repeats, there is a shade called Corruption in the MTHRSHP Sublime Bronze Temptation palette and Smoked Amethyst in MTHERSHP Subversive Metalmorphosis palette that both appear in the Star Wars Dark Galaxy palette. The shades Bronze and Gold Standard from Subversive Metalmorphosis are in Star Wars Galactic Gold. Gold Standard is also in the Decadence Palette and Mini Eye Ecstasy.
Mini Eye Ecstasy: Subversive
I bought this tiny palette to try and satisfy my desire for the Decadence palette, which hadn’t restocked at the time and I also couldn’t justify spending so much on a palette without the “special” shades. The color curation is gorgeous, but I’m so glad this mini exists. For me, this was a much better way of getting the shades I wanted most without spending an arm and a leg.
Final Thoughts
I really enjoy these shadows for the luxury experience and performance. However, there are brands with a larger range of eyeshadows that don’t have as many duplicates as Pat Mcgrath does. Her collection is comparatively too small to have so many repeat shades. And besides using the actual same shades, there are still those with different names that are similar to each other as well. When you’re spending so much money on palettes, the last thing you want is to essentially purchase the same thing multiple times. So, that’s one of the reasons I’m very selective about which palettes I buy and why I spent so much time discussing comparisons in this post for those who want to avoid this issue as well. Aside from that, the quality of Pat Mcgrath shadows are very nice and in some ways worth the hype.
My first Coloured Raine purchase was in November 2017. For two years, their eyeshadow formula was in a league of its own at the top. I even preferred it over my expensive Viseart, Natasha Denona, and Pat Mcgrath shadows! This year, I took a deeper dive into other indie brands’ makeup. Although I no longer know which brand can claim the #1 spot in my collection, Coloured Raine is still tied at the top. Their gorgeous forest green shade, Forbidden, is my all-time favorite eyeshadow (not counting duochromes or multichromes). I purchased nearly all their eyeshadows, and I even have a few duplicates, because I love them so much! However, rather than trying to complete my collection, this post motivated me to pull a Marie Kondo on all my single/depotted shadows and just keep the ones I love.
Because the quality of Coloured Raine shadows are so consistent across the board, there isn’t much to say about them except that they’re highly pigmented and blendable with the smoothest creamy texture. This is the case among all types: mattes, shimmers, metallics, etc.
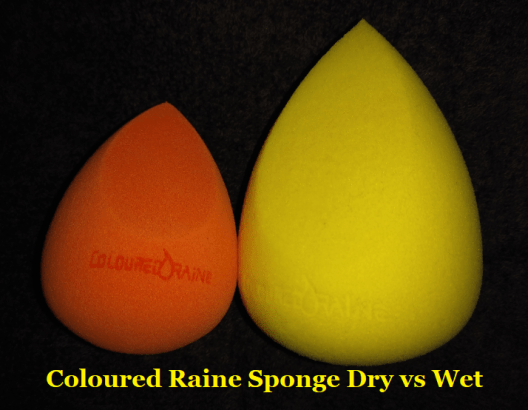
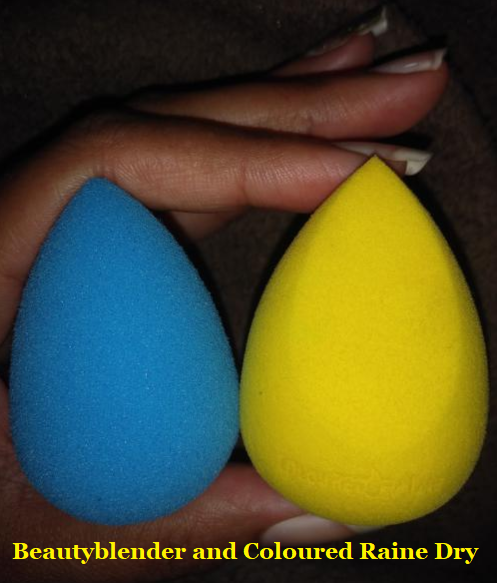
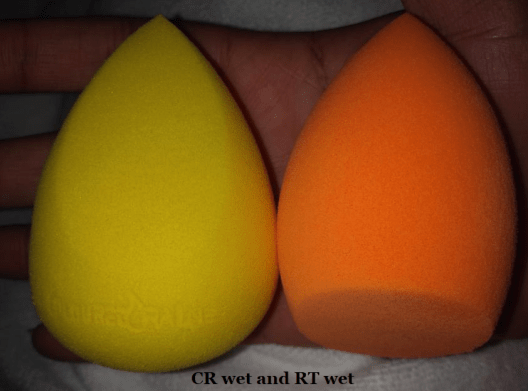
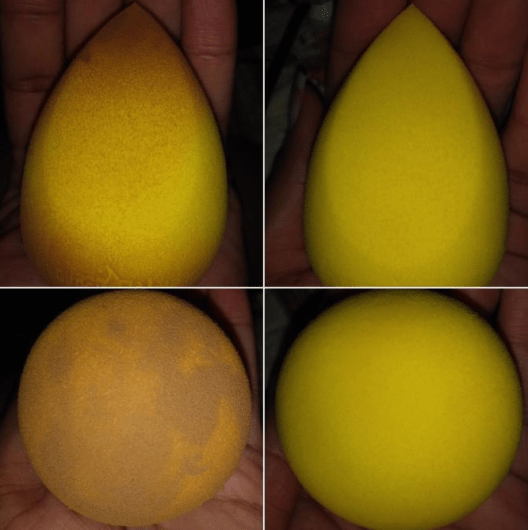
I will make note of any shades that stand out for negative or especially positive reasons. I will also be discussing more than just eyeshadows. This review will include comments on a few blush/highlighter duos, sponges, and empty magnetic palettes.
THE EYESHADOWS
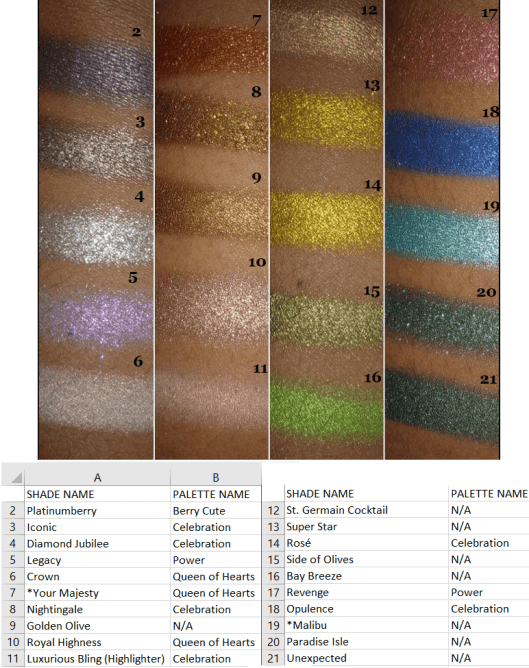
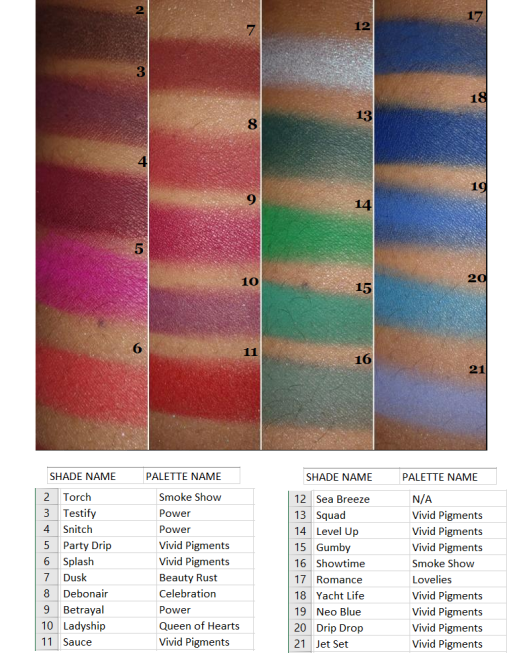
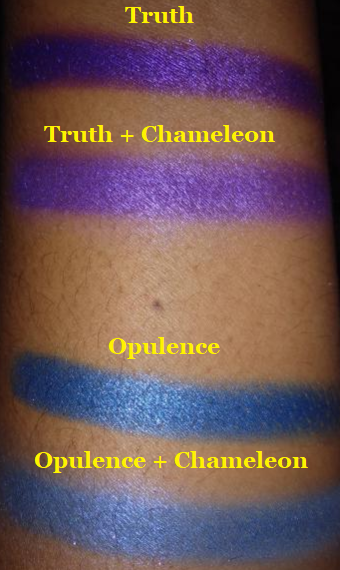
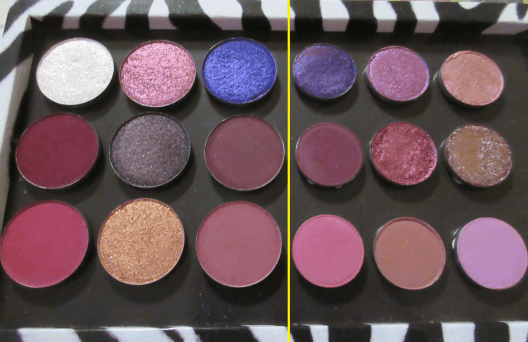
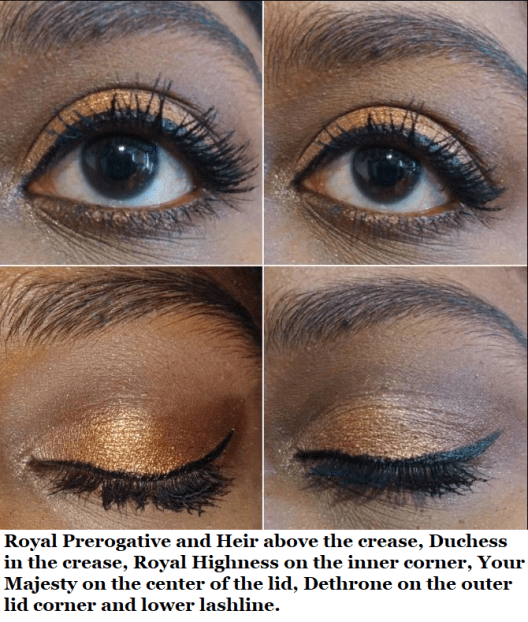
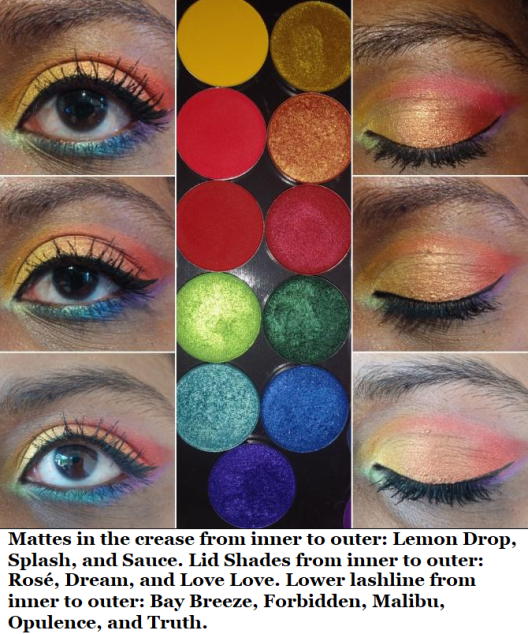
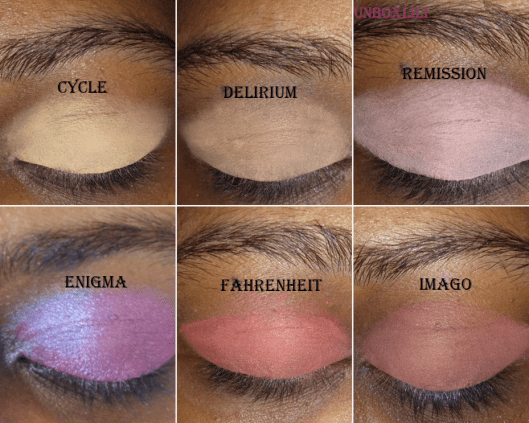
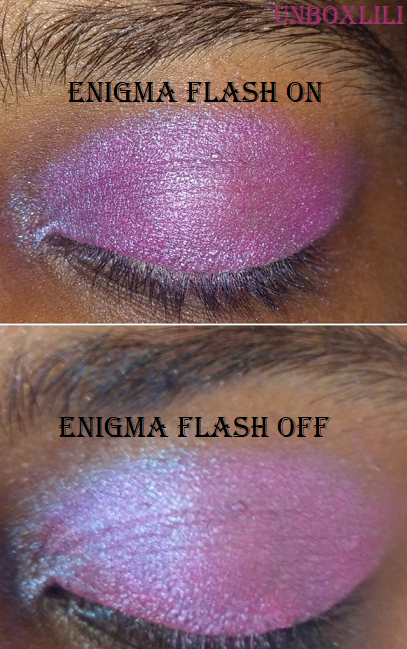
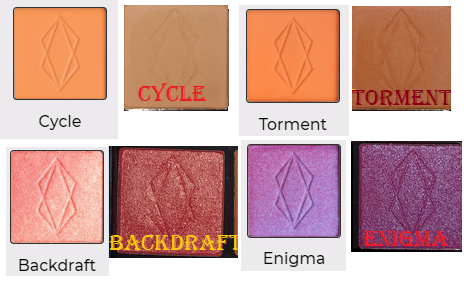
There was a time when I purchased Coloured Raine shadows to make quads as Christmas gifts. Your Majesty (which I somehow had three backups in my collection) and Malibu from this set of swatches were among them. I should note that I did take Super Star out of my collection since it was so similar to Rosé. I parted with Nightingale as it is too common of a color. Paradise Isle looks like a more sparkly version of Unexpected, yet I couldn’t part with either shade. I was also surprised to discover the Blue Magic shade I’ve purchased for others, I didn’t have in my own collection. I kept seeing Opulence and assumed it was Blue Magic. In the pan, Opulence has a purple tinge that doesn’t translate to the eye, as the purple disappears once it’s rubbed onto the skin. Since I’m just left with bright blue on my skin, I wonder if I’m still missing out by not having the Blue Magic shade. It looks like it might just be a darker version. If I get it in the future, I will update this post as usual. I also have to comment that Legacy is such a cool shade! It’s whitish-pink in the pan but pinkish purple on the eye, making it a nice topper shade. As with other iridescent shades, I wouldn’t use this on its own, except for the inner corner or as an interesting brow highlight.
I have enough dark greens, so I removed Grandeur from my collection. Noblewoman won over Passion. And even though Smoke Screen was the only black shade with gold shimmer in my collection, I rarely use any form of black other than matte, so I took that out as well. I would like to reiterate that this had nothing to do with an issue of the formula. I was so tempted to keep them all, but I needed room to add Safari Raine and the upcoming Juicy Boost collection. I could have used another empty magnetic palette (I have so many) but I don’t think I need over 100 eyeshadows from any single brand.
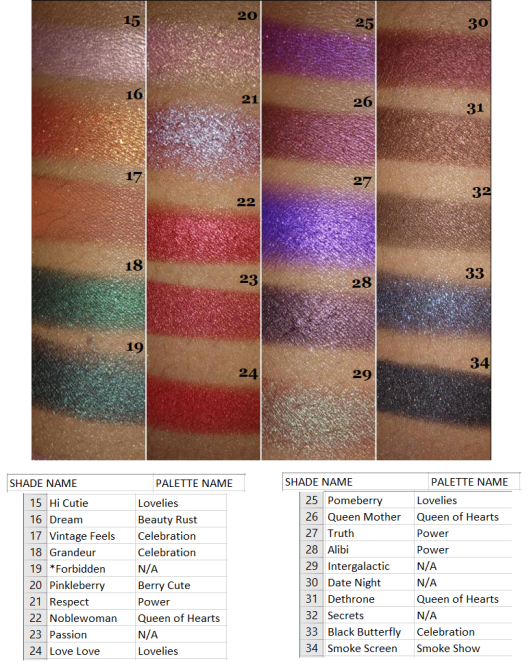
I got rid of all the white shades in this set. I’ve never had use for a white eyeshadow, and I prefer using highlighters to highlight under the brow or to use a cream shade to blend out shadows. Choosing between the dark brown shades was surprisingly difficult, so I only removed Chocolate since it looks like the kind of brown I have the most repeated in my collection.
I got rid of Snitch and Torch for the same reason as Chocolate in the previous round of swatches. I noticed that the palette with the most shades I decided not to keep was from Smoke Show. Prior to getting the Safari Raine palette during the last restock, Smoke Show was the last palette I added to my collection as it had the least appealing color story for me. The shade I wanted most, Showtime, I didn’t keep either as it couldn’t compete with those stunning Vivid green pigments.
Side Note: I’ve always wondered if Coloured Raine is the reason Colourpop had to discontinue selling their Smoke Show palette and rename it Blowing Smoke. Coloured Raine’s palette came first and the name is trademarked. Even though the color story between the palettes is different, I believe one of the stipulations of a trademark breech is if it would cause confusion. Since they both have ‘Colour’ in their names, to have the same palette name on top of that seems like sufficient grounds to me!
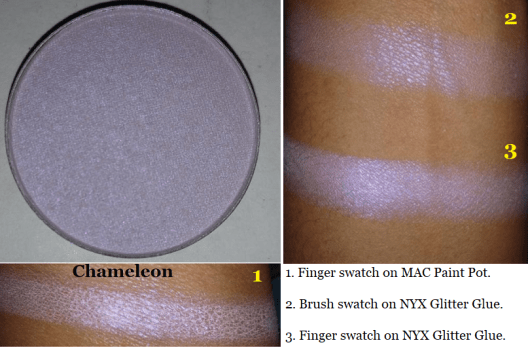
I purchased the shade Chameleon with my Safari Raine order, so I’m including it here as well. It’s a purple iridescent shade that I don’t think looks that nice on its own. When used as just an inner corner highlight, it had an interesting darker purple glow, but it’s not the texture or pigmentation that I’m looking for. The swatches for this shade I intentionally built up to see what’s the maximum pigmentation I could get when certain spots refused to deposit color, and I was still not happy with the results. I would rather reach for an iridescent from other brands over this one. It’s one of the few shades in their entire collection that I wouldn’t recommend. The one application I’ve found to be somewhat useful for this is adding a lighter pearly finish when topped on other shades. I recommend just skipping this one.
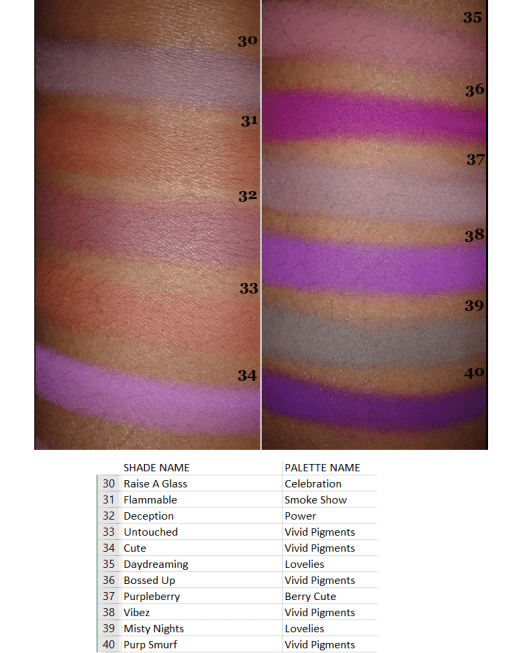
The Celebration palette had the second most eyeshadows I decided not to keep, having decluttered 5 out of 13, which is still a decent amount to have kept. Raise a Glass, Flammable, and Misty Nights were removed. As a purple eyeshadow lover, I would love having a lot more purple shimmers from Coloured Raine. The Power palette definitely satisfied some of my purple eyeshadow needs, but I will always want more, even though I have plenty of purples from other brands. Here is a comparison of CR’s Power Palette to CP’s As You Like It palette.
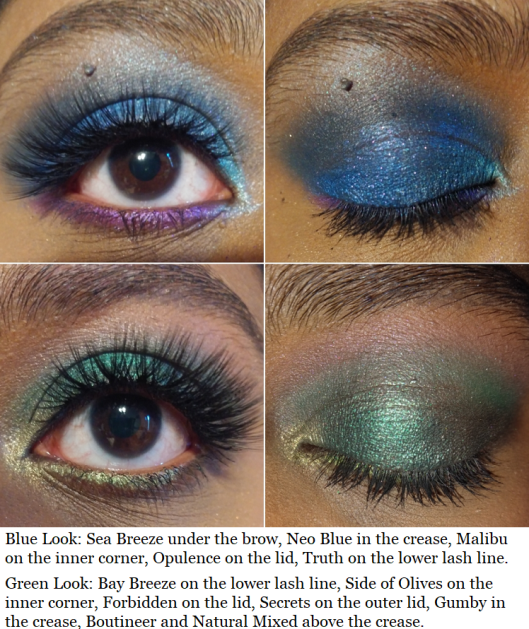
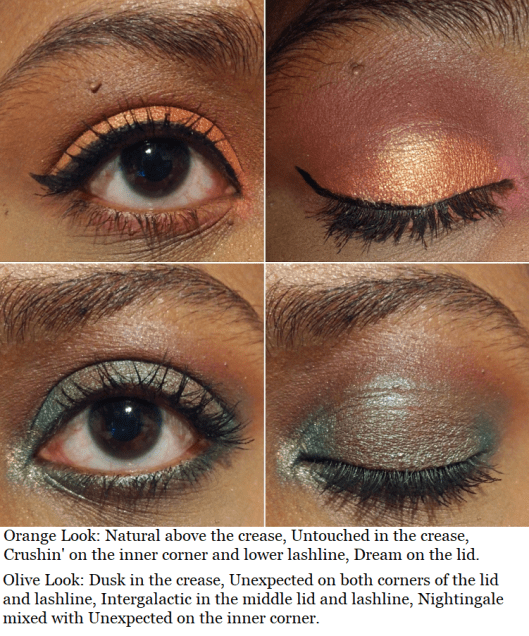
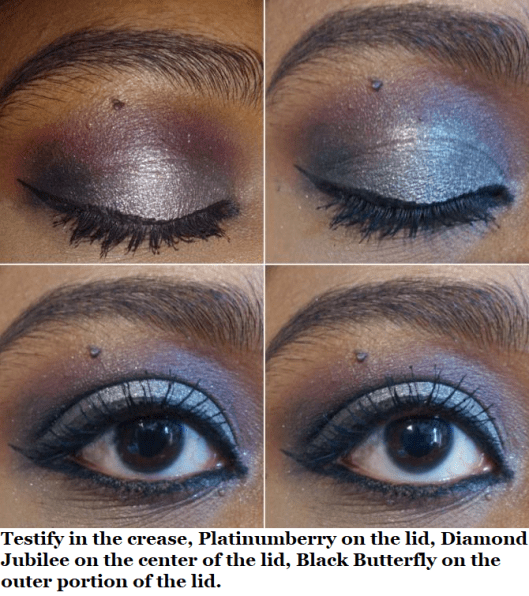
And here are some eyeshadow looks!
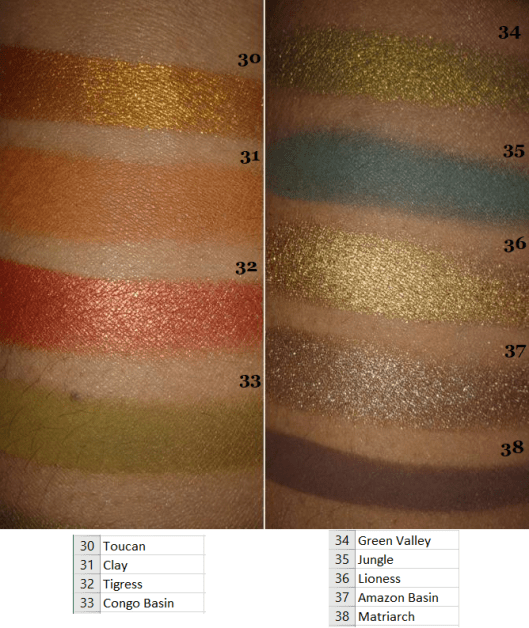
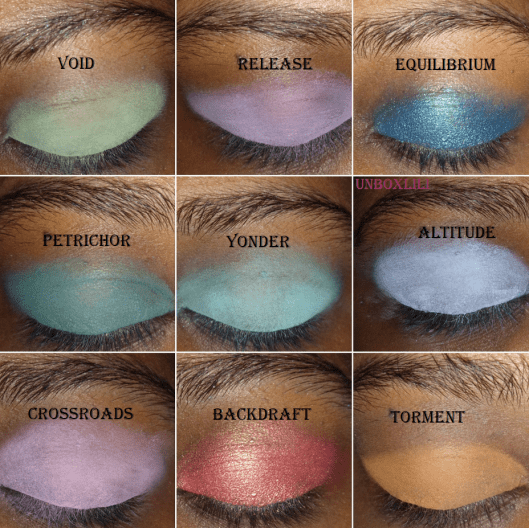
SAFARI RAINE
CR had one final restock of this palette, so I have it in my collection now! They’re also selling the shades individually, which is appealing since I planned to depot the shadows anyway. However, at $6.99 each, that would cost $62.91 to get them all when the palette is just $29. I have no issues with Coloured Raine charging them at their standard eyeshadow price. I just made the most cost-effective decision and I’m glad they kept the original Palette price instead of raising it due to the hype that Jackie Aina played a part in restarting.
Although I’ve only had time to use this twice, I would say that the quality is on par with the other shadows. The only shade I had a little trouble getting to show on my skin was Congo Basin (even after trying with the ABH primer which I use to make shadows really stand out). Even to the touch, it felt a little grittier than the others. It reminded me of the texture of the Snitch from the Power palette that I didn’t like. Purples of that shade do tend to have that texture, but I’ve never had a green eyeshadow feel like this. Regardless, I did manage to get it to show a little.
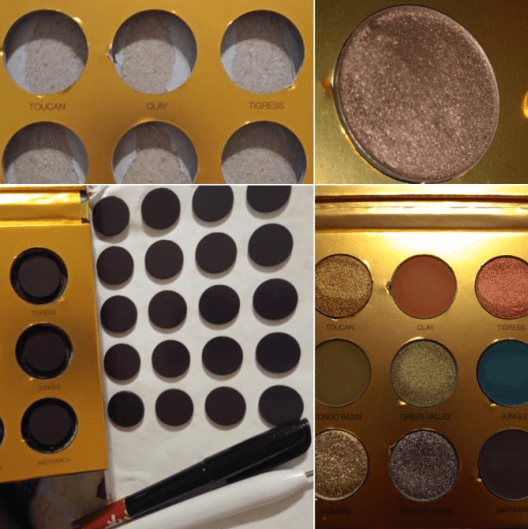
Because the palettes were so sought after, I felt bad about completely getting rid of mine after depotting it. So, I turned it into a magnetic palette. I removed the shadows from the palette, colored the wells with black marker (I didn’t want to wait for black paint to dry) just to make it look more aesthetically pleasing. You can cut around the magnet to fit the size of the wells (keeping the sticker on the back) and place the pan inside to make sure the magnet isn’t too thick. Although I had thinner magnets and magnetic sheets, I wanted to use up my thicker ones, so I used them anyway. It made the pans stick out from the top a little, but the lid still closes, which is most important. I stuck all the magnets in the wells and that’s it! When depotting, I always clean off the glue (this time using Parian spirits) and place a sticker label on the bottom so I can remember the shade name and palette it came from.
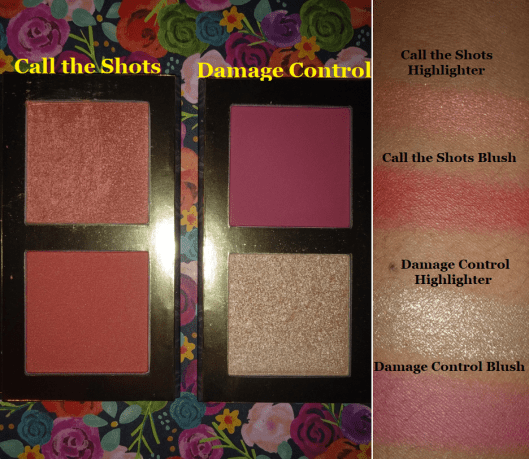
The Blush/Highlighter Duos
I have 2 out of the 4 Blush and Highlight Duos from the Power Collection. I didn’t buy the one called Prove My Loyalty because it has an icy white highlighter best suited for pale-light skin tones and a dark red matte best suited for dark-deep skintones. Anyone can wear any makeup they want, but the pairing of those two was…an interesting choice in my opinion. I’m not sure how many people can find use for both of those together. I also didn’t purchase My Day One because both the highlighter and blush looked like they might be too dark for me.
I purchased Damage Control first. Here are some old photos with it.
I like the blush portion. It’s very pigmented, so it requires a light hand or very fluffy brush with it. The highlight shade is beautiful, but too glittery for my taste. I prefer finer shimmer particles in my highlighters.
The other duo I purchased is named Call The Shots. The blush has a little more warmth to it, which suits me a bit better, although the color difference between this blush and the previous one isn’t that obvious when I use a sheer application. This highlighter has more of that shimmer finish I prefer, but I typically don’t reach for this shade. I love golds. Lately, I have been more interested in blush toppers, which this color is great for, meaning it won’t go to waste. I just know I won’t use it as often as I should.
These duos are fine, but don’t really ‘wow’ me. Although I don’t think $25 is too much considering what you’re getting, if you can snag them for 50% off (as they’ve been on sale multiple times) then I’d be more likely to say they’re worth checking out at that discounted price.
THE SPONGES
I don’t know why I keep buying sponges when I’m 90% more likely to use a brush to apply my foundation and concealer. If I don’t use a brush, I use the Blendiful from Tati Beauty because I can get my products on and blended in half the time.
In any case, the only traditional beauty sponges I have used so far are from Beautyblender, Real Techniques, and Coloured Raine. The Real Techniques sponge is nice, but the one from Coloured Raine easily surpasses it. I cannot decide which I like more, though, between BB and CR because they both are better at different things.
Softest: When it comes to the softest sponge, Beautyblender wins. The Coloured Raine sponge feels a bit dense when dry but softens up after it is damp. It swells to the largest size among the three sponges. The Real Techniques sponge is a lot harder and remains a bit hard even after being wet.
Precision: The pointy tip of the CR sponge fits perfectly in the crevices around my eyes when applying concealer. It easily wins, followed by the RT flat edge and finally the BB which has no flat edge and the tip is still a bit rounded, which impacts the precision. That being said, I don’t often use a sponge with my concealer, as I want the most coverage under my eyes and a sponge does sheer things a bit. So, this benefit isn’t the most useful in my everyday life. However, when I was on vacation last year and wanted to bring minimal brushes and wanted a backup sponge, I took the CR sponge instead of a BB.
Smoothest Foundation Application: A nice blended look can be achieved with all the sponges, but the BB does it the fastest, followed by the CR one.
Easiest to Clean: The BB and RT sponges take about the same time. They work well with the Beautyblender solid soap. The CR sponge is the hardest to clean and doesn’t work as well with the BB Solid. I have better results when I use my regular makeup removing face wash on it. It’s possible that I perceive it as being more difficult to clean because I’m using the yellow one, which is probably easier to see stains. I won’t know until I start using my orange (or green if I can find that one) CR sponge in the future.
Most Durable: The CR sponge definitely lasts the longest and hasn’t torn on me yet. My RT sponges start to get tears in them after the first 3-5 uses thanks to my long nails when I’m washing them. My BB sponges tear on me between 1-3 uses. I don’t know if there has been any changes to the beautyblender because the first two I ever had years ago had to be thrown out before it ever tore. But now my beautyblenders don’t last as long.
Prices: RT = $5-$6. CR = $6. BB = $20.
Side note: BB sells silicone (or silicone-like) cases to put sponges in to let dry and keep away from dust and other particles. You can find adorable dupes for 50-75% cheaper on sites like Amazon and Ebay. I have the official one along with the dupes and although the official one is thicker/sturdier with more breathable holes, there isn’t that much of a difference. My kitty ones get the job done and they even have ridges on the bottom that lets them stand upright, unlike the official one.
EMPTY MAGNETIC PALETTES
I have the Book of Shades (which holds 72 standard size eyeshadows), four of the 96 pan Power palettes, and one purple 96 pan palette. The collector in me still wants the pink one I don’t have.
On my previous trip, I made use of one large z-palette, but I missed having an even wider variety. That’s why I bought the Book of Shades. I wanted it for times I plan to travel for longer than a week.
The Book of Shades fits comfortably at the bottom of my makeup train case and is a safer way to house my shadows than carrying multiple palettes separately. It’s heavy but that’s the tradeoff for being so sturdy and keeping the eyeshadows secure.
There are 3 pages (each page holding 25 pans) and each page has removable plastic sheets that you can write the shade names on with a dry erase/washable marker. Or perhaps in permanent marker if you don’t intend to swap them out. I’m not sure. I don’t have a need for the sheets since my shadows are all labeled on the bottoms of the pans, but it’s a nice addition. There’s also a mirror on the other side of the cover.
I’ve talked about the 96 pan palettes multiple times on my blog. I can’t take it traveling, but I prefer having these over the book of shades because of the freedom of being able to place any sized eyeshadow pan I want in them, it holds more shadows, and I can see everything at once. It’s harder for me to figure out what shades I want to use when I have to flip back and forth between pages. That’s why I also prefer this over the smaller sized flat empty magnetic palettes. The last photo is what my palette looks like now.
That’s all I have for today’s post! I tried to keep it short after my massive Japanese brush review. Although I enjoy making large comprehensive posts (for ease of keeping everything in one place), it means they end up being incredibly long. That’s why I decided to wait until I could at least include Safari Raine in the review, though not long enough to wait for the Juicy Boost collection. At the time that I’m writing this, we haven’t seen anything yet besides the outer packaging.
**With costs of materials ever increasing and supply of certain hair types being harder to acquire, brush prices also increase. So, the prices I’ve listed might not reflect what is current, though I will do my best to keep them updated.
***DISCLOSURE: All products in this post were purchased by me with my own money and prior to me being part of any affiliate program.Unhighlighted links in bold blue font (Example) are non-affiliate links that will not generate commission. The vast majority of links on this blog are traditional non-affiliate ones. Links marked in bold black font with a light blue background (Example) are affiliate links. Affiliate links allow me to get a commission if purchases are made directly using my links. The price of the product is not affected by these links, and anyone who uses them would be supporting this blog. Whether you click to shop through them or not, I appreciate you visiting and I hope you find the information I’ve provided helpful!
What Makes These Brushes Special?
Kumano is called the world’s brush making capital and it is where all the brushes I’ll be talking about today were created. Chikuhodo has a detailed explanation of the process that artisans go through to handmake these brushes. For generations, the brush makers in Kumano have been honing their craft, making world-renown calligraphy brushes, paintbrushes, and then segued into makeup brushes. The finest hairs are chosen, and nothing is machine cut. The tips are left on, which adds to the silky-soft feel. These brushes are never scratchy! Although most of these companies use natural hair, especially for their elite lines, there are some brands like Hakuhodo, Chikuhodo, and Wayne Goss who have some synthetic brushes in their lineup.
BLUE vs GREY SQUIRREL and CRUELTY-FREE STATUS
Before we get into the review, I’d like to address the discrepancies that are sure to come up, such as some brushes being listed as Blue Squirrel on one website and then Grey squirrel for the same brush on another site. Red squirrels and Grey squirrels are confirmed to be different, but I’ve seen conflicting information as to whether blue and grey are the same.* It ultimately is up to the manufacturer to decide what it is and how it should be listed. I thought perhaps it came down to the location the hair came from, the color of the bristle, or the quality of the hair. The ones listed as blue that I have seen tend to be darker, almost black. Whereas those listed as grey when I bought them look dark brown. However, the tail colors of actual grey squirrels fluctuate seasonally between brown, black, and silvery gray, so I realized that couldn’t be the right answer.
I have only found one source that specifically lists a name for a blue squirrel (or at least a squirrel with blue-black tail hair) which is called Saccamina or Sacamena.
Even on Sonia G’s blog in 2012, she makes a distinction between the two types, but in her Surratt review from 2015, she calls them the same.
I contacted Beautylish asking if blue squirrel comes from a grey squirrel or if they are different, and the customer service representative told me they are not the same. That they feel the same but grey is less expensive than blue. I contacted FudeJapan and they told me the opposite information. That they are the same. So finally, I emailed Chikuhodo and the representative wrote back that blue and grey are the same. That in Japan it is usually marked as grey and that western markets tend to call it blue. This makes sense to me when I thought about how Beautylish and the US Hakuhodo website are the only ones I’ve seen with blue squirrel brushes, compared to what is available on CDJapan or Fude Beauty’s websites. So, from this point forward I will consider grey squirrel and blue squirrel to be the same.
*UPDATE: 04/2022 According to this source, red squirrel hair is the red hair from a grey squirrel.
As for the cruelty-free status, there is this idea that has been going around for years that the fur from wild animals have been gathered from catching, brushing, and then letting them go, or that they were humanely kept in cages to be brushed. This is a concept that retailers like for us to believe because it’s a much sweeter tale than the reality of the situation. This might sound feasible for domesticated animals in abundance, such as goats and ponies which their hair can be combed, sheered, or cut, but this concept for rarer hairs like squirrel and silver fox isn’t realistic. Even with goats, the quality of hair isn’t the same across the entire animal. The chest is the coveted area, but the quality is different even within that section: Saibikoho, Saikoho, and Sokoho. If squirrels had to be brushed every day to produce a few loose strands that haven’t already fallen off while they ran around, it would take years to make just one hundred brushes and the cost would be astronomical.
While combing/brushing, sheering, and cutting hair is cruelty-free, if the animal was killed for their meat or as pest/population control in a region, the procured hairs are considered a by-product of the industry, which allows them to also be labeled cruelty-free. Meaning, if the animal was not killed specifically for its fur, it is considered cruelty free. I don’t remember all my sources, as some of my research was done in 2017, but I came across this comment from Temptalia where Hakuhodo mentions that even goat hair is obtained from “butchers.” This further supports my belief that most cruelty-free natural hair fibers are not obtained from brushing or sheering. The majority are sourced when the animal is no longer alive.
It is quite a messy topic that I don’t feel informed enough to debate the ethics of the situation. I’m just providing the information I’ve obtained over the years, though I feel my information is still just as limited.
BRUSH SPECIFICATIONS
As these are all handmade (although I’m not sure about the Hakuhodo / Sephora ones) the measurements vary slightly among the brushes. Any number I measured myself in millimeters will have an asterisk next to it. All inch numbers were calculated by me as well. Regarding the width, the numbers are based on post-wash which will typically be wider than straight out of the package. My width measurements are the widest part of the brush hair.
Also, this post took several weeks to work on. So, some of the photos of the brushes look clean (as they’ve just been washed) and in other photos there is leftover product on them because I took more pictures later on. Natural hair brushes should not be washed as often as synthetic, so to preserve the integrity of my brushes, I did not want to wash these multiple times in a month when I normally only deep clean them once a month.
As to how durable these brushes are, I’ve been using all the Hakuhodo brushes for years and they still look to be in great shape. All of my Wayne Goss brushes I’ve used for years as well, excluding the original Holiday brush (but it’s pre-owned and probably used a lot) and the Holiday 2019 brush. The Chikuhodo Z-3 is the only Chikuhodo brush I’ve had for years, although I barely used it. So, I would consider my overall Chikuhodo brush use timeline to be a few months to a few weeks. My Sonia G brushes, I’ve also only used for a few months.
And my final note is that even though I broke this post into separate sections by brand, it’s difficult to discuss these brushes without comparing them to each other. So, if you’re only interested in learning about the Chikuhodo FO series, for example, just note that additional information might be included in the comparison to the Z series or Wayne Goss brushes. And I will include additional photo comparisons at the very end.
Hakuhodo
Hakuhodo is an OEM, an original equipment manufacturer. OEMs purchase supplies from other companies (for example: fibers, wood, paint, metal, etc.) to create their own products. But generally, the product they make becomes part of another company’s unique creation.
Hakuhodo has its own series of brushes, but they also create brushes for other companies. This is not necessarily the same as private labeling, though OEMs can offer that as well. Private labeling would be keeping the brush identical with just a different label or color. The most basic of changes. Some OEMs offer even more, where their customers can request modifications to their exact specifications: handle size, weight, and width, bristle length, density, hair type, ferrule metal type, pinched or unpinched ferrules, etc. This is done in bulk to make it worth their time and effort. The further the specifications stray from an OEM’s template, the more expensive it will be. Larger companies may work out a deal to keep their unique specifications from being used by anyone else, but others might see the ones they came up with become a new template. The Lunar Beauty vs Makeup Revolution prism highlighter component comes to mind.
Hakuhodo was my first introduction to Fude in December 2014, upon hearing rumors that they might be the ones to make Wayne Goss brushes and some of MAC’s past older brushes. It’s just a rumor I heard; I cannot confirm anything. Though, the extreme similarities between the brush heads among Hakuhodo and WG brushes is an interesting coincidence. And the additions to Hakuhodo’s synthetic line around the time that WG started offering synthetic brushes as well…
Between getting a WG brush and Hakuhodo brush, I started with Hakuhodo as I wanted to go for the brand with the longer-standing reputation. In a sense, I have them to thank for sparking my love of Japanese brushes. Although some of their brushes have gone up in price, everything Hakuhodo makes (minus the Sephora collab) is well worth it.
Hakuho-do + Sephora Pro Fan Cheek Brush (retail $40)
Full Length: *169mm / 6.7 in
Hair Length:* 35mm / 1.4 in
Hair Width: *33mm / 1.3 in
Bristle Type: Synthetic
I didn’t purchase anything from the collection until they went on sale. I didn’t want to pay full price when I was uncertain how much I would enjoy these brushes due to their unusual shapes. I love fan brushes though, so I was curious about how this would perform. It’s soft, but I’m admittedly biased against synthetic brushes for powder products. As expected, it doesn’t feel as soft as the finest goat or squirrel hair and doesn’t pick up powder as well when using this brush on a firmly pressed or baked product. The shape is such that I would only use it for cheek and jaw contour, as well as bronzer in a sweeping motion. It’s a little too floppy for my taste as I find myself holding the brush as close to the head as possible to blend out bronzer and contour. It works fine with highlighter for a more subtle and diffused application. It’s a versatile brush, but not my favorite.
Hakuho-do + Sephora Pro Small Teardrop Pointed Highlighter Brush (retail $38)
Full Length: *180mm / 7.1 inch
Hair Length: *38mm / 1.5 in
Hair Width: *22mm / 0.9 in
Bristle Type: Synthetic
I’m not sure what other uses this brush could have, besides highlighter, but the shape of the bristles makes it just okay for applying and blending highlighter on my cheeks. It’s more precise than the fan brush above, but it still applies powder sheerly. Perhaps I could try this sometime with a liquid highlighter, but this brush ranks low in my entire brush collection, not just among the Fude.
Hakuhodo B5521
Full Length: 172mm / 6.8 in
Hair Length: 32mm / 1.26 in
Hair Width: 13mm / 0.5 in
Bristle Type: Blue Squirrel and Goat
Handle: Wood
Ferrule: Nickel plated brass
This brush used to be $35 as I remember it being the same price, if not cheaper, than the WG 02 brush. I specifically purchased the one from Hakuhodo because it has similar dimensions to the WG, but I wanted to know what a goat and blue squirrel mixture of a brush felt like. I can confirm the former price from a blog post I found dated from 2014, although the current Hakuhodo brush is a little longer. Temptalia has it listed as $53 from 2016, although the hair thickness was listed as 5mm thicker. It is $63 as of 2020.
This was my favorite highlighter brush until it was surpassed by the Wayne Goss Air Brush. It is still very pleasant to use, but the reason I prefer the Air Brush is because of the paddle shape (with its wider surface area to pick up powder). It disperses more product onto my skin and picks up harder pressed powders a little better.
Hakuhodo J142
Full Length: 153mm / 6 in
Hair Length: 18mm / 0.7 in
Hair Width: 6mm / 0.24 in
Bristle Type: Goat
Handle: Wood
Ferrule: Nickel plated brass
Certain styles of Hakuhodo Brushes, like the 142, are part of multiple series’ of brushes. For example, you can get the same Basic/J version that I have with black handles made of wood, a nickel-plated brass ferrule, and goat hair bristles. There’s also the i-142 synthetic version for $6 less, but you’re getting black plastic handles and an aluminum ferrule. The S142Bk is double the price of the B/J version, even though it also has black wooden handles, but the ferrule is made of 24-karat gold plated brass and has squirrel hair instead of goat. The final version is the S142, which has everything the same as the S124BK except that the handles are painted in a gorgeous vermilion shade with the end of the brush as an angled flat surface with the blue and white Hakuhodo logo on it, that if I remember correctly is supposed to symbolize a crane. This was one of my most used eyeshadow blending brushes until I started purchasing Sonia G brushes.
Hakuhodo J146
Full Length: 156mm / 6.1 in
Hair Length: 16mm / 0.63 in
Hair Width: 5mm / 0.2 in
Bristle Type: Goat
Handle: Wood
Ferrule: Nickel plated brass
The 146 is available in multiple series’ as well. It’s slightly shorter and thinner than the 142. Deciding which version is the best depends on the customer’s preferences. The more expensive brush doesn’t automatically make it better. Squirrel hair will give a softer wash of color, softer blend, and softer application. When it comes to eyeshadow, I want a more resilient bristle such as goat hair which is soft but also less fragile. Most of the time I want the maximum color-payoff and not a sheer application that a squirrel brush will provide. That’s not to say the squirrel brush cannot build up color. It would just take longer, especially as these brushes are meant to be used gently. It’s why I prefer squirrel hair for my powder complexion products and high-quality goat hair for eyeshadows. I used to prefer the 142 over this one, but as I got older and my eyes became even more partly hooded, I began to prefer the tip shape of this one instead.
Hakuhodo J5529
Full Length: 153mm / 6 in
Hair Length: 13mm / 0.5 in
Hair Width: 5mm / 0.2 in
Bristle Type: Goat
Handle: Wood
Ferrule: Nickel plated brass
This brush, along with the other two above, are brushes I use in my crease. I love how small they are, so I can do more complicated looks with precision. I have a tendency to carry my eyeshadow too far up, so using smaller brushes helps me with that. This brush has similar dimensions with the Sonia G Mini Booster, making it tied for smallest crease brush in my collection.
Hakuhodo J5523
Full Length: 151mm / 5.9 in
Hair Length: 16mm / 0.63 in
Hair Width: 4.5mm / 0.18 in
Bristle Type: Goat
Handle: Wood
Ferrule: Nickel plated brass
This brush is available in a variety of fibers: goat, horse, goat/horse mixture, blue squirrel, and synthetic. This brush is commonly touted as the equivalent of the MAC 217, Wayne Goss 18, and Sonia G Worker Pro. I don’t use this brush that often, as I feel more comfortable using my cheaper brushes with this head shape (until the Sonia G Builder Three). Though the shape is more beneficial for packing/patting, I sometimes use this to apply a wash of color above the crease or blow out one shade.
Chikuhodo
Chikuhodo is also an OEM, having made brushes for Suquu, RMK, Lunasol, etc. Chikuhodo is my favorite brush manufacturer. The hairs they procure and their skill at bundling and shaping their brushes is top notch. If I want a classic and traditional brush shape, there’s no one better to go to than them. In addition, their specialty handles appeal to the luxury lover in me and it makes their brushes that much more special to not only use, but also display. Many Chikuhodo brushes are like works of art. Their brushes are so sought after that counterfeit brushes started being made in 2018, so purchasing from a reputable seller is important in experiencing the true quality of their products.
A timeline of the company’s history can be found here and more in-depth information on the accomplishments of Chikuhodo and how they grew into a powerhouse can be found here.
As with most of these brushes, the price differences vary greatly between Beautylish, Fude Beauty, CDJapan, and VisageUSA. Beautylish is the most expensive, but the shipping is free in the US for orders over $35. This makes it cheaper for me, than say CDJapan whose prices might be ten or more dollars cheaper in total, but because of the pandemic, the cheapest shipping option is $24. If I spend over $112, specifically on makeup brushes, then CDJapan is cheaper. CDJapan also has a points-for-cash program, which can help, but their prices are in yen which means Paypal will charge a small international conversion fee, which could make prices about the same as other retailers. Another thing to factor is the strength of the YEN versus the currency of the customer. For example, at times when the YEN is weaker than USD, a retailer like CDJapan, Fude Beauty, and Fude Japan whose websites automatically adjust prices based on the currency value would give me a better price than Beautylish or VisageUSA which have set prices. I would suggest taking your time when deciding the most cost-effective options among these retailers. One thing I wish I knew beforehand is that Visage offers $2 engravings on some of the brushes. The engravings plus occasional sale up to 25%, depending on how much you spend, make it an alluring option.
Chikuhodo MK-KO Powder Brush (Carp Design)
Full Length: 167mm / 6.6 in
Hair Length: 52mm / 2 in
Hair Width: *40mm / 1.58 in
Bristle Type: Grey Squirrel (listed as “Ash Squirrel” only on the Beautylish website)
I jokingly refer to this as the Rolls Royce of my brush collection. This brush was released at the end of April 2020 and is part of Chikuhodo’s Makie Series. It is described as a collaboration between Chikuhodo, the lacquerware brand Yamanaka-Shikki, and mural artist Hideki Kimura for his Koi design. The subtle sparkles in the paint on this brush were caused by the Maki-e process of powdered gold, silver, and/or other precious gems being dusted onto the design while the lacquer was still wet. The brush head looks huge because the bristles are extremely long while also being the standard width of a large powder brush. However, when turned, you can see that it has a flatter side. This is not a dense buffing type of brush. I find it’s more of a finishing brush to either sweep powder all over the face or dust away any excess powder.
Another thing to note is that the handle of this brush and the Z-1 are quite chubby and feel on the verge of being too big, despite the fact that I have large hands and should have no issues with large handles. I don’t mind this handle size for the MK-KO because it doesn’t need to be practical when I may just stop using it and keep it on display instead. The Z-1 could have benefited from a slimmer handle. I like that Chikuhodo gave us smaller ones in the FO series, including indentations that show the best spot to grip each brush.
External Dimensions: 215mm x 100mm x 50mm (8.5″ x 3.9″ x 2″)
Inside Dimensions: 200mm x 85mm x 30mm (7.9″ x 3.4″ x 1.2″)
This box is the tortoiseshell black color, but it’s also available in red and beige. I bought this originally for my MK-KO but I’ve since found a better storage method that won’t disturb the bristles from laying flat.
This brush head is completely round-shaped. I incorrectly assumed it would be the same width as the Z-8, but it’s much smaller. Although the shape is round and can be used in a circular buffing motion, the bristles aren’t very dense and flatten enough to feel like the kind of brush you’d use to sweep on blush instead. This makes the brush trickier to use the way I like to apply, as I have to hold it further back on the handle to have the bristles not squish flat from regular pressure, yet firm enough to still buff. I am impressed, though, with how soft the bristles are. I do find it to be slightly softer than grey squirrel hair, although I don’t know how much of a factor brush head density plays into that. At least this brush doesn’t flatten the way synthetic bristles with no substance do; I can still feel how springy the fibers are when bounced on the skin.
This brush is definitely made for just loose or lightly pressed powders. My favorite uses for this are with blush and bronzer. I like it and enjoy it, but I can name several blush brushes I prefer over this one. It doesn’t rank as high because of the size and thickness. If softness was the only factor, it would be #1.
ChikuhodoKZ-05
Full Length: 150mm / 5.9 in
Hair Length: 35mm / 1.4 in
Hair Width: *25mm / 1 in
Bristle Type: Kazan Squirrel
Handle: Granadillo Wood
Upon first glance, the brush head size reminded me of the Wayne Goss Air Brush. That brush is made of blue squirrel for $35 versus Kazan squirrel for $90. The Air Brush is a few millimeters smaller in length and width, but when I squished the bristles, the Air Brush is about half as dense as the KZ-05. If the Air Brush was double the density and twice the price, that would still show the large price gap between the two squirrel hair types.
Even though this is called the highlighter brush, I don’t actually like it with highlighter. However, I like a very natural contour, which this brush is perfect for creating because of that tapered tip. It’s also nice for bronzer.
Chikuhodo FO-1 Powder Brush
Full Length: 155mm / 6.1 in
Hair Length: 45mm / 1.8 in
Hair Width: *30-50mm / 1.2 – 2 in
Bristle Type: Silver Fox
Handle: Maple Wood
Ferrule: Aluminum
The head of this brush is described as a “round flat” shape. When you first receive the brush the bristles are much more compact (around 30mm), but after it is washed and dried the brush puffs out to be much wider (approximately 50mm at its widest point). This is not due to improper cleaning or care. This is a unique feature of silver fox fibers.
Also, the varnish or lacquer of the green ferrule still had a noticeable smell on all the FO series brushes for me, so I let them air out in a ventilated spot for about 3-7 days.
This brush is slightly softer than grey squirrel, yet the bristles are as resilient as goat hair. I absolutely love the feel of this on my skin! I initially purchased this to use as a large blush brush, but the shape of it made it clear it’s better suited for applying powder all over my face. If you’re a natural hair brush lover, I highly recommend getting one of the face brushes in this line to experience how amazing these are! Silver Fox hair in makeup brushes is so uncommon, or at least it was in 2020. To my knowledge, Chikuhodo did it first. I believe Koyudo was next and released theirs on May 15th, 2020 although the shapes of those didn’t appeal to me the way this FO series does. In 2022, there are several other brands including ones from China that are selling silver fox bristle brushes, but they are pricey and still not commonplace.
Flat tops are not my favorite style of brushes, but I decided to buy this one to use as a buffing blush brush, and I’m so glad I did! It’s especially handy when I have a sheer/buildable blush that I want to quickly pack onto my cheeks. It’s also nice to blend out (not apply) powder contour. Applying it would deposit too much color at once and in too large of a surface area. The Z-3 Contour brush would be better to apply with and then use the FO-2 to blend out for a quicker and more diffused look.
Although this brush is intended for foundation, I don’t want to take the chance of ruining the bristles from my liquid foundations (I don’t use powder or cream foundations), so I will not be using it for that purpose. This is my absolute favorite brush to use with my Dior Powder-No-Powder and this is overall easily my favorite flat top brush in my collection.
After washing my Chikuhodo FO-3 and using a brush guard, it dried a bit misshapen. So, I rewet it (without cleanser) and let it dry upside down freely. I love the way it fluffed up naturally into the perfect shape for me. A brush with silver fox is the one time when I actually want my brush to be a little fluffy and rounded, especially for blush. As for brush guards, I rarely use them anyway. I prefer the aloe vera method which I describe in greater detail under the Wayne Goss 00 Original Holiday Brush section.
The FO-3 brush is very similar in size to the Chikuhodo Z-8. The bristles have incredible spring to it. When bounced on the palm, I can feel the spring back. It is not perfectly rounded, but applies as though it is. I don’t have any other blush brush that tops this, especially for use on pigmented blushes to ensure I won’t overapply the product. There are only two other blush brushes I like just as much (Chikuhodo T-4 and Sonia G Cheek Pro). I am so happy! It’s not too small and also not flat the way the majority of Japanese blush brushes are made due to the preferred technique of sweeping blush rather than patting and buffing. For about a year, this was my favorite brush in my entire collection!
Because this brush doesn’t fluff out, and is more compacted, it feels differently than the others on the skin. The rounded tip is where it feels the softest, but I would have to use it in my crease to get the full enjoyment of the way it feels while applying product to my skin. Because of the size, I bought this for the purpose of setting my undereye (which works decently) or doing a one-and-done shadow application (which is nice). It works fairly well to blend out a subtle nose contour. I probably should have skipped getting this brush, but my curiosity wouldn’t rest until I could test it out for myself. There are two other eye brushes that I did not purchase because the shapes of them are the type of eye brushes I don’t use often.
From photos on the websites, I didn’t realize this brush was a fully round shape, as is my preference. I’m glad I watched several videos online before purchasing, as it stopped me from getting the wrong one! I learned that the difference between the Z-1 and Z-9 is that this brush is round whereas the Z-9 more closely resembles the heads on the Makie Series. 5 out of 7 of the Chikuhodo brushes in this post were purchased from CDJapan because they offer free shipping on brushes over 12000 yen and the listed price is less expensive than Beautylish, even with Paypal’s conversion rate. Fude Japan and Visage sometimes have their brushes priced the same or lower, but during the pandemic, the cost to ship was too expensive (or they didn’t ship at all). With CDJapan, I also purchased when they offered a discount code and was also able to use accrued points to make the purchases as cost-effective as possible. This brush is great to use when you want to quickly cover a large surface area with powder products. However, because this brush is denser than the MK-KO and FO-3, I really enjoy using this for blushes that are harder pressed. It’s my second favorite brush to use for blush because of the head shape and how soft it is.
I bought this brush pre-owned, and it does have a flaw (a portion of the bristles that were cut for some reason), but it surprisingly has not interfered with the integrity or performance. This brush is fairly round and not quite dense enough to be a true buffing brush, yet I do find I can buff reasonably well and I am not just restricted to sweeping blush onto my cheeks. I also really enjoy using this brush to apply bronzer. It doesn’t need saying, but as with all my grey squirrel brushes, the bristles are unbelievably soft.
I plan to purchase another one at some point, but this time from CDJapan. I want to experience the perfection that is the Z-8, but the way it was intended with whole and exquisitely shaped bristles.
I specifically remember that when I bought this brush, the Z-series brushes from Chikuhodo were listed as grey squirrel on Beautylish’s website. They now say blue. From what I could find, it is only Koyudo squirrel hair brushes that are listed as grey on their website now.* I’m not sure if that was the company’s decision or if Beautylish wanted to differentiate between Chikuhodo and Koyudo, since Koyudo is generally less expensive among the comparably sized brushes. Other retailers like CDJapan and Fude Beauty still have the Z-series listed as grey squirrel as well.
*The change to “blue” was in 2020, but it’s back to “grey” as of 2022.
This is known as a contour brush, and I do exclusively use this brush for that purpose. Even though blue/grey squirrel is known for lighter applications, the fact that this brush is so dense means that I still have to be careful not to over-apply. However, the flat-top shape allows me to buff the product into my skin very well. I don’t use flat tops very often. Here are some others in my collection to compare, although there’s only one somewhat similar in head size.
It always bothered me that the ferrule of my brush was slightly misaligned and not completely flush with the handle. It didn’t impact the performance, so I just dealt with it. This was the first Chikuhodo brush I ever purchased back in January 2016, so I thought the high quality everyone mentioned about the brand’s handmade brushes was an exaggeration. It honestly kept me from wanting to purchase anymore at the time considering the expense, but now that I’ve experienced so many other brushes from them, I realized that this is absolutely not the norm and I should have emailed Beautylish since this kind of flaw is something Chikuhodo would never have wanted to end up in the hands of the consumer (unless listed as an Outlet brush). They have the reputation of being among the world’s best, and this brush did not reflect that. The flaw bothered me enough that I ended up selling this brush to someone else in 2021. I considered purchasing a new one, as I’m certain this kind of mistake from Beautylish or any other retailer would not happen again, but the Chikuhodo FO-2 is so much better suited to my style of makeup application that I’m just going to stick with using that one. In fact, the FO-2 is the reason I finally had the will to let go of the Z-3.
CDJapan has a softness scale rated 1-10. This brush has a softness degree of 3, which surprised me when I felt the bristles because it’s not that rough. However, when I used it on my face, I could feel that the very tips where it tapers slightly inward was a bit scratchy.
This brush was made specifically for contouring the nose, but I didn’t like the results when I tried it. Something about the way this is shaped prevents it from performing evenly. The tips create a harsh line, which takes so much longer to blend in.
Because it’s scratchy, I don’t want to use this brush for any purpose other than one-and-done eyeshadow looks. The flat side picks up a lot of product and lays color on the eye beautifully, without having to feel the sharper ends.
The R stands for “Regular” series. The brushes in this series come in either red or black handles. In order to distinguish between the two when purchasing, red handle brushes have an additional R written on receipts, though not on the actual brushes.
Unlike the previous horse brush, this one was noticeably rougher on my finger before even applying to the eye. It’s rated 2 out of 10 for softness on CDJapan, so it’s even lower than the E-4. Unfortunately, I also find it to be a less useful brush. The bristles are longer than the E-4 and flop around in multiple directions when I try to blend with it. One of the things I love about squirrel, fox, and goat hair brushes from Chikuhodo is the way the bristles glide perfectly in the direction of the movement of the brush. Even though this is made from horsehair, I thought it would move the same way as the others, but it does not. This also doesn’t pick up as much product as the E-4 so it’s not even as efficient for the one-and-done eyeshadow looks.
It does make a nice precision highlighter brush on the cheekbones and under the brows. I like the way this brush picks up shimmers.
Koyudo is another OEM that has made brushes for Kihitsu and even CDJapan’s CB line. I used to be uninterested in this brand because the majority of their brushes were not my style, but as the years have gone on I’ve bought quite a few that are beloved in my collection. A fantastic article on the brand’s beginnings, dedication to their craft, and the thought process that goes into their products can be found here. The company has a long and rich history which I have grown to respect, and they are one of the brands I always eagerly await seeing what they will produce next, even if I don’t end up purchasing them myself.
Koyudo BP Series BP018 Blush Brush
Full Length: 162mm / 6.4 in
Hair Length: 37mm / 1.46 in
Hair Width: *25mm / 1 in
Bristle Type: Grey Squirrel
Unfortunately, I had to return this as it was not the shape and size I expected. It’s barely bigger than my Wayne Goss Air-Brush (yet twice the price), and at this size, I would never think to apply blush with it. The Chikuhodo Z-8 is the smallest blush brush I would enjoy and this is smaller in width and thickness than that one. The BP018 is beautiful, with a nice weighted handle and such silky soft bristles, but I know it would never get used if I kept it. It costs too much to go unused. I thought I did enough research prior to purchasing, but apparently, it was not enough. So, I photographed all the brush comparisons I could think of before returning it to Beautylish.
Koyudo BP Series BP017 Blush Brush
Full Length: 162mm / 6.4 in
Hair Length: *37mm / 1.5 in
Hair Width: *38mm / 1.5 in
Bristle Type: Pine Squirrel
This purchase was made entirely on the recommendation of TheFancyFace. I have been curious about the feel and performance of pine squirrel, but I was waiting to find the right brush first and this became the one! I purchased this from Beautylish, as I was surprised to see this brush was slightly cheaper from them than CDJapan and FudeBeauty (plus free shipping).
I’ve used this several times now and I haven’t noticed it being any better or worse than my other squirrel brushes despite the 6 out of 10 softness degree vs the typical 9 out of 10 grey squirrel brushes get. I can feel slight texture when I feel the bristles along the side but when touching the tips I don’t notice any difference. Perhaps it’s slightly less soft than the others, but it still feels extremely nice on the skin. I really like the shape and size of this and the way my blush looks when I use it. I’m very happy I bought it and I do use it exclusively for blush, as the size prevents it from being as versatile as the others.
Also, something about these bristles don’t respond as well to my aloe vera method. It’s the first time I’ve come across that being an issue, so I thought I should mention that. A brush guard works just fine.
I believe this brush has since been discontinued, along with many brushes in Koyudo’s BP line. I am happy that I ended up buying a backup brush before that happened.
Koyudo Somell Garden Bluberry x Walnut Highlighting Brush
Full Length: 97mm / 3.8 in
Hair Length: 27mm / 1.1 in
Hair Width: *30mm / 1.2 in
Bristle Type: Hakutotsuho Goat
This brush is TINY! I should have paid attention to the dimensions listed on the website. From photos alone, I assumed it would be an average size highlighter brush. Despite being so small, this brush is very useful! Once again, I don’t use it for the intended purpose. The bristles are packed densely in a round shape and the head is quite wide considering the overall size of the brush. The surface area applies a wider patch of highlighter than is my preference, but this is perfect for packing a concentrated amount of color to one area, like blush. It gives a sheer blush more impact with one application or be used as a buffing brush.
The softness degree is 6 out of 10 on the website, which is still quite nice. I would say anyone looking for a non-scratchy brush should aim for 6 and up.
Saikoho goat hair at this size for that price ($54 instead of $78) is a fantastic deal! It’s so large that the only product I’d use to apply with this is powder all over my face. My favorite use though is as an all-over finishing buffing brush because it’s fairly dense with durable enough bristles to sustain me using it a little rougher. CDJapan occasionally has outlet brushes for sale, which means there is a small flaw. I have been unable to detect any issues with this brush, which gives me confidence in purchasing more outlet brushes in the future. Although I don’t own the Rephr 30 brush, I believe this may be identical in shape to that one. Also, although I haven’t found this brush available for sale individually, I believe it is part of a fantastically priced set.
Wayne Goss
Wayne Goss is a makeup artist, YouTuber, and has an exclusive brush line sold through Beautylish. In 2020, he released a lip collection to launch his cosmetics brand. As I mention in the Hakuhodo section, it was rumored that they make Wayne Goss brushes. If that is indeed the case, I would recommend US purchasers of Hakuhodo to buy the WG equivalents from Beautylish wherever possible because his range is either the same price or cheaper when you factor free shipping over $35. Plus, the quality of his brushes is right up there with the other Fude makeup brush brands.
WG Holiday Brush 2019
Full Length: *185mm / 7.3 in
Hair Length: *60mm / 2.4 in
Hair Width: *65mm / 2.6 in
Bristle Type: Goat
This fan brush is enormous! The closest comparison to it that I have is the BH Cosmetics All Over Fan Brush 1. Despite the BH one being soft, the bristles are so flimsy and they don’t move in the same uniform direction while being used. It’s not as dense as the BH brush, but it performs way better.
I’ve used this brush to apply bronzer and highlighter. It’s surprisingly not too large to do that, as the pan size limits how much of the surface area of the brush get covered with the product. This means I can still apply highlighter with precision. And for bronzer, by dipping the center of the brush into the powder, once I apply it to the perimeter of my face, I can brush back and forth so that the bristles simultaneously blend without adding additional powder. I’ve also used this to blend out blush and contour (though not apply with them). This also makes a great finishing brush.
The only brush in my collection that’s larger than this is my Becca The One Perfecting Brush. The Becca brush is made of goat hair too, but it is much rougher to the touch and definitely a lower grade of goat hair. I believe the Wayne Goss brush has Sokoho goat hair based on how soft it is, while also factoring the price. I would like to say I get a lot of use out of this brush nowadays, but I don’t. It’s mostly around as a collector’s item now, but I’m still happy to have it.
WG 00 Powder Brush (Original Dyed Goat Hair Holiday Brush)
I purchased mine from a Third Party Seller. My brush doesn’t completely match the specifications on the site, as is normal with older brushes when hair is more abundant than other years, so I used Temptalia’s measurements based on her original review, which does match mine. When I received this brush it was considerably puffed out, which I reshaped later. I use 99% aloe vera gel (I couldn’t get 100% at the time) to shape them after being wet. I learned the trick from Tarababyz. It’s great because brush guards are only really meant for specific brush shapes. The brush guard didn’t work well enough on this brush and I felt it needed to be reconditioned anyway (I use facial oil or almond or sunflower seed oil mixed with a good cleanser) so I rewashed it using my reconditioning method, then added a small amount of aloe vera gel just on the outsides. Then I cracked it loose of the gel the next day and it was perfect! I’ve been using this method for several years and have not had any issues with it, though I would always say use caution when trying out new tricks. If you want to test it, try it on a brush you like the least.
For example, this is how the Wayne Goss Holiday 2019 brush arrived with the outer sections bent like that. But from the other photos you see of this brush, they’re straightened out due to the aloe vera method.
Full Length: *175mm / 6.9 in
Hair Length: 44mm – *50mm / 1.7 – 1.97 in
Hair Width: 20mm – *25mm / 0.8 – 1 in
Bristle Type: Goat
WG Air-Brush
Full Length: 170mm /6.7 in
Hair Length: 37.5mm / 1.5 in
Hair Width: *25mm / 1 in
Bristle Type: Blue Squirrel
This was my absolute favorite highlighter brush for years, though I also liked to use it to lightly set concealer with powder under my eyes before discovering the Real Techniques Setting Brush. It was also my favorite brush to lightly sweep bronzer precisely around the perimeter of my face. It’s the perfect thickness and even though the bristles are very soft, they’re still able to pick up harder pressed powders such as the Nabla Skin Glazing Highlighters. I bought it for $35, but in 2021 the price was raised to $45.
WG 15 Fan Brush
Full Length: *166mm / 6.54 in
Hair Length: *35mm / 1.38 in
Hair Width: *55mm / 2.17 in
Bristle Type: Goat
This dyed goat hair version of the brush is discontinued, though they sell the white undyed version now. I got rid of many other fan brushes because they couldn’t compete with this one. I’ve discussed it before on this blog, but I love how thick it is because the top portion picks up the perfect amount of highlighter. It’s also great for dusting away excess powder if you like to bake under the eyes.
I used to consider this a big fan brush, but compared to the Wayne Goss Holiday 2019 Brush, this is so much smaller!
WG 06 Eye Shadow Blending Brush
Full Length: 145mm /*150mm / 5.9 in
Hair Length: 15mm / 0.6 in
Hair Width: *10mm / 0.4 in
Bristle Type: Blue Squirrel
I used this brush off and on throughout the years when I’ve just wanted a light wash of color on my lids. Now that I have similar shaped brushes through Sonia G, this brush gets even less love. I still do like it and it has its place, albeit limited, in my collection.
WG 19 Eye Shadow Precision Blending Brush
Full Length: *154mm / 6.06 in
Hair Length: *16mm / 0.63 in
Hair Width: *8mm / 0.31 in
Bristle Type: Goat
This brush has a similar head shape and dimensions as the Hakuhodo J146, so I use it for the same purpose of precision blending.
WG 08 Eyeliner Brush
Full Length: 130mm / 5.12 in
Hair Length: 2mm / 0.08 in
Hair Width: *4mm / 0.16 in
Bristle Type: Listed as “Natural” with no specifics. It does not feel like Water Badger, so I’m unsure which of the more water-resistant natural hairs this could be. Perhaps sable, tree squirrel, or Yano goat (tail). I’m leaning towards sable of some kind.
This brush is so useful for stamping on a super-thin line across the lid or to use in my waterline. It’s the smallest brush that I own and it affords me the most control. It is also much softer than the Wayne Goss 21 eyebrow brush, which also adds to the comfort of using this brush in such a sensitive area as the eye.
WG Brow Set $55 (Purchased discounted from someone’s Lucky Bag)
WG 21 Eyebrow Brush Out of the set, I get the most use out of this brush. It works very well, but it’s a bit bigger than I prefer. All my other angled brow/liner brushes are smaller, so I have to be careful using this. Also, water badger hair isn’t all that soft. Just forewarning, since natural hair brushes are usually associated with softness. This brush is stiff.
Full Length: 140mm / 5.5 in
Hair Length: 4mm / 0.2 in
Hair Width: *10mm / 0.4 in
Bristle Type: Water Badger
WG 22 Dual Ended Brow Brush I’ve only used this tool a few times. I like the fact that this has natural bristles when all other tools of this style that I’ve seen are made of synthetic material. Because the brush portion is also made with water badger hair, it’s stiff but not as hard as synthetic ones I’ve had in the past. It’s fantastic if you have a need for this type of brush. However, I do not.
Full Length: 155mm / 6.1 in
Hair Length: 23mm / 0.9 in
Hair Width: *25mm / 1 in
Bristle Type: Water Badger
WG 23 Spoolie Brush $12. I prefer using brow products that already have a spoolie attached. I don’t notice any difference among spoolies. They all feel the same to me, so I don’t see this as being anything special, especially for $12.
Full Length: 153mm / 6 in
Hair Length: 23mm / 0.9 in
Hair Width: not applicable
Bristle Type: Synthetic
Wayne Goss The Artist Large
Full Length: 7.24 in / *184mm
Hair Length: 1.5 in / *40mm
Hair Width: *28mm / 1.1 in
Bristle Type: Grey Squirrel and Saikoho Goat
I purchased this brush from a reseller, as I did not want to buy the full Artist Collection set. This brush is way more useful than I thought! It almost surpassed the Wayne Goss Air Brush as one of my favorite bronzer brushes.
The bristles pick up a lot of product, but the application is still sheer because the bristles don’t deposit the powder on the skin all at once. Every time I used it, I would blend until I didn’t think there was anything left, and then I’d look at the brush and see certain spots that still had colored powder on it. This can be seen as a good thing depending on your needs. It nearly guarantees that overapplying won’t be an issue. It’s amazing for bronzer and contour, both products I’d want to build up and blend for an airbrushed finish. It also deposits the perfect amount of highlighter, but it’s time-consuming with blush. The shape of this looks good for precision blush work but I’d rather use other brushes for that purpose. Three standout uses is still impressive.
I have to note, though, that there are a few strands within this brush that feel a little sharp. I can’t feel it when I touch the brush with my fingers, but I feel it on my face when I move the brush back and forth to blend. I’m guessing a few bristles of rougher goat hair was accidentally mixed into this Saikoho-Squirrel bundle. I’m not sure how else to explain it, but I still really like this brush.
Sonia G
Sonia G is an avid brush collector and is considered an authority on makeup brushes because of the wealth of knowledge she has shared on her Sweet Makeup Temptations blog. I discovered that she is a great source for comparing brush sizes while doing my own research to try and figure out which brushes from her line I wanted to purchase. Her series’ of brushes are a combination of traditional and innovative shapes. It’s astounding how the slightest tweaks between her brushes and others regarding their shape or bundling can make such a difference in performance. Her eye brushes in particular have surpassed all other brands’ brushes for the top spots in my collection. My favorite hair type in her line are actually the dyed Saikoho goat bristles. The feel of them and the product pickup ability is fantastic! Chikuhodo is my favorite brand, followed closely by Sonia G.
Sonia G Mini Booster
Full Length: 154mm / 6.06 in
Hair Length: 14mm / 0.55 in
Hair Width: *6mm / 0.24 in
Bristle Type: Brown Saikoho Goat
I use this brush as often as my Hakuhodo J5529 though I like this one more. This brush is a little softer (due to the type of goat hair), and therefore more expensive, but I don’t notice a difference in performance. I love how small this is for precision work and it is described as a miniature version of the blender pro.
Sonia G Builder Three
Full Length: 150mm / 5.9 in
Hair Length: 10mm / 0.4 in
Hair Width: *10mm / 0.4 in
Bristle Type: Dyed Saikoho Goat
I’ve never really liked this shape of packing brush until I started using this one. It’s the only one I’ve used that I noticed actually performs differently—performs better. It came from my 2020 Beautylish Lucky Bag. Loving this one so much prompted my need to buy more! I could do an entire eye look using this brush alone if I really wanted.
Sonia G Worker Three
Full Length: 154mm / 6.06 in
Hair Length: 14mm / 0.55 in
Hair Width: *12mm / 0.47 in
Bristle Type: Saikoho Goat
This reminds me of the Hakuhodo J5523, but it’s a bit fluffier. It works well to pack on eyeshadow but I sometimes use it in the crease as well to apply and blend transition shades. Among all my Sonia G eye brushes, I get the least use out of this one. I tend to just use my multi-tasking eye brushes to complete a look.
Sonia G Worker Pro
Full Length: 154mm / 6.06 in
Hair Length: 14mm / 0.55 in
Hair Width: *9mm / 0.35 in
Bristle Type: Saikoho Goat
Whenever I see this brush, I instantly think of yet another packing brush. It is a smaller and slightly thinner version of the Worker Three. Because I have so many other brushes to apply color to my lid or use in the crease, this brush ends up being used to blend my brow highlight with the transition or crease shade. When a beauty guru says to, “Take a clean brush with no additional product on it to blend,” it ends up being either this brush or a different fluffy one from my collection.
Sonia G Blender Pro
Full Length: 158mm / 6.22 in
Hair Length: 18mm / 0.7 in
Hair Width: *9mm / 0.35 in
Bristle Type: Dyed Saikoho Goat
This blending brush has a pointed tip, which prevents it from feeling as soft on the eye, even though it is soft when I touch it with my fingers. It is on the larger side of eyeshadow brushes, but the pointy tip allows for a little precision, though not as much as the other brushes I use in the crease. What this brush is great for is blending out harsh edges. The point allows concentrated pressure onto the line, without blending too much of the color away.
Sonia G Jumbo Blender
Full Length: 160mm / 6.3 in
Hair Length: 15mm / 0.6 in
Hair Width: *11mm / 0.4 in
Bristle Type: Brown Saikoho Goat Hair
This was a preowned purchase, as I was tired of waiting for the restock. The brush’s condition is in like-new state as the owner took very good care of this (unlike my Chikuhodo Z-8). The size makes it great for applying a single shade quickly, as it covers a large area of space, but I can also blend with it.
The Jumbo Blender works as well as the other Sonia G brushes of this shape; it’s just bigger. It’s everything I wanted the Chikuhodo FO-5 to be, but better.
ADDITIONAL COMPARISONS
There are so many more unique styles of brushes that I don’t own. As much as I love brushes, I thankfully don’t feel the urge to buy complete sets. Japanese brushes are truly amazing, and I don’t think any of them are bad. It all comes down to preferences of how the individual likes to apply makeup.
JULY 19th, 2020 UPDATE: Towards the end of the post I have an update section with 24 additional eyeshadows, some of which have come from the new After Dark collection.
Note: I can’t post a review at this time without first mentioning that I hope everyone reading this is and remains safe during the COVID-19 pandemic. This year has been especially difficult with what is going on throughout the globe, in addition to having yet another surgery. The beauty world has been a comforting distraction for me these past few months and I hope that my blog posts are also a welcome distraction. Now, onto the review!
These are the shades I currently possess. There are twelve more eyeshadows I intend to purchase, after international shipping prices return to normal, which I believe would fully round out my collection.
Lethal’s website has a fun palette designing tool that helps to put a color story together. There were so many shades I wanted that didn’t go together, so I wish we weren’t limited to 12 spaces maximum (as my intention was always to put them in a larger magnetic palette), but it’s still helpful when getting started. Plus, the palette builder allows you to put the 12 shadows in a bundle to be discounted. You can see tons of combinations others have made following the #lethalbyop on Instagram. I found their examples to be quite inspiring. Here are some of my own.
PRICES, SHIPPING, AND CUSTOMER SERVICE
The eyeshadows are $6 each, which is great considering the normal cost of single shadows, but I do recommend using the palette designer to bundle for the best prices.
It usually comes out to be $58-$59 if you include one of their magnetic palettes, though you can bundle without one as seen in the screenshot above. The smaller Orbital palette holds 9 shadows and also gives a discounted price after putting it together.
Lethal Cosmetics is based in Germany, but shipping under normal circumstances takes about a week. Standard shipping used to be $7 or free on orders of $80 and up. Currently, due to the pandemic, it is $24 or free with orders at or above $150.
I love getting a good discount, so I spent hours looking for promo/affiliate/influencer codes, but I have been unsuccessful. By signing up for emails, you can get notified about sales (and the occasional code). I was able to find Jolina10 from Jolina Mennen who collaborated with Lethal Cosmetics to create their first (non-customizable) eyeshadow palette. However, the code does not work on everything, like Jolina’s own palette. Also, when the palette was first released, I heard that the Pieper Perfumery had 30% off, but even with Chrome’s help translating their site to English, it was hard to navigate.
My Duolingo lessons didn’t prepare me enough to understand the site either.
I have interacted with Lethal Cosmetics’ customer service a few times and the representatives I’ve spoken with have been so polite and friendly. They also have a great social media presence with the way they interact with customers regardless of their follow-count. This is not always the case, even regarding Indie brands, so I felt it was important to note and applaud good customer service whenever I come across it.
SWATCHES
I normally use eyeshadow primer when taking pictures for this blog, but I did not for any of these arm or eye swatches. However, for my different eyeshadow look examples, I used a MAC Paint Pot in Groundwork, ABH eyeshadow primer for the pastel look specifically, and Nyx Glitter Primer in any area requiring the metallic/shimmer eyeshadows.
For the mostpart, the color you expect from the website is what you get. However, I had quite a few surprises
The orange shades look vastly different in the pan than what appears online, but when actually used on the eye, they do reflect the color presented on the website. Backdraft is way darker in person than on the website. It’s not the light peachy-pink I was expecting, though it is described as being “fiery.” Also, it says fuchsia in the description of Enigma on the website, but it looked so blue from the glitter shift that I was expecting a cooler blue-purple shade. Several more of the shades were slightly different than I expected, so I would recommend paying close attention to the descriptions on the site. Some, but not all, of the photos from the website include swatches. I wish they had light, medium, and dark arm swatches for all of them. Overall though, when you compare the shadows in my first picture with flash on, it shows more accurately what they look like in person (excluding enigma which looks more accurate with flash off in this case). The flash off side looks closer to what is on the website (again excluding Enigma which is the reverse).
Another thing I noticed was how similar some of the shades look on my skintone. So, I put them together to have an easier time seeing the similarities and differences.
The similarities are less apparent once they’ve been built-up, such as Relapse and Habitat. Habitat builds up to a medium green. Crossroads and Release look alike because of the shared purple tone, with Crossroads being a cool pinkish purple compared to Release’s lavender shade.
PERFORMANCE
The darker and red-based mattes look opaque on my lids with minimal effort. The lighter and pastel shades take more time to build up, but they do build beautifully, especially when I use a light base such as the ABH primer underneath. The mattes blend so well, and though some take extra time, the unique shades make it worth the effort. I tried comparing them to other eyeshadows in my collection and could only find a few that were similar.
As for the metallic/shimmers, some shades worked well regardless of the tool used, but for the most part, I’ve been unable to get the maximum color payoff using just a brush. So, my favorite application method is to lay the color on first with the brush and then apply another layer with my finger. They all apply so smoothly and pigmented to my eye when using my finger that I don’t feel the need to wet my brush when I use them.
Here are some of the looks I’ve done:
I also got the last two look ideas from Instagram:
There isn’t much more to say about these eyeshadows except that I enjoy the formula. I have some shadows, like Natasha Denona, where I can mix two shades on top of each other to create a new shade. I haven’t found that to really be the case for the Lethal Cosmetics shadows (or at least not easily), which is useful when I want to do a more complicated look involving more than four shades and want them to stay true to color. You definitely don’t have to worry about these shadows looking muddy on the eyes. The fact that they are different from the other shades in my collection and unique enough to inspire me makes these eyeshadows worth it to me. And as I mentioned earlier, I intend to get a few more!
JULY 19th, 2020 UPDATE
This is what my collection currently looks like with the new additions. The names with * in front of them in the swatch photos are brand new shades from the After Dark Collection.
Thank you for reading my first in an ongoing Indie spotlight series! I’m not sure when the next one will be since it takes me so much time to test them out. The new brands I’ve tried this year are Sydney Grace, Devinah Cosmetics, Clionadh Cosmetics, Give me Glow, Makeup Geek, Menagerie Cosmetics, etc. I’ve been posting a lot of eyeshadows lately so I might do a different topic for my next post.
The online retailer, Beautylish, offers package deals on mystery beauty products the day after Christmas and ships them out in the following New Year to celebrate the Japanese fukubukuro tradition. Although the items in each bag are “chosen at random,” the only thing we know for certain is that foundations and concealers are excluded.
This is my third year reviewing these lucky bags. You can click these links if you’d like to see what I received in 2016 and 2018. Some differences I noticed between my previous review and this one is that shipping fees have increased on the Original Bags from $7 to $10. Beautylish also included a Buy one, Give one bag. If you choose that option, you will spend $150 to receive an Original bag with at least $150 worth of products, and another Original bag with a minimum of $150 worth of products will also be donated to Alternative Family Services. In looking at previous screenshots, I also see the XL bags were once guaranteed to have $350 worth of product instead of the $300 now. I should have taken that as a hint…
How To Get One
You’ll want to sign-up here to be on the email list for 2021.
Unlike 2018, where the XL boxes sold out during priority access (given to customers who spent at least $1000 that year), Beautylish did away with that and just kept early access. This gave everyone an equal opportunity to buy the bag of their choice. I like this change!
Customers across social media can confirm the XL bags still sold out between 9:02 a.m. and 9:03 a.m. PST. This is just minutes after the options became available! I believe the Dark-Deep Original bags sold out within the early access hour and the remaining bags sold out within the day.
As I happened to be one of the people who snagged an XL bag, I’ll share my tips here:
1) Have your payment details saved on your Beautylish account prior to the lucky bag launch. This will save you precious time when checking out. Between me clicking on the XL bag and checking out of my cart, it took perhaps 10 seconds. If you don’t want to keep your card or PayPal info stored, you can always delete it off your account afterward.
2) Be on the website at least a minute prior to the launch but preferably 5-10 minutes ahead of time. The early access emails are released staggered and not all at once. Some customers report getting them at 9:01 (like I did) or as comparatively late as 9:07. Some did not receive an email at all. I can confirm that the other email address I signed up with did not get the early access email, but I did get a reminder that only a few bags were left later that day.
I was on the early access page before 9:00. When I continued refreshing at the launch time, I noticed the message changed to include a link. Because I couldn’t actually click it and had to copy and paste the web address in another browser tab, I’m not certain if that was meant to happen or not.
I finished checking out just seconds before my early access email came. And I received my order confirmation at 9:02.
3) Don’t forget to do that early access sign-up! Even if you end up not buying a bag next year, at least the option will be available to you.
4) Already know which bag you want ahead of time so that you can immediately make your purchase without having to spend time thinking about it or second-guessing yourself. It’s not a fun feeling to have an item sell out while in your cart!
5) Going along with the previous tip, remember you can only buy one bag. It’s one bag per customer (account), the form of payment, and address. If you try to buy a second bag with any of the same information, they will cancel your second order. So, know which ones you want ahead of time!
What Was Inside
Ordinarily, I would give a brief review of every product. However, there were so few items I wanted that I didn’t swatch or use any of it. I kept 2 and traded everything else for the item I hoped I would get the most.
NATASHA DENONA Diamond & Blush Palette in 01 Darya $89. I’ve seen this for $53.40 on ND’s official website on Black Friday. Beautylish also had 30% off ND items during their one and only sale (that I’ve ever seen). This palette is beautiful, but I don’t use shimmery blushes and considering this was the highest value item in my bag, I didn’t want to swatch this and saved it instead to sell or trade.
CHARLOTTE TILBURY Starry Eyes to Hypnotise $75. The green shade was calling out to me, but I did not keep this either. After not being the biggest fan of CT’s eyeshadow formula from the quad I received in my 2016 box, I decided I didn’t want to risk trying it and being disappointed again.
HOLIFROG Kissimmee Vitamin F Therapy Balmy Wash $42. I didn’t mind receiving this item and would have tried it if I didn’t need it for the trade.
SOL DE JANEIRO Copacabana Bronzing Glow Oil $35. This type of product isn’t intended for already dark skin. Lol. Regardless, I’m not into shimmery body products.
BECCA Hydra-Mist Set & Refresh Powder $39. I’ve seen this sold for $19.50 multiple times during Ulta’s 21 days style events. I have a deluxe sized sample of this powder that I still haven’t used yet, so it made no sense to hold onto the full size.
SONIA G. Builder Three $32. Although this wasn’t on my list of Sonia G brushes I wanted to try, I was happy to have at least something from her line.
JOUER COSMETICS Long-Wear Lip Crème in Guava $18. I didn’t try this since I’ve been mainly wearing lip glosses and lip balms for the past two years. I still never even used the Jouer Lippie from my 2018 Lucky Bag.
GOOD MOLECULES Niacinamide Brightening Toner $14. This and the Sonia G brush are the only two items I kept. I’ve been using the Good Molecules Discoloration Correcting Serum, which I think has been helping in certain areas, so I’m happy to try this out.
Final Thoughts
Total Retail Price of items in my XL Lucky Bag – $344
Total at Discounted Pricing – $256.9
Practical Savings (Cost of items I would actually buy $46 – $165 that I paid) – Loss of $119 without selling or trading.
This ended up being my real Lucky Bag this year. Thankfully, I found a trustworthy person willing to take my up-for-trade items worth $298 retail for a $129 Natasha Denona Metropolis Palette shipped directly from Beautylish. I don’t care about the price discrepancy because products are only worth as much as you’re willing to pay for them. I did not want to keep items I wouldn’t get enough use out of. I paid an extra $17 for shipping out of pocket, but it was worth it to me. Plus, it made someone else happy in the process.
Total Retail Value of My Revised Lucky Bag – $175
*Final Practical Savings – Loss of $7
* In this case, the practical savings is the retail price of the items in my new bag I would buy ($175) minus what I paid originally ($165). That gives me a surplus of $10. However, I paid $17 to ship the trade items, which leaves me with the $7 loss. Much better than before. I’m happy with that. But do I want to go through this process again? Absolutely not.
2019 saw a rise in anti-consumerism/pro-minimalism, reducing excessive product purchasing for environmental reasons, No buys, Low buys, Project Pans, and Anti-Hauls. I saw the most sales ever from Ulta, Sephora, Macy’s, etc. These sales (beyond their annual ones) are an indication that people weren’t buying as much in 2019. I was able to get pretty much everything I wanted for much lower prices, which means there wasn’t as much wiggle room for being pleased with the items in my bag. However, past XL Lucky Bags always (with rare exceptions) had an eyeshadow palette valued at over $100 in each box. That’s why I was willing to get this again, thinking that at the very least I would need to sell only one or two items to outright buy what I want. I knew they wouldn’t put the large ND 28 pan palettes in the bags for the 4th year in a row, however, I don’t own a majority of her $100+ palettes, nor any of the Viseart Grand Pro palettes. With those things in mind, it appeared to be a safe bet getting another XL bag this year.
But this year, they didn’t do things the same way. I scoured Instagram and Youtube daily, seeing everything people received in their XL bags. About 10% of what I saw were Viseart Grand Pro 3 (mainly in the XL bags that shipped out first 🤔). 10% Natasha Denona Metropolis. Perhaps 5% received the ND Gold Palette. The remaining 75% had items I’d expect to see as the big item in the regular bags: Jeffrey Star/Shane Dawson Conspiracy Palette, Charlotte Tilbury Starry Eyes to Hypnotise + ND Diamond and Blush or one of the Dominique Cosmetics Palettes, etc. There were also more skincare items this year than ever before. Some XL bags had an eyeshadow palette in the $40 range paired with the Sulwhasoo Time Treasure Renovating Cream, Oribe Gold Shampoo, or Uma Oil as their high-value item.
This year’s lucky bag is also not as “random” as they lead us to believe. I’ve seen maybe 10-20 different combinations of the same products. Some being higher valued than others. The ones that appeared to be “extra lucky” would have been considered normal in previous years.
The bag I received did not have bad items, they just weren’t popular ones. I’ve always praised Beautylish for not doing what all other companies do with grab bags: only include old or hard to sell inventory. Beautylish still did that with a few items in the past, but not to this degree! The going rate for the items in my bag on selling apps and sites would have required me to sell 3 items for a discounted high-value palette that I could only hope was authentic. Or sell nearly everything to get it from an authorized retailer. I didn’t anticipate this happening for an XL bag, and this new precedent is why I decided to no longer get them in the future. Without that “big ticket” guarantee, it’s too risky.
I honestly don’t consider my bag variation to be the worst one. But as I am trying to only buy products I will use and love, I won’t be getting regular lucky bags in the future either. Mystery boxes don’t guarantee a happy result, and I don’t want to either waste my money or go through the hassle of buying/trading again. So, this ends my every-other-year Lucky Bag tradition! I tried to balance my disappointment with positives in this review, but… the majority of 2020 XL Lucky Bags were duds!