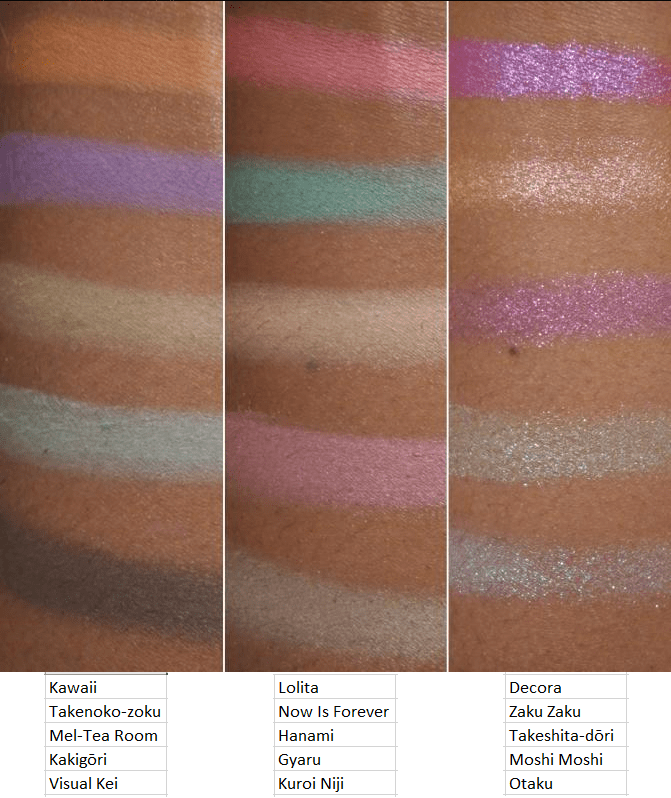
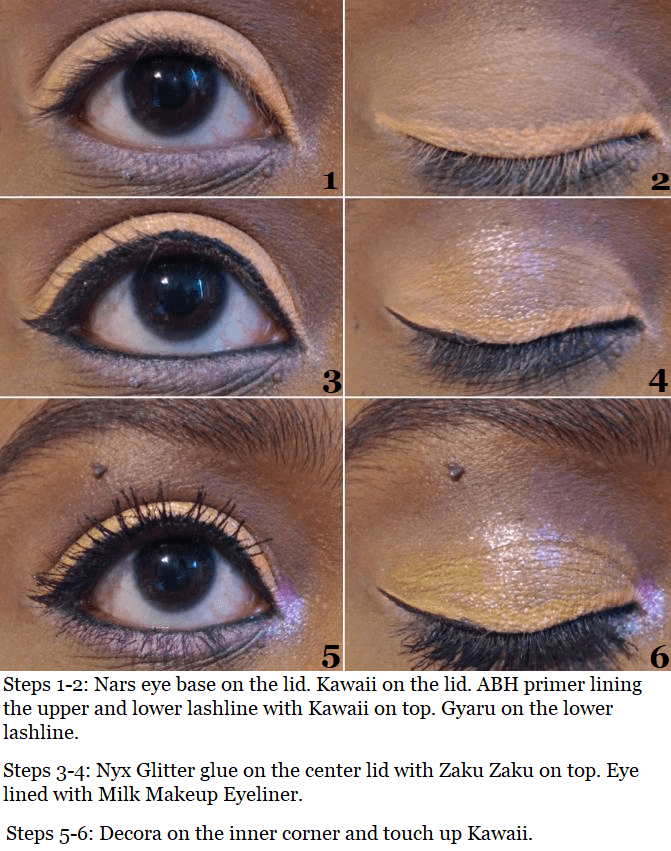
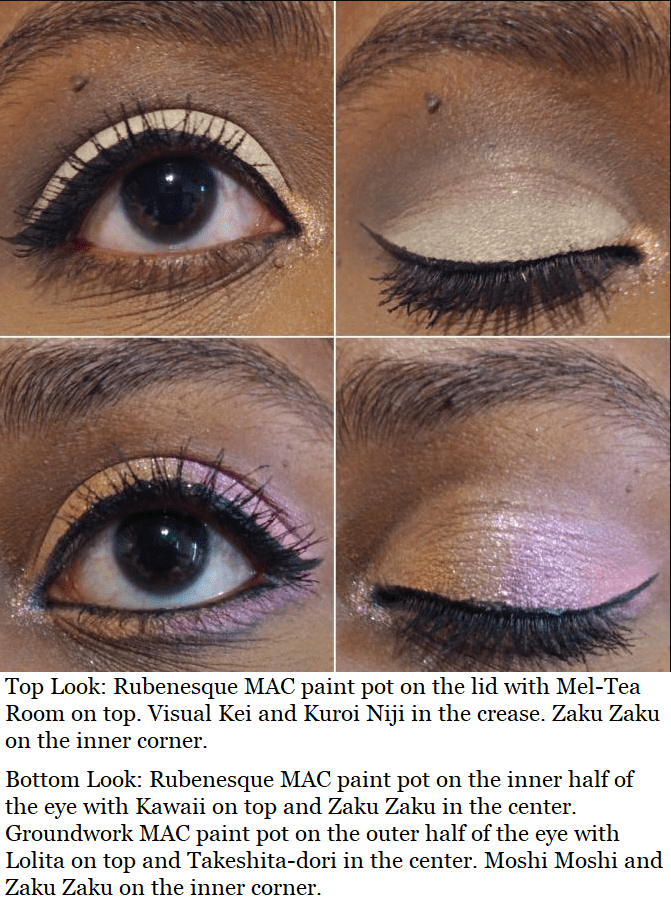
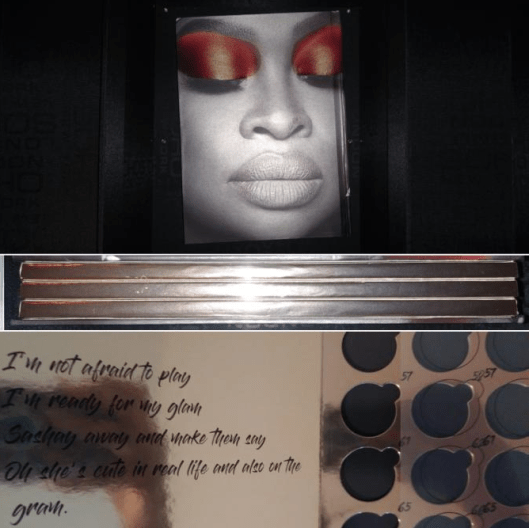
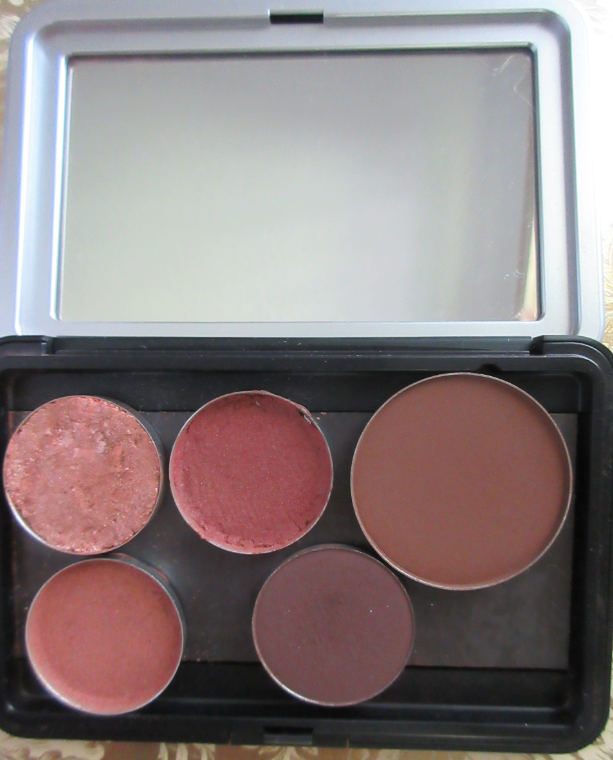
I’m starting this post with a description of the palette to set the tone of what I was expecting: “Nomad x Tokyo Harajuku Intense Eyeshadow Palette. This poppy pastel palette of fun combines 10 high-pigmented eyeshadows and 5 unique multi-chrome toppers for a sheer prismatic color effect. 15 kawaii shades inspired by the wild creativity of the trendy Tokyo youth. Infused with Camellia Japonica Oil to make skin soft and silky smooth. Cruelty-free & vegan.”
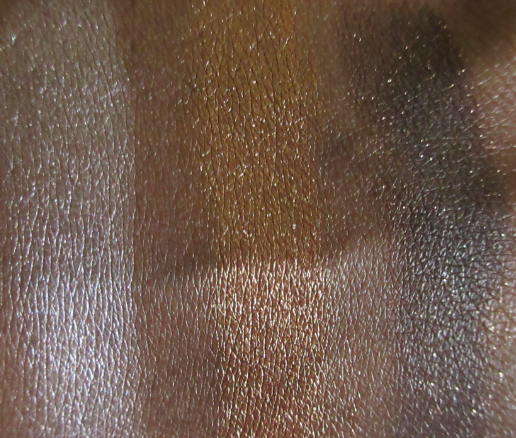
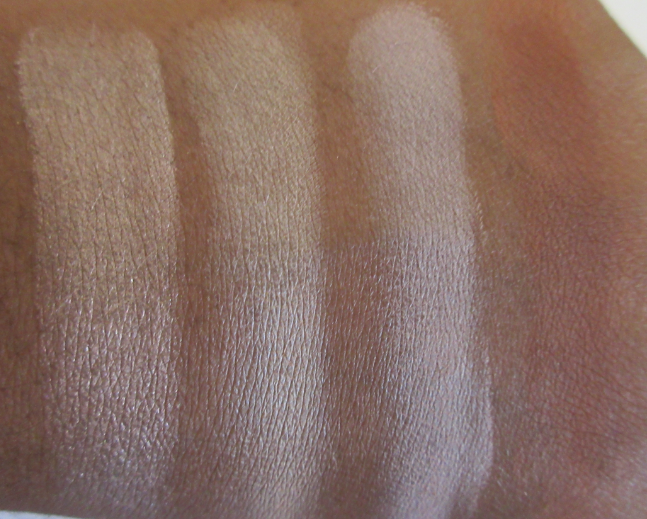
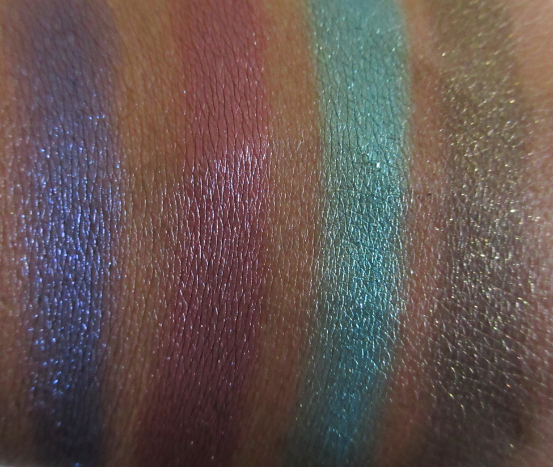
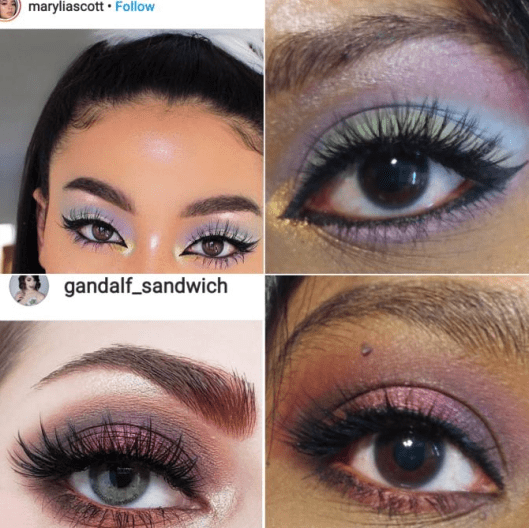
Nomad’s website features Instagram looks from people who have used the palette. Someone please teach me this sorcery of how you get that purple and that blue on the eye compared to the swatches that Nomad themselves posted. Below are my own swatches which I don’t think are that far off from Nomad’s. So, the color intensity from my palette matches up to what I was supposed to get. Yet the site description and photos give the impression that the palette is much more vibrant than it really is.
Perhaps this is considered “intense” because it’s not a neutral color story. Maybe it’s “highly pigmented” for an eyeshadow palette as opposed to the color payoff it should have if it was a pigment palette. There are many times I’ve seen a photo on Instagram with a list of multiple branded eyeshadows used in a single look, yet one brand will repost the photo and make it seem like the whole thing was created using just their eyeshadows. So, it’s possible this person used more than the Harajuku palette on the eyes and that would explain the color differences. Or they used highly pigmented bases/paints underneath. It’s also possible someone used editing tools to turn up the color saturation and tweak the brightness, intensity, etc. I’m not saying it’s impossible to be talented enough to produce that kind of look from this palette. I just have no idea how to naturally do that regardless of what base I used. I tried seven different ones, which I will discuss further into this post.
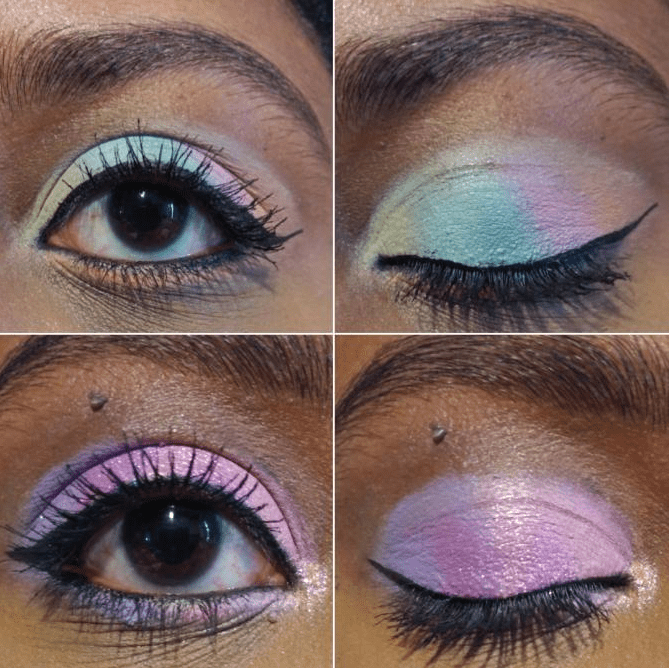
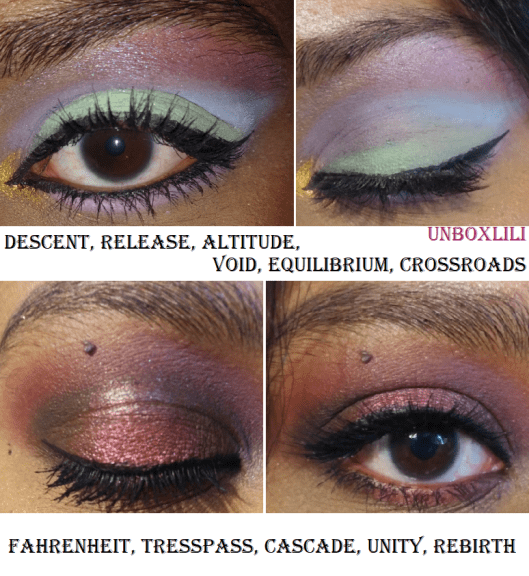
This was the outcome of my first use of this palette, which I quickly realized has a learning curve.
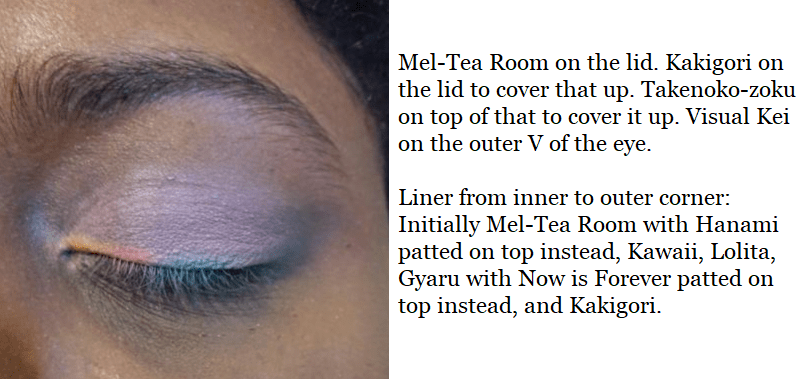
These eyeshadows swatch beautifully! They feel smooth and glide across the skin nice and evenly. I swatched them on my MAC Paint Pot in Groundwork, yet when I used the same base on my eyes, they wouldn’t stick and kept dusting away. The reason I was able to pack three different colors on top of each other on my lid was because the previous two blew away and just left me with white powder on the lids. Patting motions produce decent results with some of these eyeshadows, but I have been unable to actually blend any shade besides that dark grey called Visual Kei.
Pastel shades can be quite tricky to use, particularly on darker skintones. While it’s true that I tend to avoid pastels because they’re time consuming to use if the formula isn’t suited for me, the pastels from Lethal Cosmetics and Makeup Geek show that they can be made to work for everyone.
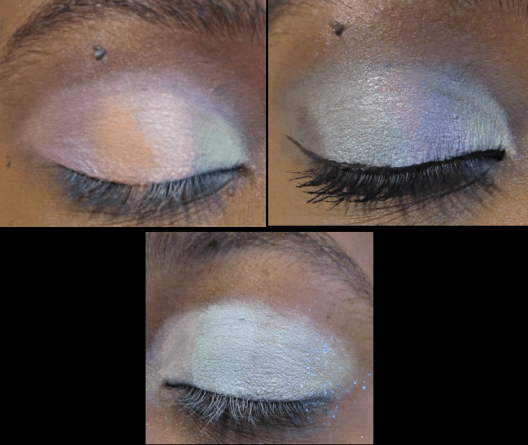
What I learned from my failed attempts is that it’s not enough to just have a creamy base (MAC paint pot) or a white base that is dry (Anastasia Beverly Hills eyeshadow primer), so I switched to the Nars Smudgeproof Eyeshadow base which is whitish-clear and emollient. Making this switch provided better results.
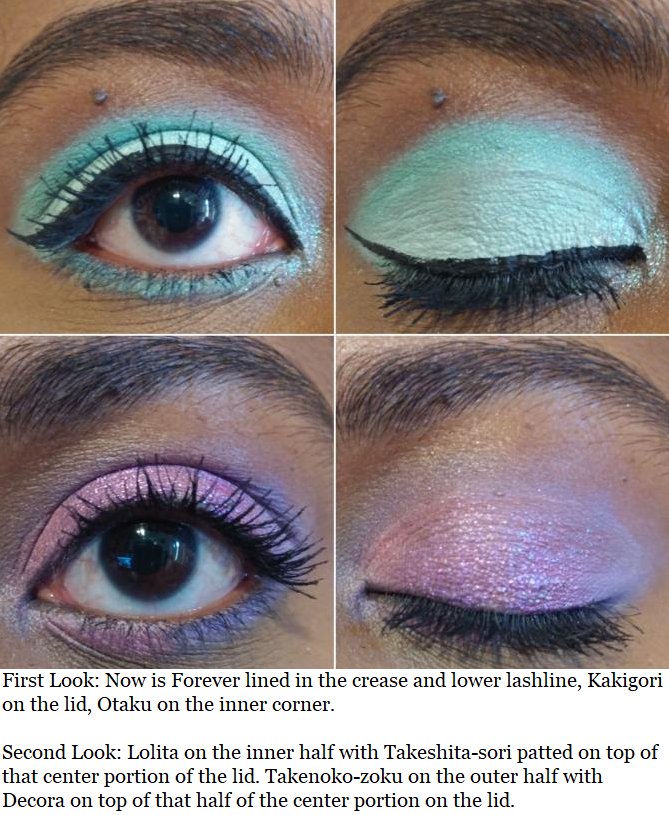
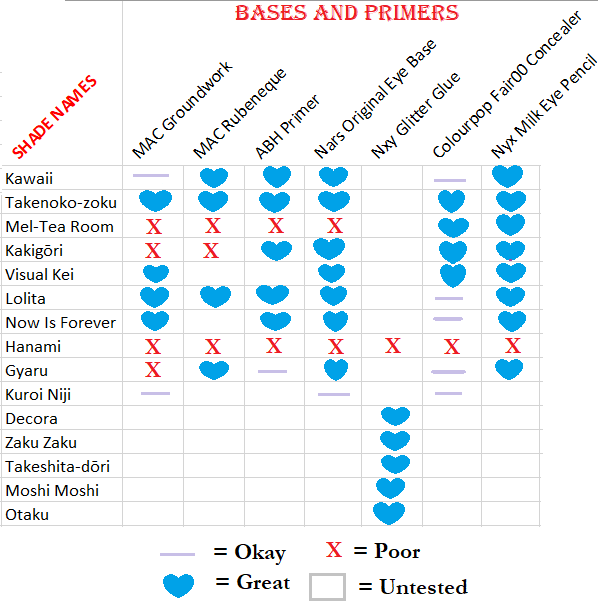
I still wasn’t satisfied though, so I continued to test things until I came to the realization that the Nyx Jumbo Eye Pencil in Milk is the best base that I have. I was able to get every shadow to perform decently from the top two rows of the palette, excluding the two shades which I couldn’t get to work with any base: Hanami and Kuroi Niji. And the satin finish in Now is Forever is what helps me distinguish between that shade and Kakigori, even though they look different in the pan.
These are the results of my testing, which I hope better explains what I was trying to say. The difference between the lilac line and blue hearts is that some of the bases had the color show up but the shadows faded quickly. And even though the Nyx Jumbo Eye Pencil worked the best of all, there’s still a learning curve to using this too.
Shadows do crease on me, but if I use too much of the Nyx pencil on my eyes the creasing becomes deeper and more noticeable. Using too much also prevents it from drying down, but too little and the shadows won’t stick. A few hours after I did that eyeshadow look, which had a little too much of the Nyx pencil, I accidentally rubbed my eye and a thick patch of eyeshadow left a streak across my hand. I’ve had shadows come off a little but not to this degree. So, it’s important to find the right balance.
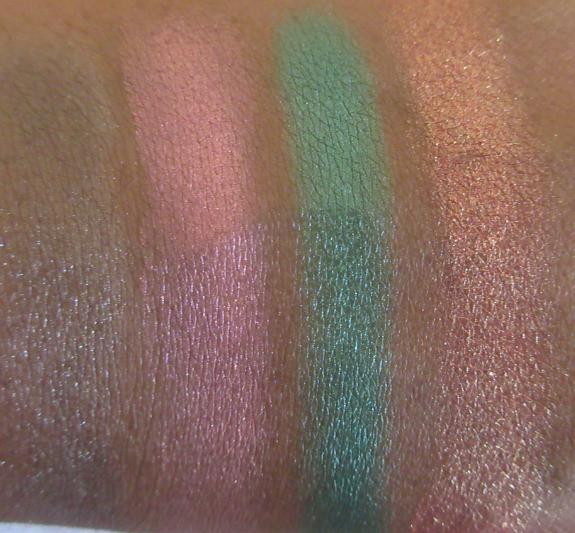
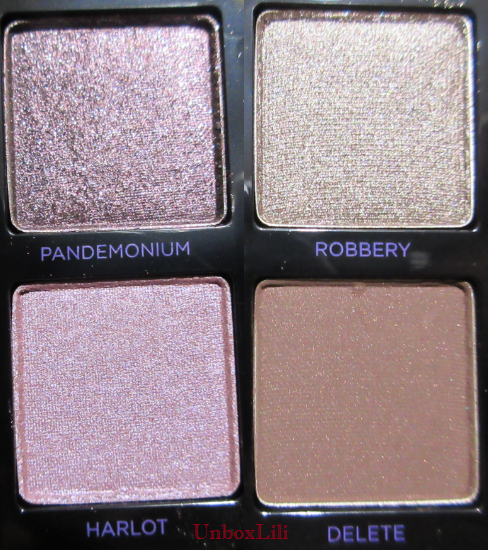
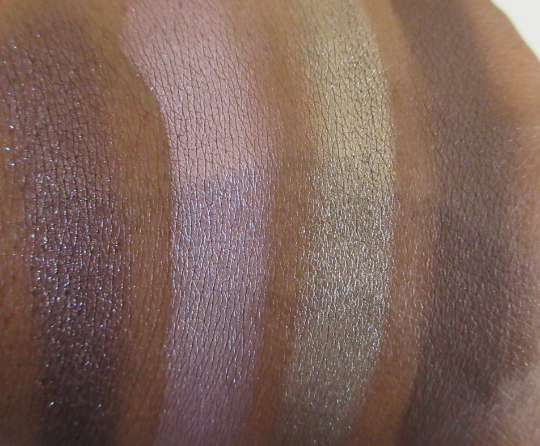
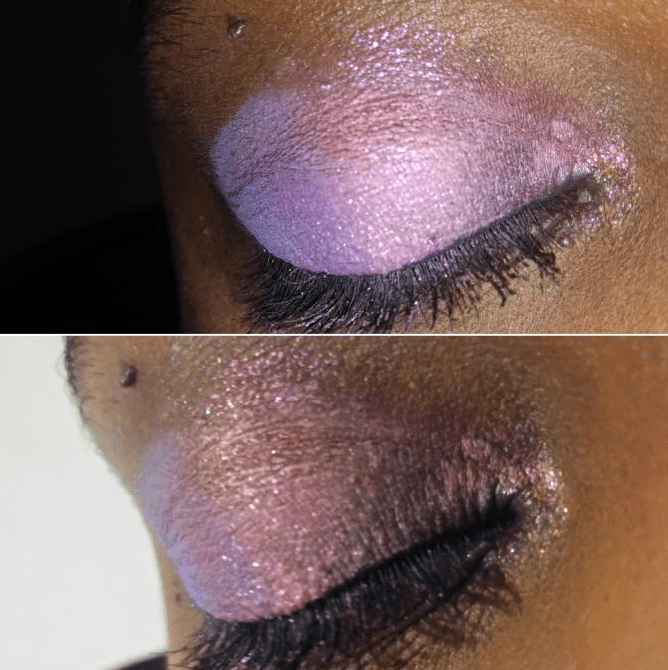
As for the “multi-chromes,” the five sparkly shades on the bottom row have multi-colored shimmery specks but when I think of a multi-chrome, I expect a color shift. Perhaps it just doesn’t show as well on my skintone, but to my own eyes these are duochromes at most. That doesn’t take away from the fact that these really are beautiful and are the stars of this palette. They stick fairly well on their own, but Nyx Glitter Glue ensures that there’s minimal glitter fallout. They definitely stay in place, even when rubbed.
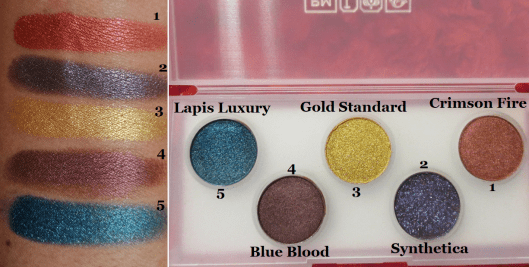
The base in Decora is the most pigmented, and therefore is the darkest one, especially with its darker purple glitter. That’s why I often pair it with Takenoko-zoku over Lolita or Gyaru when one of those two are on the other half of my eyes. Takeshita-dori looks darker in the pan, but the light purple glitter makes it appear lighter than Decora. The vibrant yellow in Zaku Zaku doesn’t translate to the eye and appears more of a peachy pink, which is why I pair it most often with Kawaii. Moshi Moshi looks mostly green with blue glitter. Otaku looks pink in the pan, but it just looks blue on me.
FINAL THOUGHTS
Now that I know the trick to making this palette work for me, I can foresee myself continuing to use it. Liking 9 out of 15 shades is a decent ratio for a premade palette. However, I can’t recommend this despite loving the packaging, the concept, the texture of the shadows, and the results with specific shades. The formula is too finicky. And although it didn’t work as well for me, I thought it was still worthwhile to post about for anyone wanting to see this on a dark skintone. If you have a lighter complexion or a more advanced skillset than I do, you may enjoy this palette more than I did.
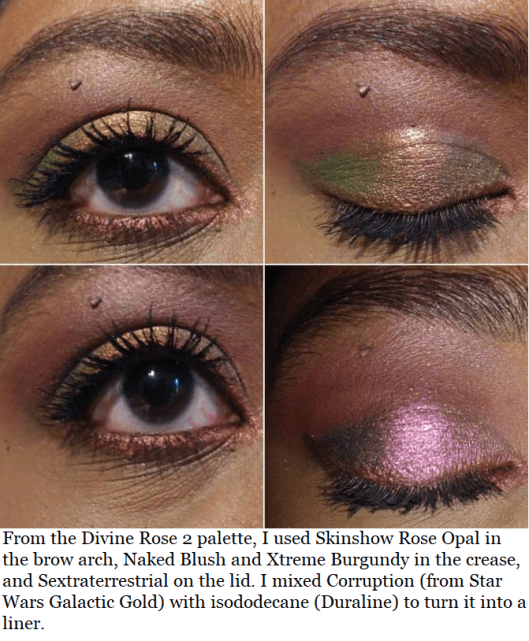
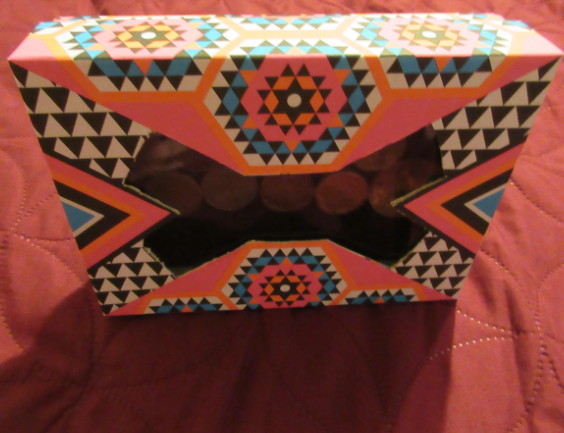
After the excitement of getting my hands on the special pink chrome mirrored packaging of Divine Rose II, I felt inspired to take a closer look at all the Pat Mcgrath palettes in my collection. I don’t have many, but I’m very happy with the selection I own, as these are color stories that suit me without there being too many repeats or similar shades, as PMG has been known lately to do.
MOTHERSHIP VIII: DIVINE ROSE II
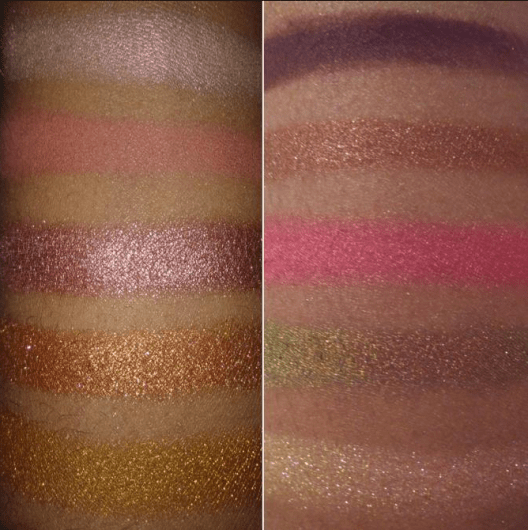
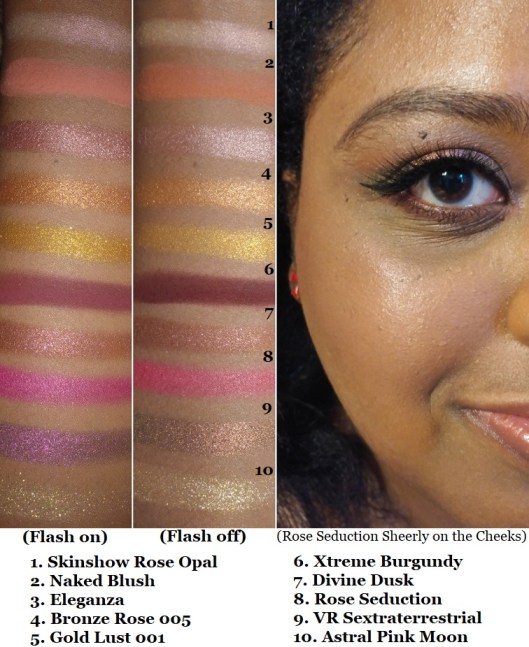
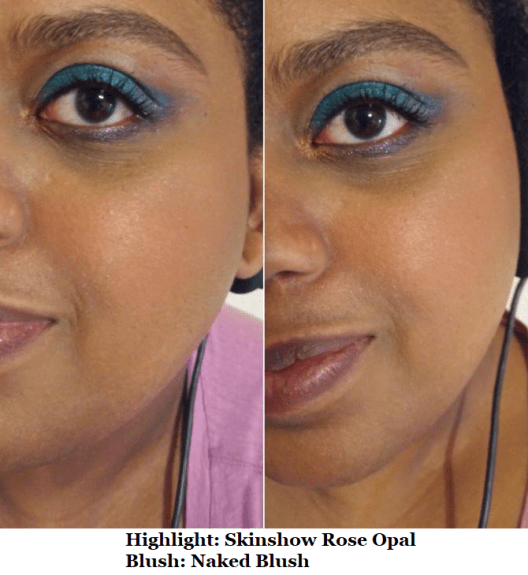
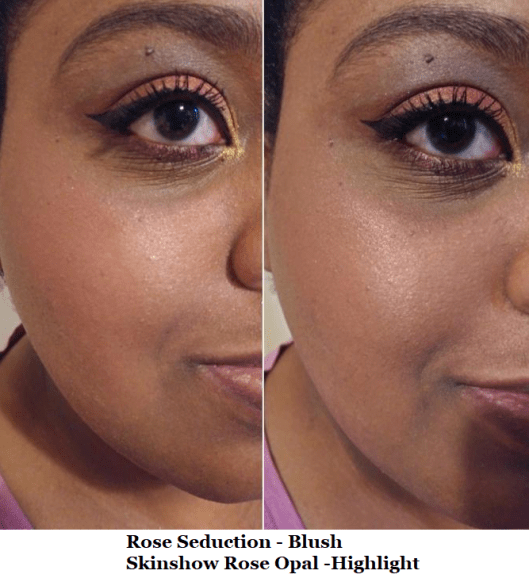
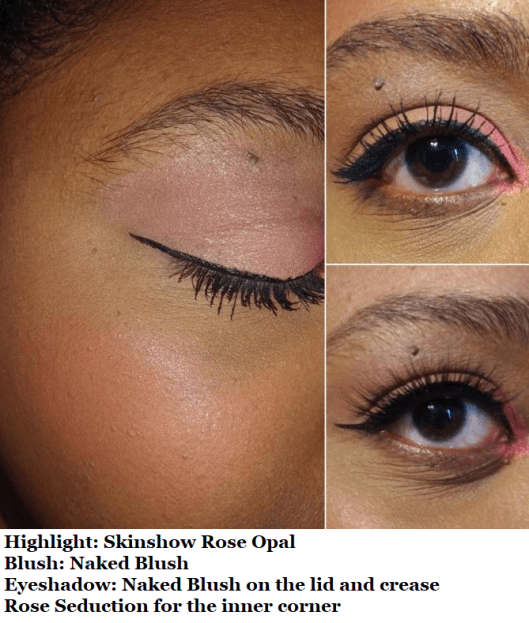
This palette somehow turned me into a pink eyeshadow lover! The shade Rose Seduction is considered safe in the EU, which is often ahead of the US in terms of cosmetic safety, but the FDA hasn’t updated their stance on eye-safe pigments, so this is an “artistry” palette rather than an “eyeshadow” palette. What sold me on trying this out is that Kinkysweat on Youtube suggested that Naked Blush and Rose Seduction could be used for blush, Skinshow Rose Opal as a highlighter, and Astral Pink Moon as a highlight topper. It turns out that both Rose Seduction and Naked Blush work as a blush for me since Naked Blush deepens up when applied to the skin. Rose Seduction also looks like it would be far too bright, but it’s subtle looking on my cheeks with my Chikuhodo blush brushes. I don’t like Astral Pink Moon on the cheeks because of how glittery it is, but Skinshow Rose Opal makes a fun pinkish gold highlight.
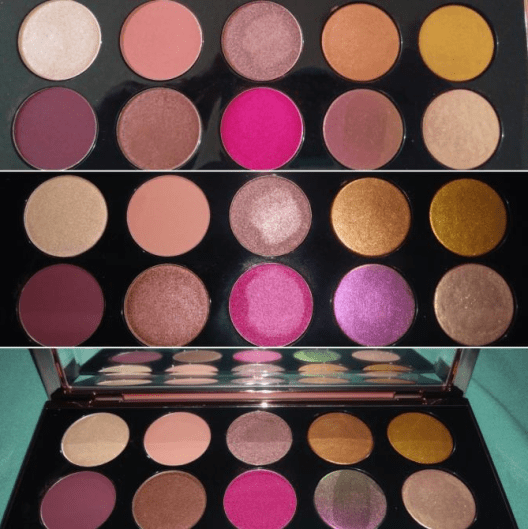
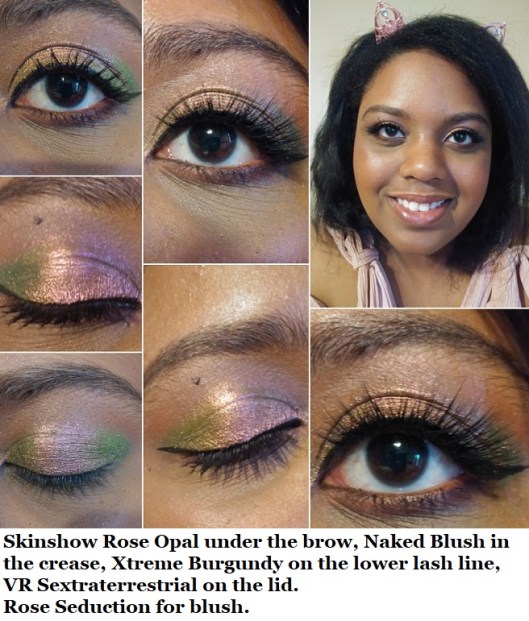
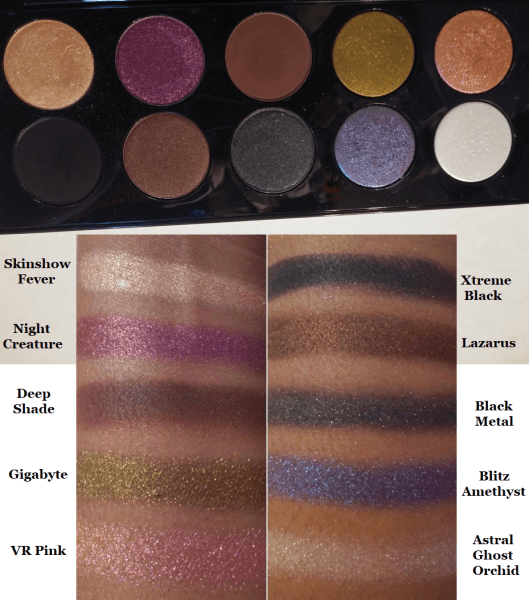
As I mentioned in my Eyeshadow Tag post, despite how nice the quality of these eyeshadows are, I still feel they’re a bit overpriced. However, the multi-purpose shades, the Sextraterrestrial Trichrome, and the limited-edition packaging made this palette worth getting. I am obsessed with the Sextraterrestrial eyeshadow! Clionadh Cosmetics’ Forge multichrome is a close dupe for the shade, though that one packs more of a punch based on the photo comparisons I’ve seen. Ironically, the color never interested me when I placed my Clionadh orders, yet when I actually tried Sextraterrestrial on my eyes, I suddenly saw the beauty and allure of the shade combination. At some angles it looks neutral on me but then the light catches it and suddenly BAM! You’re hit with a gorgeous color shift. It doesn’t pick up the best on camera but it’s so stunning in person. You can even see the shift depending on the lighting within the pan (and how it is reflected in the mirror of the palette).
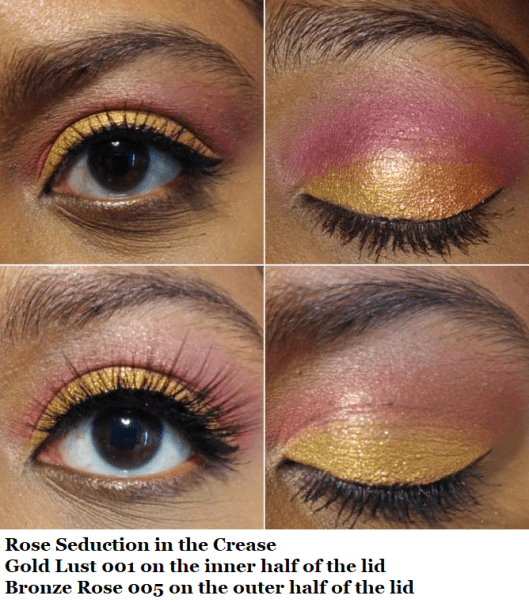
The only disappointment I have is the addition of both Bronze Rose 005 and Gold Lust 001 because the differences in those two shades aren’t distinct enough on my eyes. Considering how specific this color story already is, and being limited to ten shadows, I would have liked the gold eyeshadow (which she has plenty of across all her palettes) to be replaced with something else. Also, Eleganza and Divine Dusk look similar next to each other on my lids as well. Regardless, I’m still glad I bought this.
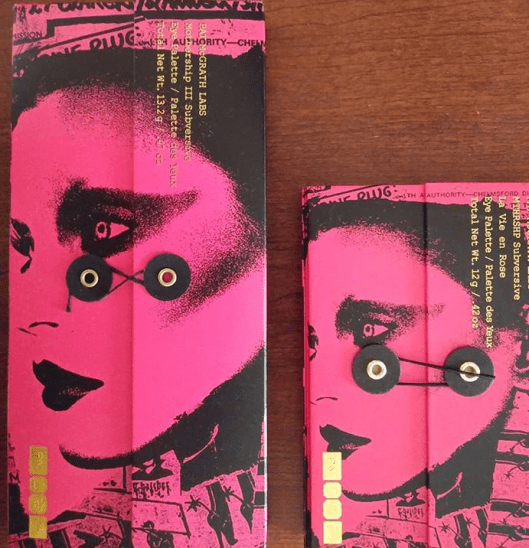
MOTHERSHIPIII: Subversive and MTHRSHP Subversive La Vie En Rose
I’ve discussed the Subversive palette in my Eyeshadow Tag post, so I will just update that I’m still enjoying it very much. This was a new purchase this year, but I bought the smaller palette several years ago. La Vie En Rose is starting to near the end of its usability, as the shadows are starting to get crumbly. It smells fine, but textural changes are indicating it is time to stop using this soon. It was a limited edition product, so I cannot repurchase it. Purple Reign is the only color I would miss, but I do have extremely similar purples from other brands.
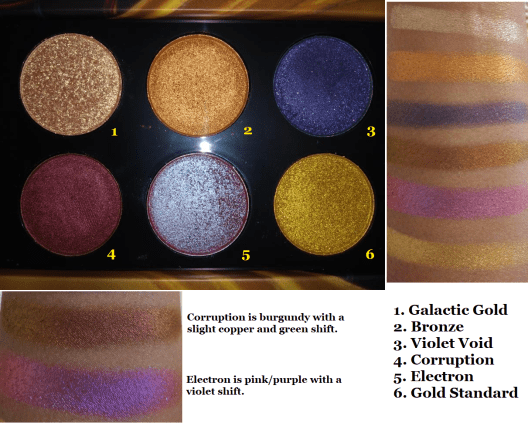
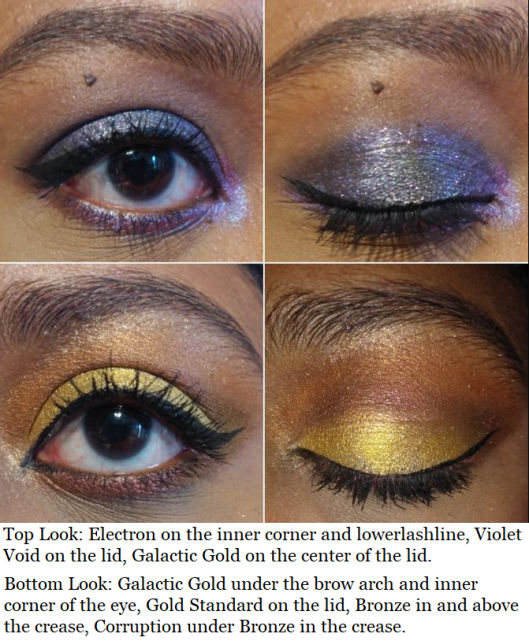
Star Wars Galactic Gold and Dark Galaxy
Aside from swatches when I first bought this, I haven’t done looks with the Star Wars palettes until this post. I originally felt a bit disappointed since the shades didn’t look how I expected in person, and I didn’t know how to pair these colors together. However, when I originally swatched them, it was on bare skin and I have since learned that several of Pat Mcgrath’s best eyeshadows require a sticky/tacky/wet base to show the true impact of the shade. I didn’t realize the shifts in some of these until I started working on this post. Now I am so glad I bought Galactic Gold! The duochromes make it a better purchase than Dark Galaxy because the shades in that palette aren’t the type I reach for that often and aren’t particularly memorable. These palettes were limited edition but anything limited edition with a high demand always comes back from this brand.
Also, I like that these palettes don’t have the flap top that the other 6 pan condensed palettes have because it’s easier to store, open, and keep open.
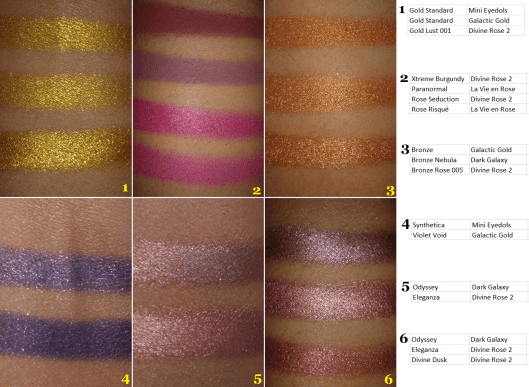
As for repeats, there is a shade called Corruption in the MTHRSHP Sublime Bronze Temptation palette and Smoked Amethyst in MTHERSHP Subversive Metalmorphosis palette that both appear in the Star Wars Dark Galaxy palette. The shades Bronze and Gold Standard from Subversive Metalmorphosis are in Star Wars Galactic Gold. Gold Standard is also in the Decadence Palette and Mini Eye Ecstasy.
Mini Eye Ecstasy: Subversive
I bought this tiny palette to try and satisfy my desire for the Decadence palette, which hadn’t restocked at the time and I also couldn’t justify spending so much on a palette without the “special” shades. The color curation is gorgeous, but I’m so glad this mini exists. For me, this was a much better way of getting the shades I wanted most without spending an arm and a leg.
Final Thoughts
I really enjoy these shadows for the luxury experience and performance. However, there are brands with a larger range of eyeshadows that don’t have as many duplicates as Pat Mcgrath does. Her collection is comparatively too small to have so many repeat shades. And besides using the actual same shades, there are still those with different names that are similar to each other as well. When you’re spending so much money on palettes, the last thing you want is to essentially purchase the same thing multiple times. So, that’s one of the reasons I’m very selective about which palettes I buy and why I spent so much time discussing comparisons in this post for those who want to avoid this issue as well. Aside from that, the quality of Pat Mcgrath shadows are very nice and in some ways worth the hype.
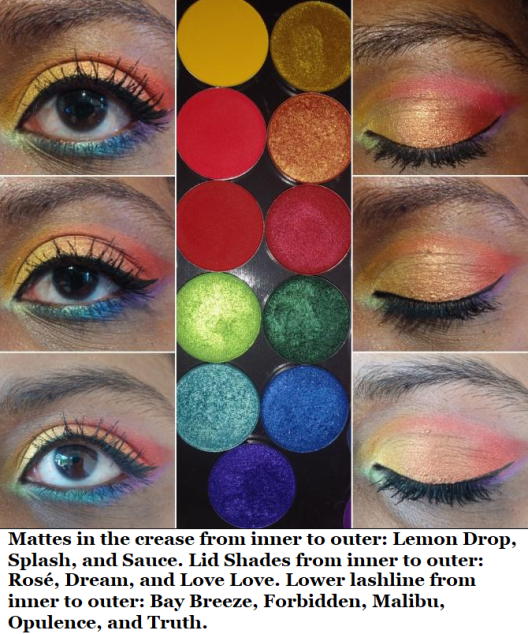
My first Coloured Raine purchase was in November 2017. For two years, their eyeshadow formula was in a league of its own at the top. I even preferred it over my expensive Viseart, Natasha Denona, and Pat Mcgrath shadows! This year, I took a deeper dive into other indie brands’ makeup. Although I no longer know which brand can claim the #1 spot in my collection, Coloured Raine is still tied at the top. Their gorgeous forest green shade, Forbidden, is my all-time favorite eyeshadow (not counting duochromes or multichromes). I purchased nearly all their eyeshadows, and I even have a few duplicates, because I love them so much! However, rather than trying to complete my collection, this post motivated me to pull a Marie Kondo on all my single/depotted shadows and just keep the ones I love.
Because the quality of Coloured Raine shadows are so consistent across the board, there isn’t much to say about them except that they’re highly pigmented and blendable with the smoothest creamy texture. This is the case among all types: mattes, shimmers, metallics, etc.
I will make note of any shades that stand out for negative or especially positive reasons. I will also be discussing more than just eyeshadows. This review will include comments on a few blush/highlighter duos, sponges, and empty magnetic palettes.
THE EYESHADOWS
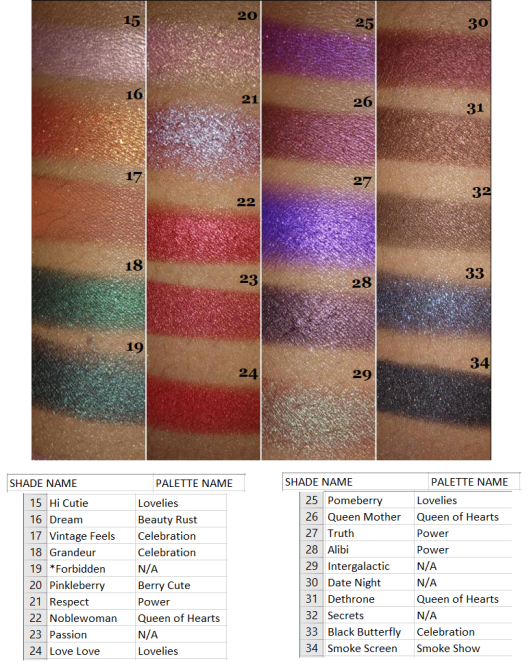
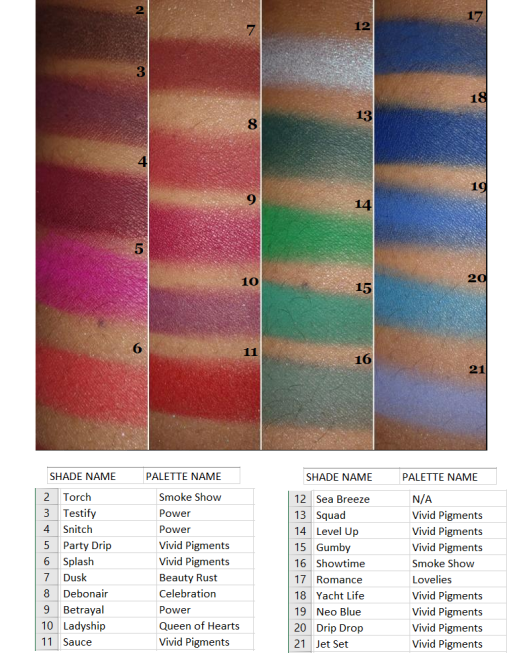
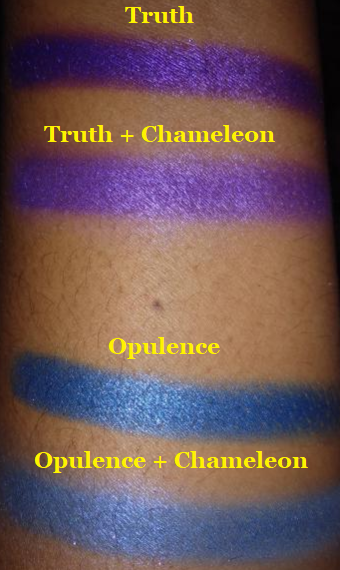
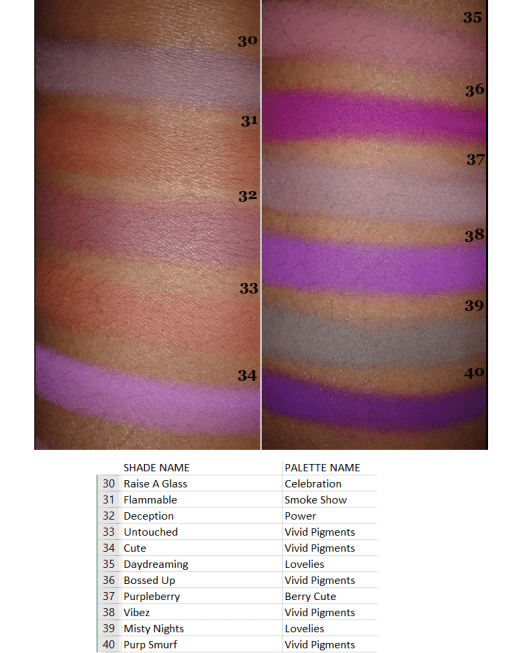
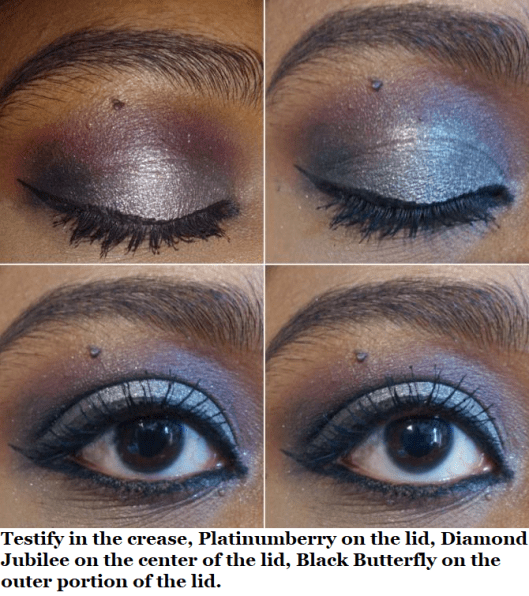
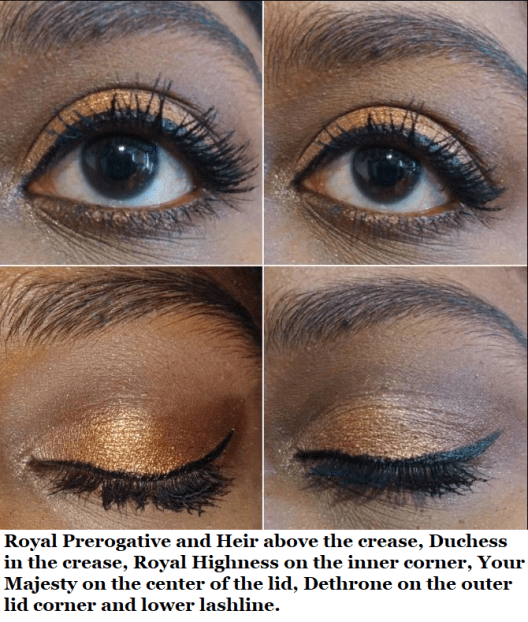
There was a time when I purchased Coloured Raine shadows to make quads as Christmas gifts. Your Majesty (which I somehow had three backups in my collection) and Malibu from this set of swatches were among them. I should note that I did take Super Star out of my collection since it was so similar to Rosé. I parted with Nightingale as it is too common of a color. Paradise Isle looks like a more sparkly version of Unexpected, yet I couldn’t part with either shade. I was also surprised to discover the Blue Magic shade I’ve purchased for others, I didn’t have in my own collection. I kept seeing Opulence and assumed it was Blue Magic. In the pan, Opulence has a purple tinge that doesn’t translate to the eye, as the purple disappears once it’s rubbed onto the skin. Since I’m just left with bright blue on my skin, I wonder if I’m still missing out by not having the Blue Magic shade. It looks like it might just be a darker version. If I get it in the future, I will update this post as usual. I also have to comment that Legacy is such a cool shade! It’s whitish-pink in the pan but pinkish purple on the eye, making it a nice topper shade. As with other iridescent shades, I wouldn’t use this on its own, except for the inner corner or as an interesting brow highlight.
I have enough dark greens, so I removed Grandeur from my collection. Noblewoman won over Passion. And even though Smoke Screen was the only black shade with gold shimmer in my collection, I rarely use any form of black other than matte, so I took that out as well. I would like to reiterate that this had nothing to do with an issue of the formula. I was so tempted to keep them all, but I needed room to add Safari Raine and the upcoming Juicy Boost collection. I could have used another empty magnetic palette (I have so many) but I don’t think I need over 100 eyeshadows from any single brand.
I got rid of all the white shades in this set. I’ve never had use for a white eyeshadow, and I prefer using highlighters to highlight under the brow or to use a cream shade to blend out shadows. Choosing between the dark brown shades was surprisingly difficult, so I only removed Chocolate since it looks like the kind of brown I have the most repeated in my collection.
I got rid of Snitch and Torch for the same reason as Chocolate in the previous round of swatches. I noticed that the palette with the most shades I decided not to keep was from Smoke Show. Prior to getting the Safari Raine palette during the last restock, Smoke Show was the last palette I added to my collection as it had the least appealing color story for me. The shade I wanted most, Showtime, I didn’t keep either as it couldn’t compete with those stunning Vivid green pigments.
Side Note: I’ve always wondered if Coloured Raine is the reason Colourpop had to discontinue selling their Smoke Show palette and rename it Blowing Smoke. Coloured Raine’s palette came first and the name is trademarked. Even though the color story between the palettes is different, I believe one of the stipulations of a trademark breech is if it would cause confusion. Since they both have ‘Colour’ in their names, to have the same palette name on top of that seems like sufficient grounds to me!
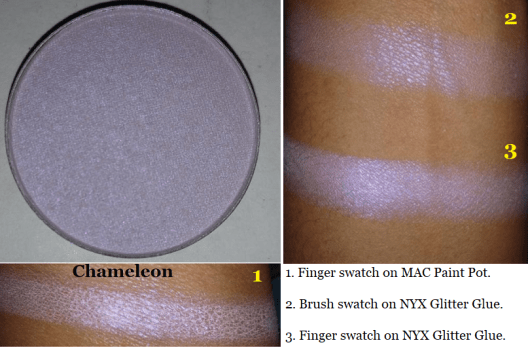
I purchased the shade Chameleon with my Safari Raine order, so I’m including it here as well. It’s a purple iridescent shade that I don’t think looks that nice on its own. When used as just an inner corner highlight, it had an interesting darker purple glow, but it’s not the texture or pigmentation that I’m looking for. The swatches for this shade I intentionally built up to see what’s the maximum pigmentation I could get when certain spots refused to deposit color, and I was still not happy with the results. I would rather reach for an iridescent from other brands over this one. It’s one of the few shades in their entire collection that I wouldn’t recommend. The one application I’ve found to be somewhat useful for this is adding a lighter pearly finish when topped on other shades. I recommend just skipping this one.
The Celebration palette had the second most eyeshadows I decided not to keep, having decluttered 5 out of 13, which is still a decent amount to have kept. Raise a Glass, Flammable, and Misty Nights were removed. As a purple eyeshadow lover, I would love having a lot more purple shimmers from Coloured Raine. The Power palette definitely satisfied some of my purple eyeshadow needs, but I will always want more, even though I have plenty of purples from other brands. Here is a comparison of CR’s Power Palette to CP’s As You Like It palette.
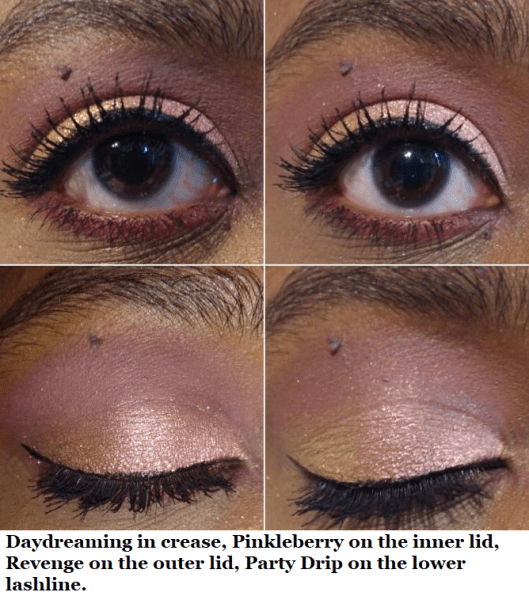
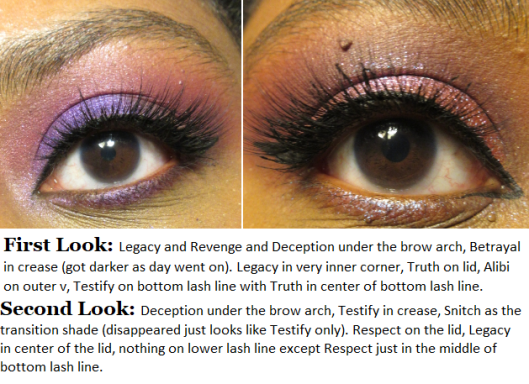
And here are some eyeshadow looks!
SAFARI RAINE
CR had one final restock of this palette, so I have it in my collection now! They’re also selling the shades individually, which is appealing since I planned to depot the shadows anyway. However, at $6.99 each, that would cost $62.91 to get them all when the palette is just $29. I have no issues with Coloured Raine charging them at their standard eyeshadow price. I just made the most cost-effective decision and I’m glad they kept the original Palette price instead of raising it due to the hype that Jackie Aina played a part in restarting.
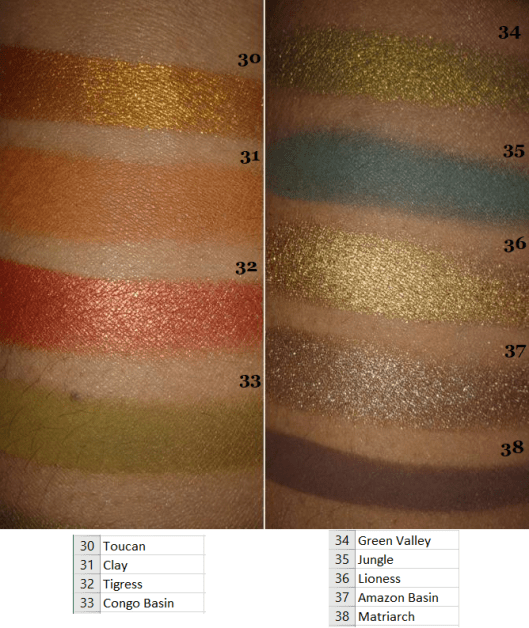
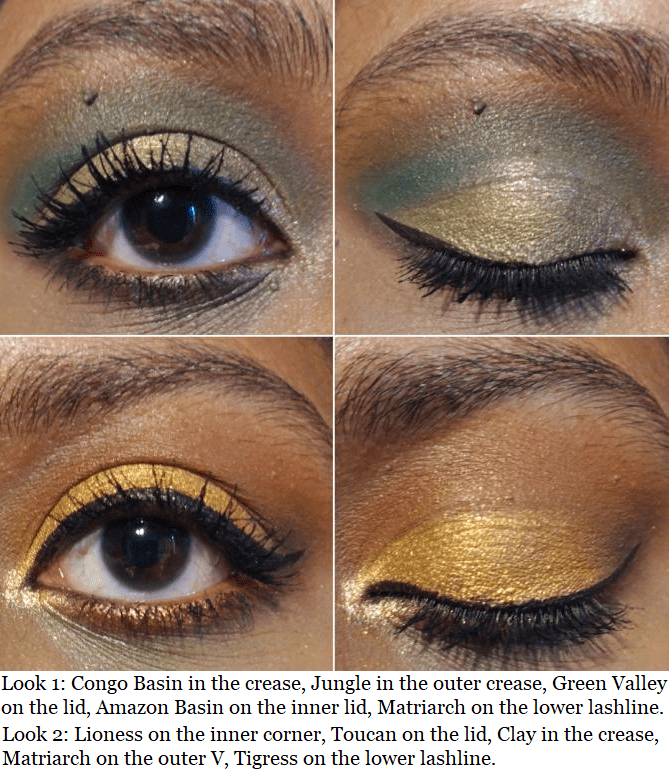
Although I’ve only had time to use this twice, I would say that the quality is on par with the other shadows. The only shade I had a little trouble getting to show on my skin was Congo Basin (even after trying with the ABH primer which I use to make shadows really stand out). Even to the touch, it felt a little grittier than the others. It reminded me of the texture of the Snitch from the Power palette that I didn’t like. Purples of that shade do tend to have that texture, but I’ve never had a green eyeshadow feel like this. Regardless, I did manage to get it to show a little.
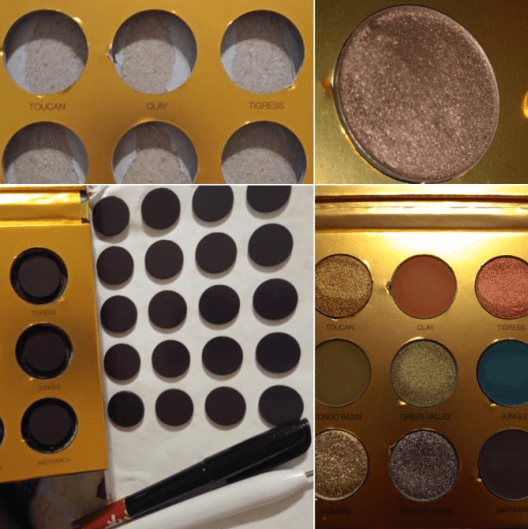
Because the palettes were so sought after, I felt bad about completely getting rid of mine after depotting it. So, I turned it into a magnetic palette. I removed the shadows from the palette, colored the wells with black marker (I didn’t want to wait for black paint to dry) just to make it look more aesthetically pleasing. You can cut around the magnet to fit the size of the wells (keeping the sticker on the back) and place the pan inside to make sure the magnet isn’t too thick. Although I had thinner magnets and magnetic sheets, I wanted to use up my thicker ones, so I used them anyway. It made the pans stick out from the top a little, but the lid still closes, which is most important. I stuck all the magnets in the wells and that’s it! When depotting, I always clean off the glue (this time using Parian spirits) and place a sticker label on the bottom so I can remember the shade name and palette it came from.
The Blush/Highlighter Duos
I have 2 out of the 4 Blush and Highlight Duos from the Power Collection. I didn’t buy the one called Prove My Loyalty because it has an icy white highlighter best suited for pale-light skin tones and a dark red matte best suited for dark-deep skintones. Anyone can wear any makeup they want, but the pairing of those two was…an interesting choice in my opinion. I’m not sure how many people can find use for both of those together. I also didn’t purchase My Day One because both the highlighter and blush looked like they might be too dark for me.
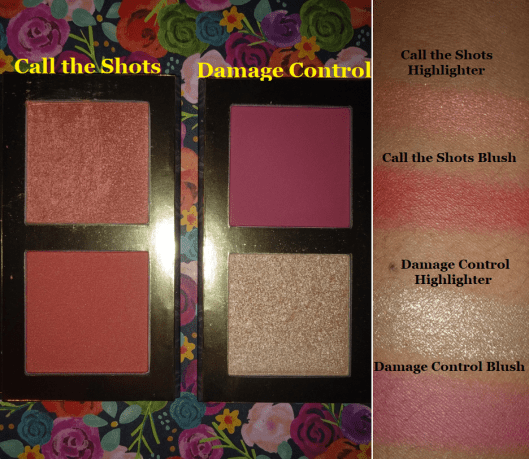
I purchased Damage Control first. Here are some old photos with it.
I like the blush portion. It’s very pigmented, so it requires a light hand or very fluffy brush with it. The highlight shade is beautiful, but too glittery for my taste. I prefer finer shimmer particles in my highlighters.
The other duo I purchased is named Call The Shots. The blush has a little more warmth to it, which suits me a bit better, although the color difference between this blush and the previous one isn’t that obvious when I use a sheer application. This highlighter has more of that shimmer finish I prefer, but I typically don’t reach for this shade. I love golds. Lately, I have been more interested in blush toppers, which this color is great for, meaning it won’t go to waste. I just know I won’t use it as often as I should.
These duos are fine, but don’t really ‘wow’ me. Although I don’t think $25 is too much considering what you’re getting, if you can snag them for 50% off (as they’ve been on sale multiple times) then I’d be more likely to say they’re worth checking out at that discounted price.
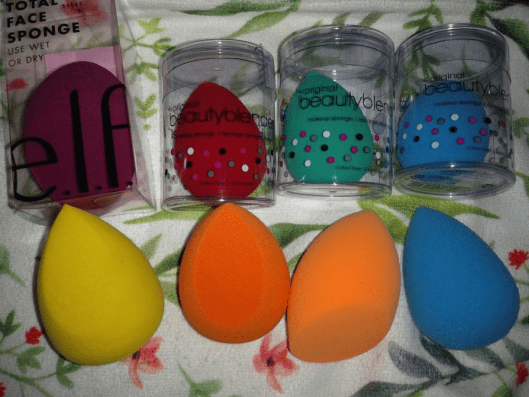
THE SPONGES
I don’t know why I keep buying sponges when I’m 90% more likely to use a brush to apply my foundation and concealer. If I don’t use a brush, I use the Blendiful from Tati Beauty because I can get my products on and blended in half the time.
In any case, the only traditional beauty sponges I have used so far are from Beautyblender, Real Techniques, and Coloured Raine. The Real Techniques sponge is nice, but the one from Coloured Raine easily surpasses it. I cannot decide which I like more, though, between BB and CR because they both are better at different things.
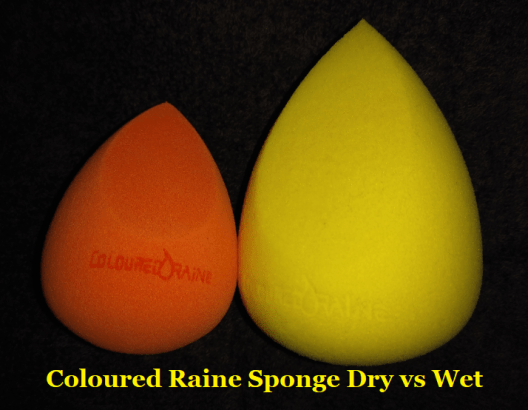
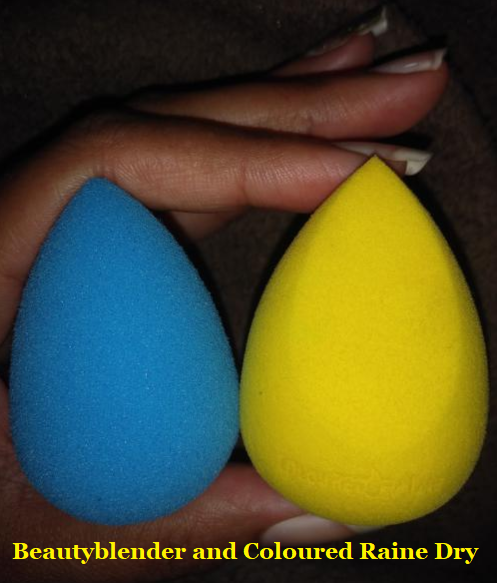
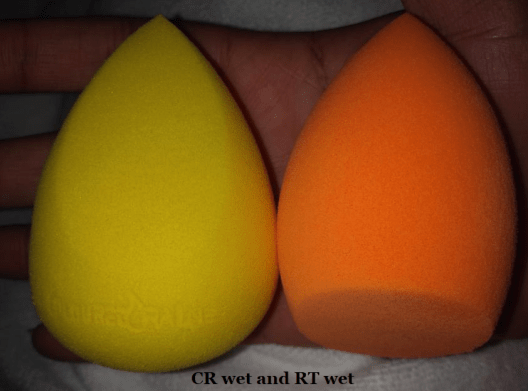
Softest: When it comes to the softest sponge, Beautyblender wins. The Coloured Raine sponge feels a bit dense when dry but softens up after it is damp. It swells to the largest size among the three sponges. The Real Techniques sponge is a lot harder and remains a bit hard even after being wet.
Precision: The pointy tip of the CR sponge fits perfectly in the crevices around my eyes when applying concealer. It easily wins, followed by the RT flat edge and finally the BB which has no flat edge and the tip is still a bit rounded, which impacts the precision. That being said, I don’t often use a sponge with my concealer, as I want the most coverage under my eyes and a sponge does sheer things a bit. So, this benefit isn’t the most useful in my everyday life. However, when I was on vacation last year and wanted to bring minimal brushes and wanted a backup sponge, I took the CR sponge instead of a BB.
Smoothest Foundation Application: A nice blended look can be achieved with all the sponges, but the BB does it the fastest, followed by the CR one.
Easiest to Clean: The BB and RT sponges take about the same time. They work well with the Beautyblender solid soap. The CR sponge is the hardest to clean and doesn’t work as well with the BB Solid. I have better results when I use my regular makeup removing face wash on it. It’s possible that I perceive it as being more difficult to clean because I’m using the yellow one, which is probably easier to see stains. I won’t know until I start using my orange (or green if I can find that one) CR sponge in the future.
Most Durable: The CR sponge definitely lasts the longest and hasn’t torn on me yet. My RT sponges start to get tears in them after the first 3-5 uses thanks to my long nails when I’m washing them. My BB sponges tear on me between 1-3 uses. I don’t know if there has been any changes to the beautyblender because the first two I ever had years ago had to be thrown out before it ever tore. But now my beautyblenders don’t last as long.
Prices: RT = $5-$6. CR = $6. BB = $20.
Side note: BB sells silicone (or silicone-like) cases to put sponges in to let dry and keep away from dust and other particles. You can find adorable dupes for 50-75% cheaper on sites like Amazon and Ebay. I have the official one along with the dupes and although the official one is thicker/sturdier with more breathable holes, there isn’t that much of a difference. My kitty ones get the job done and they even have ridges on the bottom that lets them stand upright, unlike the official one.
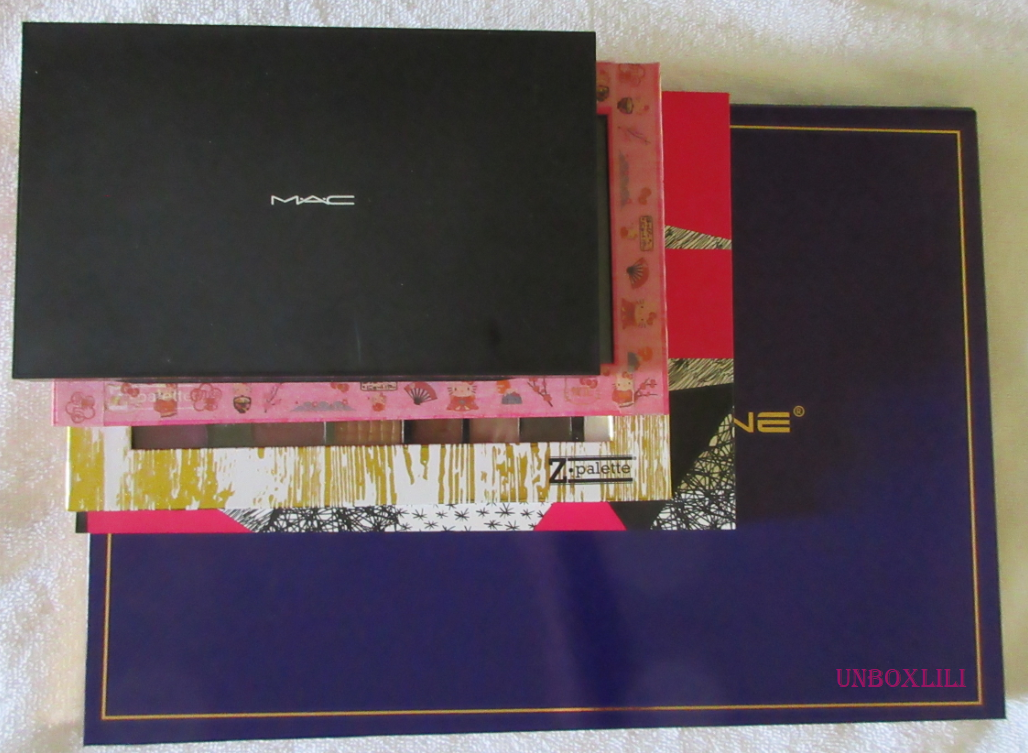
EMPTY MAGNETIC PALETTES
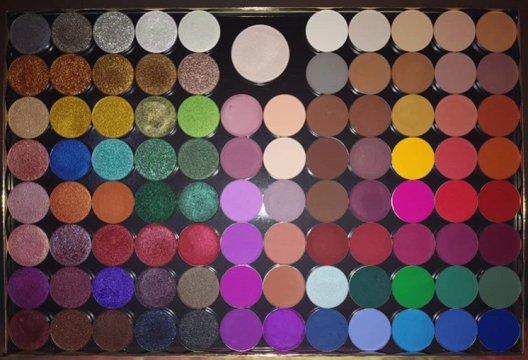
I have the Book of Shades (which holds 72 standard size eyeshadows), four of the 96 pan Power palettes, and one purple 96 pan palette. The collector in me still wants the pink one I don’t have.
On my previous trip, I made use of one large z-palette, but I missed having an even wider variety. That’s why I bought the Book of Shades. I wanted it for times I plan to travel for longer than a week.
The Book of Shades fits comfortably at the bottom of my makeup train case and is a safer way to house my shadows than carrying multiple palettes separately. It’s heavy but that’s the tradeoff for being so sturdy and keeping the eyeshadows secure.
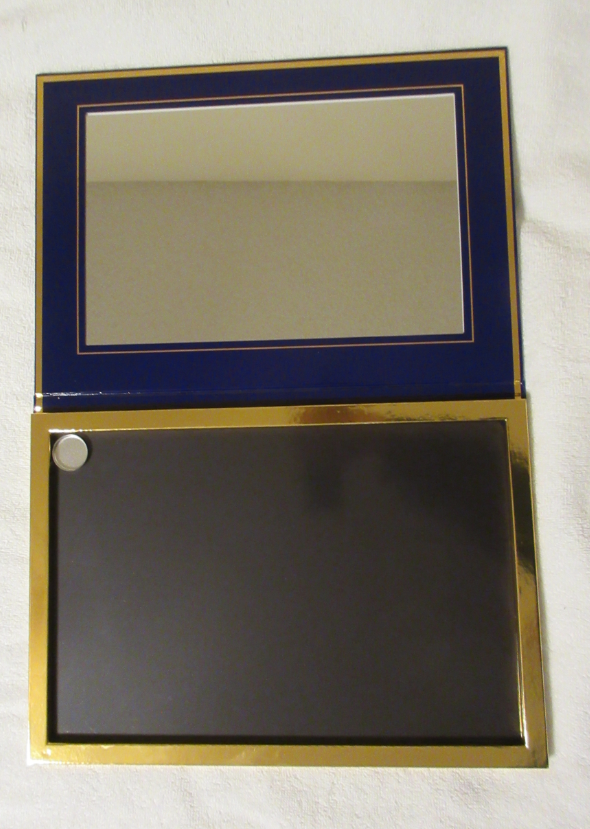
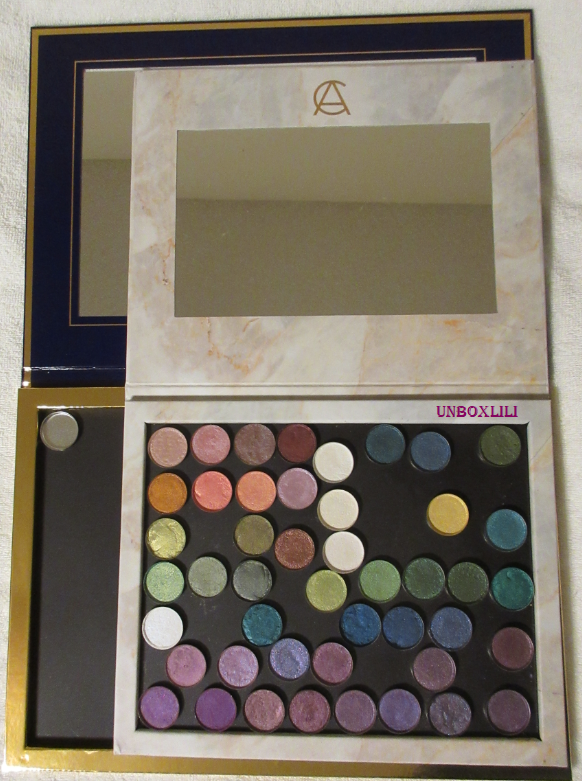
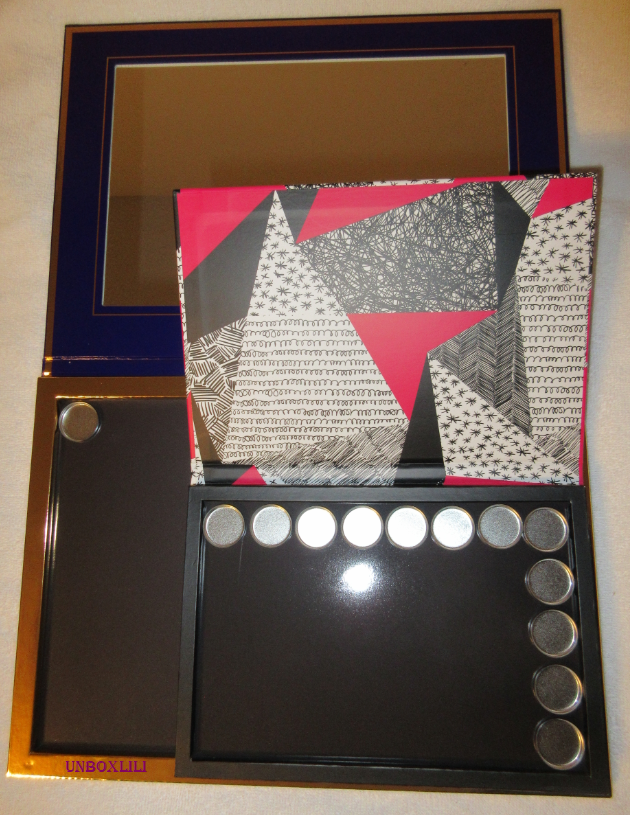
There are 3 pages (each page holding 25 pans) and each page has removable plastic sheets that you can write the shade names on with a dry erase/washable marker. Or perhaps in permanent marker if you don’t intend to swap them out. I’m not sure. I don’t have a need for the sheets since my shadows are all labeled on the bottoms of the pans, but it’s a nice addition. There’s also a mirror on the other side of the cover.
I’ve talked about the 96 pan palettes multiple times on my blog. I can’t take it traveling, but I prefer having these over the book of shades because of the freedom of being able to place any sized eyeshadow pan I want in them, it holds more shadows, and I can see everything at once. It’s harder for me to figure out what shades I want to use when I have to flip back and forth between pages. That’s why I also prefer this over the smaller sized flat empty magnetic palettes. The last photo is what my palette looks like now.
That’s all I have for today’s post! I tried to keep it short after my massive Japanese brush review. Although I enjoy making large comprehensive posts (for ease of keeping everything in one place), it means they end up being incredibly long. That’s why I decided to wait until I could at least include Safari Raine in the review, though not long enough to wait for the Juicy Boost collection. At the time that I’m writing this, we haven’t seen anything yet besides the outer packaging.
JULY 19th, 2020 UPDATE: Towards the end of the post I have an update section with 24 additional eyeshadows, some of which have come from the new After Dark collection.
Note: I can’t post a review at this time without first mentioning that I hope everyone reading this is and remains safe during the COVID-19 pandemic. This year has been especially difficult with what is going on throughout the globe, in addition to having yet another surgery. The beauty world has been a comforting distraction for me these past few months and I hope that my blog posts are also a welcome distraction. Now, onto the review!
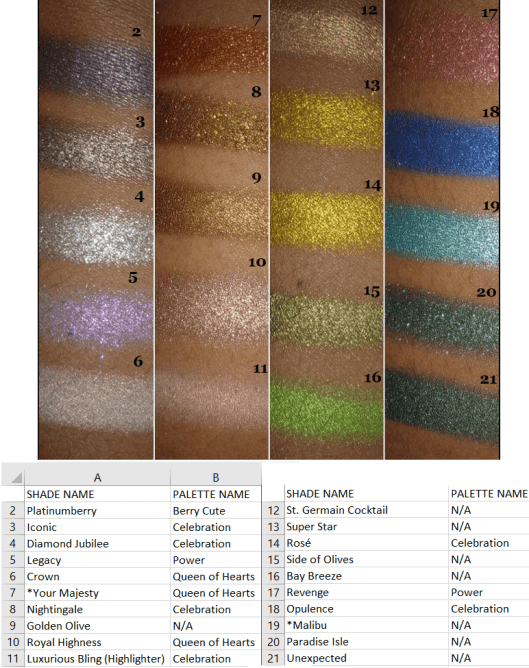
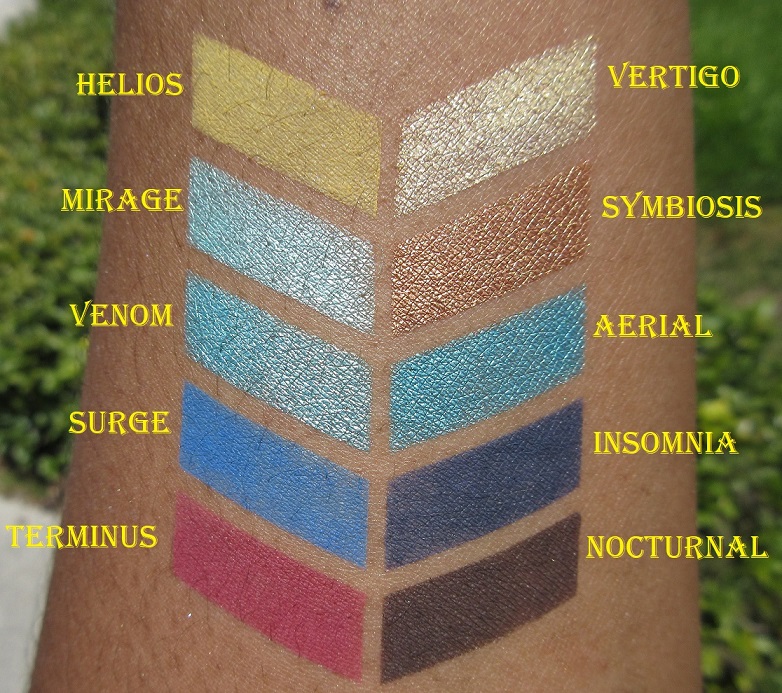
These are the shades I currently possess. There are twelve more eyeshadows I intend to purchase, after international shipping prices return to normal, which I believe would fully round out my collection.
Lethal’s website has a fun palette designing tool that helps to put a color story together. There were so many shades I wanted that didn’t go together, so I wish we weren’t limited to 12 spaces maximum (as my intention was always to put them in a larger magnetic palette), but it’s still helpful when getting started. Plus, the palette builder allows you to put the 12 shadows in a bundle to be discounted. You can see tons of combinations others have made following the #lethalbyop on Instagram. I found their examples to be quite inspiring. Here are some of my own.
PRICES, SHIPPING, AND CUSTOMER SERVICE
The eyeshadows are $6 each, which is great considering the normal cost of single shadows, but I do recommend using the palette designer to bundle for the best prices.
It usually comes out to be $58-$59 if you include one of their magnetic palettes, though you can bundle without one as seen in the screenshot above. The smaller Orbital palette holds 9 shadows and also gives a discounted price after putting it together.
Lethal Cosmetics is based in Germany, but shipping under normal circumstances takes about a week. Standard shipping used to be $7 or free on orders of $80 and up. Currently, due to the pandemic, it is $24 or free with orders at or above $150.
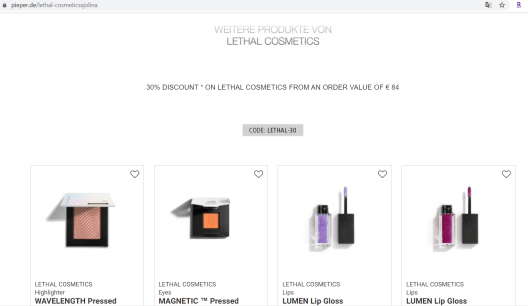
I love getting a good discount, so I spent hours looking for promo/affiliate/influencer codes, but I have been unsuccessful. By signing up for emails, you can get notified about sales (and the occasional code). I was able to find Jolina10 from Jolina Mennen who collaborated with Lethal Cosmetics to create their first (non-customizable) eyeshadow palette. However, the code does not work on everything, like Jolina’s own palette. Also, when the palette was first released, I heard that the Pieper Perfumery had 30% off, but even with Chrome’s help translating their site to English, it was hard to navigate.
My Duolingo lessons didn’t prepare me enough to understand the site either.
I have interacted with Lethal Cosmetics’ customer service a few times and the representatives I’ve spoken with have been so polite and friendly. They also have a great social media presence with the way they interact with customers regardless of their follow-count. This is not always the case, even regarding Indie brands, so I felt it was important to note and applaud good customer service whenever I come across it.
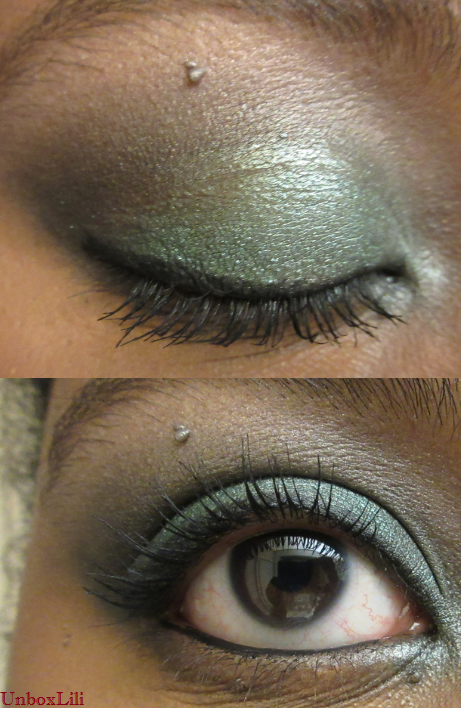
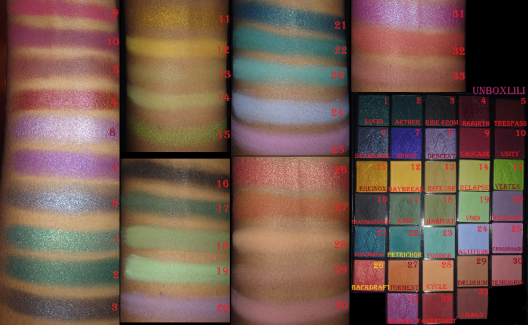
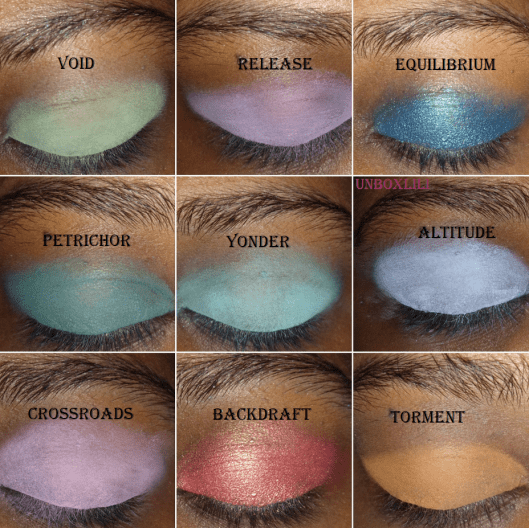
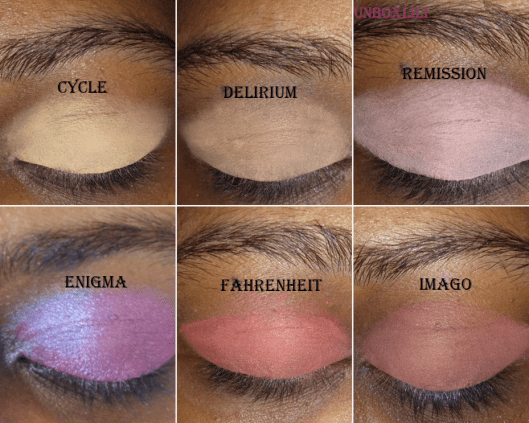
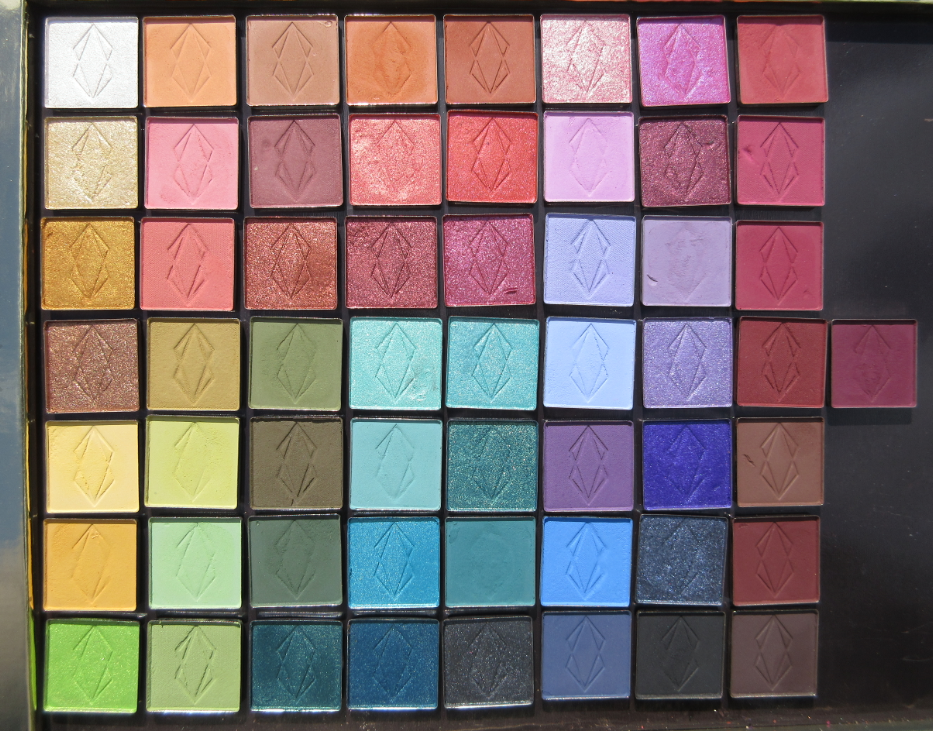
SWATCHES
I normally use eyeshadow primer when taking pictures for this blog, but I did not for any of these arm or eye swatches. However, for my different eyeshadow look examples, I used a MAC Paint Pot in Groundwork, ABH eyeshadow primer for the pastel look specifically, and Nyx Glitter Primer in any area requiring the metallic/shimmer eyeshadows.
For the mostpart, the color you expect from the website is what you get. However, I had quite a few surprises
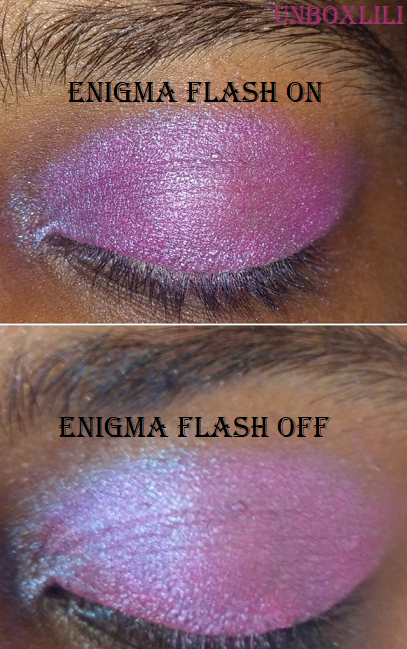
The orange shades look vastly different in the pan than what appears online, but when actually used on the eye, they do reflect the color presented on the website. Backdraft is way darker in person than on the website. It’s not the light peachy-pink I was expecting, though it is described as being “fiery.” Also, it says fuchsia in the description of Enigma on the website, but it looked so blue from the glitter shift that I was expecting a cooler blue-purple shade. Several more of the shades were slightly different than I expected, so I would recommend paying close attention to the descriptions on the site. Some, but not all, of the photos from the website include swatches. I wish they had light, medium, and dark arm swatches for all of them. Overall though, when you compare the shadows in my first picture with flash on, it shows more accurately what they look like in person (excluding enigma which looks more accurate with flash off in this case). The flash off side looks closer to what is on the website (again excluding Enigma which is the reverse).
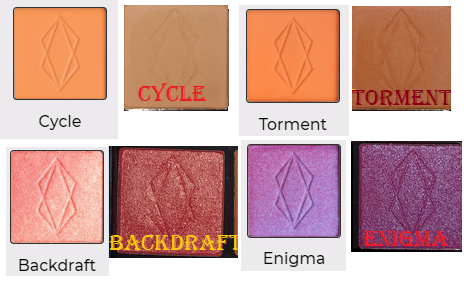
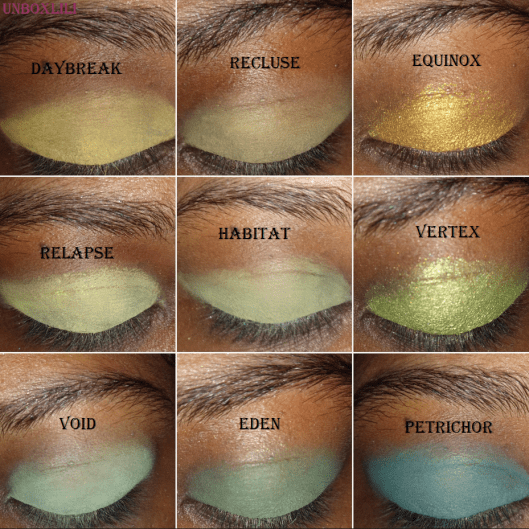
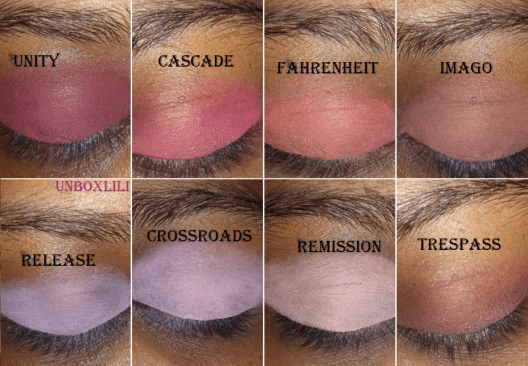
Another thing I noticed was how similar some of the shades look on my skintone. So, I put them together to have an easier time seeing the similarities and differences.
The similarities are less apparent once they’ve been built-up, such as Relapse and Habitat. Habitat builds up to a medium green. Crossroads and Release look alike because of the shared purple tone, with Crossroads being a cool pinkish purple compared to Release’s lavender shade.
PERFORMANCE
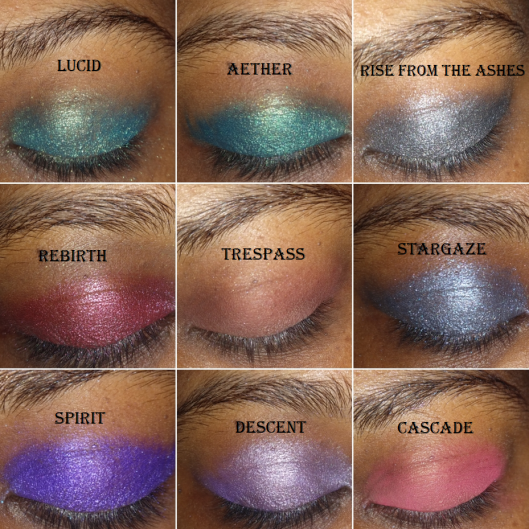
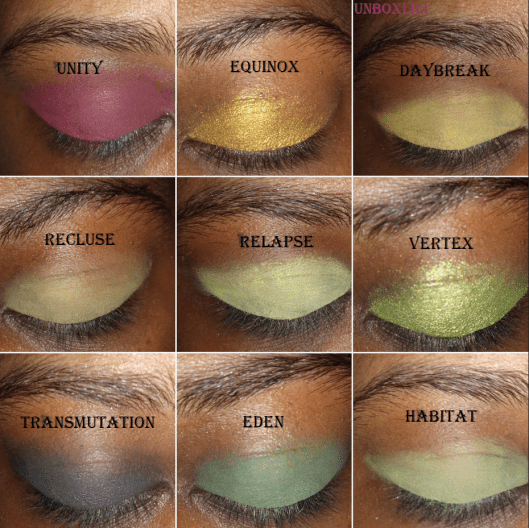
The darker and red-based mattes look opaque on my lids with minimal effort. The lighter and pastel shades take more time to build up, but they do build beautifully, especially when I use a light base such as the ABH primer underneath. The mattes blend so well, and though some take extra time, the unique shades make it worth the effort. I tried comparing them to other eyeshadows in my collection and could only find a few that were similar.
As for the metallic/shimmers, some shades worked well regardless of the tool used, but for the most part, I’ve been unable to get the maximum color payoff using just a brush. So, my favorite application method is to lay the color on first with the brush and then apply another layer with my finger. They all apply so smoothly and pigmented to my eye when using my finger that I don’t feel the need to wet my brush when I use them.
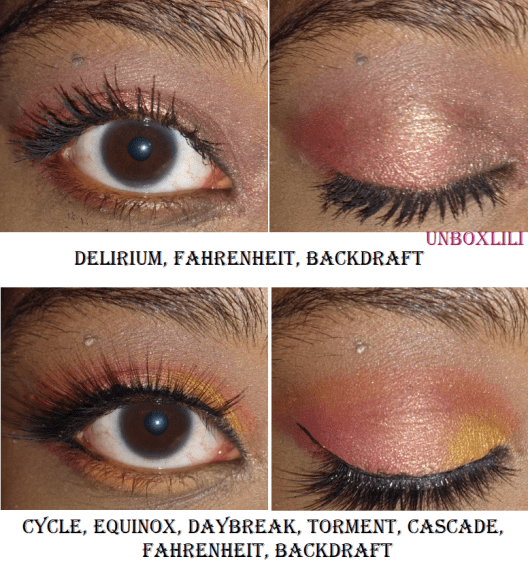
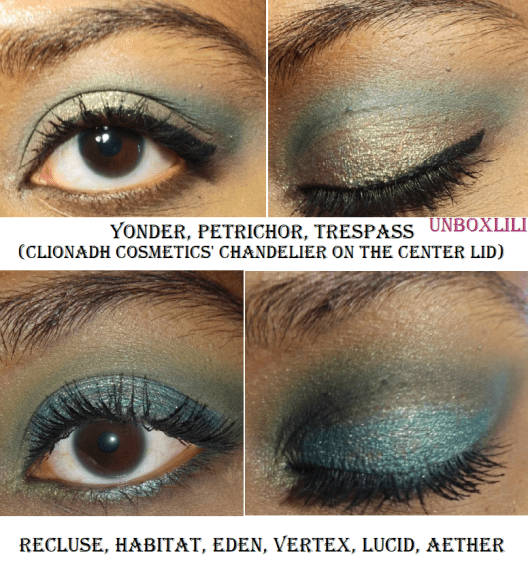
Here are some of the looks I’ve done:
I also got the last two look ideas from Instagram:
There isn’t much more to say about these eyeshadows except that I enjoy the formula. I have some shadows, like Natasha Denona, where I can mix two shades on top of each other to create a new shade. I haven’t found that to really be the case for the Lethal Cosmetics shadows (or at least not easily), which is useful when I want to do a more complicated look involving more than four shades and want them to stay true to color. You definitely don’t have to worry about these shadows looking muddy on the eyes. The fact that they are different from the other shades in my collection and unique enough to inspire me makes these eyeshadows worth it to me. And as I mentioned earlier, I intend to get a few more!
JULY 19th, 2020 UPDATE
This is what my collection currently looks like with the new additions. The names with * in front of them in the swatch photos are brand new shades from the After Dark Collection.
Thank you for reading my first in an ongoing Indie spotlight series! I’m not sure when the next one will be since it takes me so much time to test them out. The new brands I’ve tried this year are Sydney Grace, Devinah Cosmetics, Clionadh Cosmetics, Give me Glow, Makeup Geek, Menagerie Cosmetics, etc. I’ve been posting a lot of eyeshadows lately so I might do a different topic for my next post.
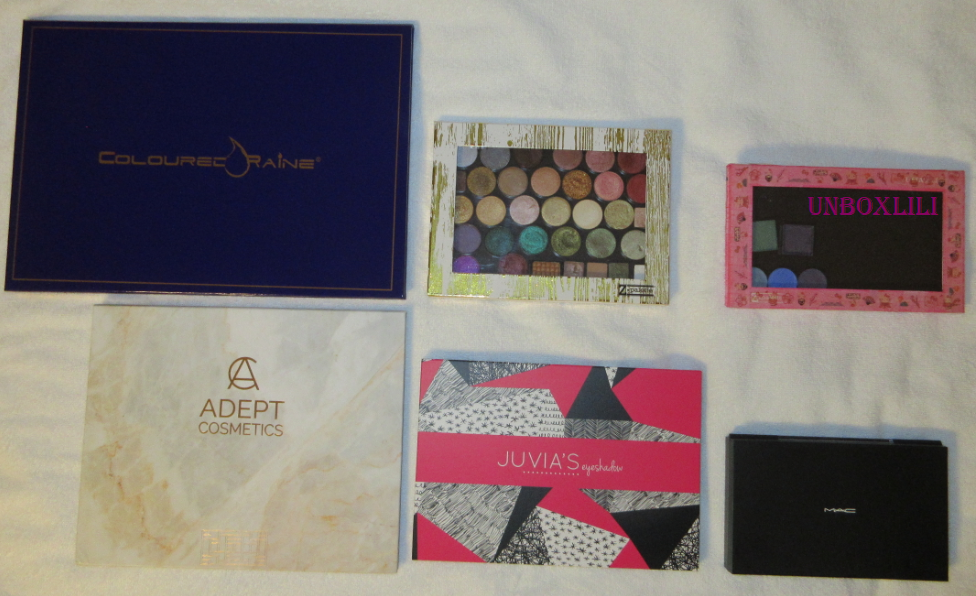
I have apost in this blog about creating DIY custom palettes, but today’s topic is for those trying to find good quality pre-made options at the best prices.
When discussing how many eyeshadows will fit, I am referring to the standard eyeshadow pan size of 26mm. Tax and shipping are not considered in the price listings.
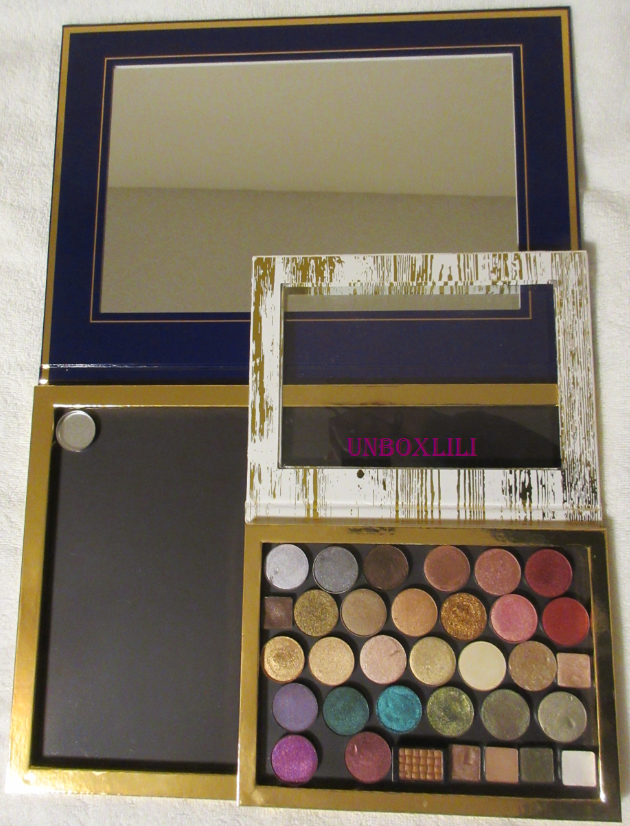
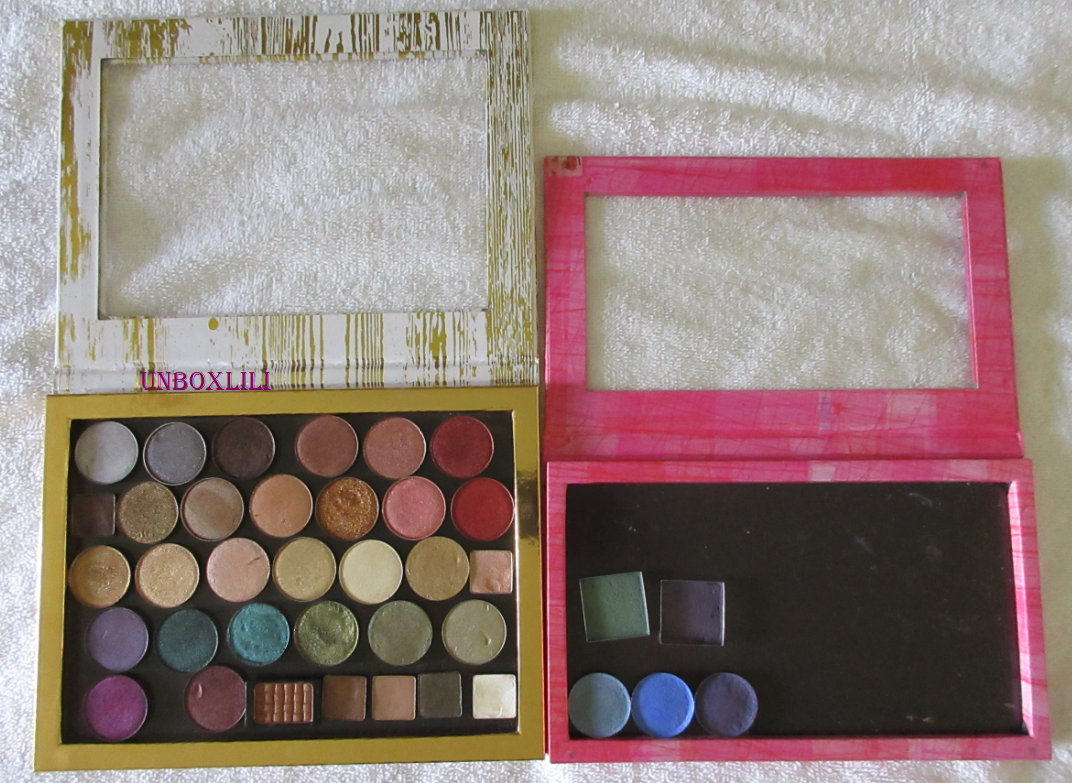
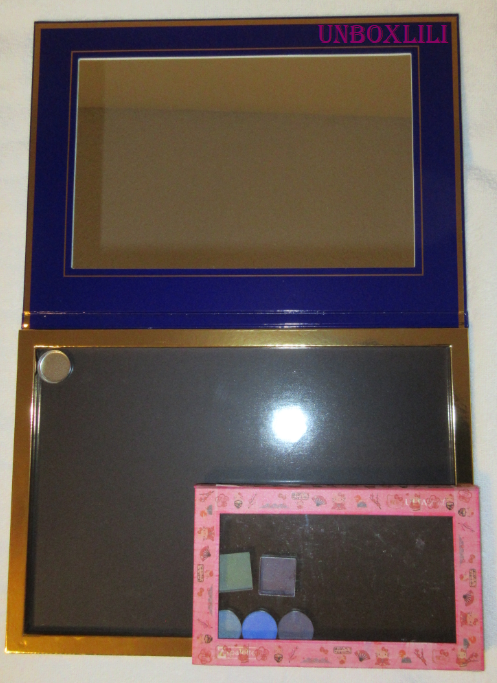
COLOURED RAINE
Holds: 96 pans
Materials: Cardboard, Mirror
Price: $45 (bought for $22 during the Christmas sale)
This CR palette is the largest I own and also the thickest of the cardboard palettes. However, I can’t give them bonus points for durability because that extra sturdiness is necessary to bear the weight of all these eyeshadows. The bigger the palette, the stronger it needs to be. At the sale price I paid, this is almost the best deal out of all the palettes I have. The full price is decent but not better than the Juvia’s Place palette. CR added to the production cost by including a mirror, but it’s a useless feature because it isn’t practical to lift a palette of this weight and size up to my face to apply eyeshadow. The top lid can fold back into a tent position very well without sliding. The magnets inside are strong and I could hold this upside down without worrying about pans falling out. Overall, I’m impressed with the quality and recommend it to anyone seeking a huge palette.
“ADEPT” vs AUTHENTIC ADEPT
Holds: 48-55 pans (depending on the arrangement)
Materials: Cardboard, Mirror
Typical price range: $19-$23
I learned of this brand from BailyB on youtube. At the time, Adept’s marble palettes that she linked from Amazon were flat and not double-sided. When I saw the same thing with “minor flaws” on ebay for at least $5 cheaper, I purchased it from there. The one I received had a bent corner, which I didn’t mind. The problem is that the magnetic sheet looks flat to the eye, but it is raised in certain areas. Because the depth of the palette is extremely shallow, the top cover doesn’t close properly. For this palette to be useable, I have to arrange them around the bubbled portions, but the top layer of the shadows still leave an imprint on the inner lid and mirror. As I mentioned in the CR portion, a mirror in a palette of this size is useless. It’s made of the thinnest cardboard and is the only flimsy palette I own.
As for the legitimate Adept palettes, the cardboard ones come in the traditional and foldable shapes. The ones made of plastic are double-sided. The pricing for the plastic trademarked Adept palette seems reasonable at $34 to house 95 standard shadows inside, but I can’t verify the quality without seeing it in person. I decided to include them on the list because someone like BailyB endorsed them, but I can’t personally recommend them.
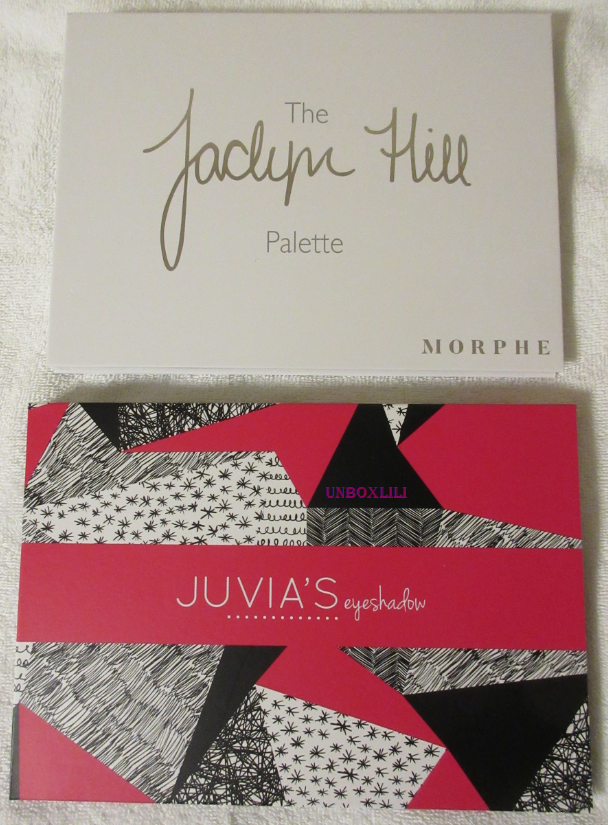
JUVIA’s PLACE
Holds: 40 pans
Material: Cardboard
Price: $15*
The retail price was listed at $20 when I originally purchased this, though I did get mine on sale for $10 a year ago. Funny enough, palettes of this size and smaller could benefit from having a mirror but this one does not. It’s made out of sturdy cardboard (much stronger than the Adept knockoff despite being smaller). If you can’t get the CR palette on sale, this is the one I recommend most. If you don’t want to use the link, just know that you have to type in the search bar “magnetic palette” for it to pop up on the site. For some reason, they don’t have a designated tab for it.
*As of January 31st, 2019, Juvia’s Place is having a 40% off sitewide sale! The current sale price of this palette is $7. It gets further reduced to $4.20 if you use the promo code: Valentine. I’ve been unable to find out how long this sale will last. There are no guarantees it will run through Valentine’s day. At a price like this, my guess is that these palettes won’t be restocked once they sell out. Four palettes, plus shipping, came to $23 which is nearly the same as a single Z-palette!
**EDIT: The sale lasted for one week (02/07/19). Juvia’s Place has sales regularly, so I suggest signing up for their emails to be notified when the next one occurs. Also, there is now a “Limited Quantities” sign on the page. One per customer.
For reference, it’s about the same size as the Morphe Jaclyn Hill 35 pan palette. I highly recommend this one!
Z-palette XL
Holds: 35 pans
Material: Cardboard, Acrylic
Price: $28-$32
Z palettes are generally not the most affordable options, but I included it in my list because it is arguably the most popular brand of custom palettes. Every Z palette, regardless of size, has a handy clear acrylic panel. This feature’s usefulness depends on the way it is stored. While the XL holds more shadows, the large standard sized palette is the more cost-effective option.
Large Z palette
Holds: 28 pans
Material: Cardboard, Acrylic
Price: $20
Sephora and Ulta have their branded versions of the Z palette but Ulta has the better deal when buying in bulk. I purchased mine when they had the “Buy 2 get 2 free” deal, which brought the cost down to $8 each when combined with a 20% coupon. The fact remains that one has to spend $32 to get the deal; while a single larger palette might be all the average consumer needs.
Z-palettes are among the least affordable options, even on sale. For example, Sephora sells Double-Sided Z palettes which hold 56 pans and have been listed “on sale” at $22.50 for at least three years. Again, I can’t account for the quality without handling it myself, but one of the biggest complaints in the product review section is that it has “weak magnets.” That is the last thing you’d want to hear about a palette where half the eyeshadows will be stored upside down. I recommend only getting a Z-palette if it’s heavily marked down.
MAC Pro Palette Large Duo
Holds: 30-36
Material: Plastic
Price: $8 (without inserts) $14 (with two 15 well inserts)
All empty MAC compacts cost $8 and all inserts are $3 each. I chose this particular palette because it holds the most and I like that it is fully encased in hard plastic, unlike the other MAC versions with the clear lid. This also has an acrylic divider in the middle which protects cream products if they are used on one side with powders on the other. It’s also good for preventing powder fallout from getting into other colored pans. Although I love mine, I don’t recommend this palette because of its limitations:
MAC compacts have a metal sheet inside, not magnets. This means that magnetized pans and pans with magnetic stickers will not adhere to the palette because it’s like putting metal on metal. MAC compacts have the reputation of being “solely compatible with MAC products” because they are one of the only brands that attach actual magnets to the base of their pans. In theory, any pan with a magnet should work. MAC’s pro refill products are strong enough to stick to the MAC compacts without inserts, but slide a little in my regular magnetic palettes.
Since I have very few MAC products, it was easier for me to turn my compact into a magnetic palette, rather than attaching magnets to every eyeshadow pan I own. I bought magnetic strips from my local craft store and hot glued them to both sides of the lids. This cost as much money as two inserts would, but this allows me to store 6 additional shadows from any brand (as long as they are magnetized). I did this over a year ago and have had no problems so far.
MAC’s inserts are not limited to just eyeshadows. They also have spaces for standard size blushes, powder foundations, and lipstick wells.
COLOURPOP
Holds: 24
Material: Cardboard
Price: $10
Colourpop offers this palette free if you select one of their build-your-own bundle deals. It’s a great option if you’re already intending to buy any of their pressed powder products. They also have a pink palette that holds half the eyeshadows for $7, so the larger palette is the better price.
For reference, it’s slightly smaller than the Large Z-palette (as pictured underneath).
The cardboard isn’t as sturdy as the others palettes (though still better than the “adept” one). I made the mistake of folding back the lid too far and now the palette’s natural tendency is to stay slightly open. The two metal pieces on the inside don’t stick as well to the bottom magnetic rim. This issue has no impact on being able to securely hold the pans, which it does well, just that I have to be extra careful to ensure that it snaps shut when I try to close it.
HONORABLE MENTIONS
TARTE Tartiest Pro Custom palette – Holds: 30, Material: Cardboard, Price: $17 (on sale for $12 as of 1/31/19). This video here has more information.
MAKE UP FOR EVERXL palette – Holds: 45, Material: Metal, Price: $25.
You’ll find many outdated videos on youtube stating that the price of the MUFE palettes are $14, but this is no longer the case. The true XL palette is only available on the official MUFE website. It is very important to note that the Extra Large palette listed by Sephora for $2 holds six round shadows or three of MUFE’s new rectangular shadow pans and is not the same thing (though it’s nice to keep in a purse or for traveling).
Final thoughts
Juvia’s Place and Coloured Raines’s magnetic palettes are the best deals I’ve found (especially when on sale). I’ve seen other palettes from random unknown brands discussed by Youtubers but often times their links to Etsy, Amazon, and other places don’t work several months later.
So, I recommend sticking to reputable brands from authorized retailers!
❤ Lili
Full Disclosure: This is not a paid review or sponsored post and these are not affiliate links. Any ads shown are from WordPress. I generate no revenue from this blog post.
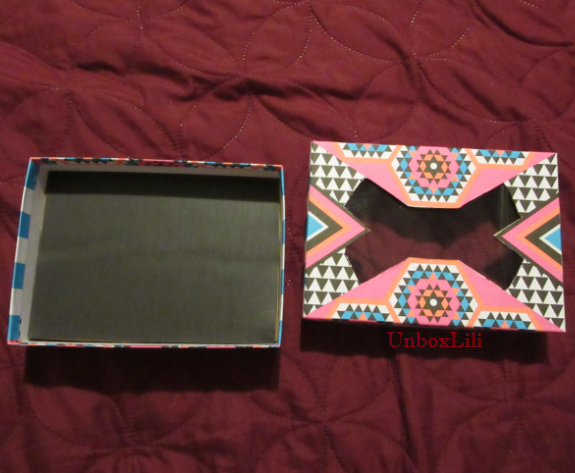
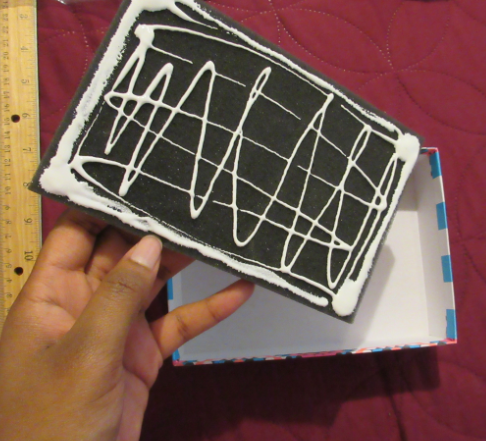
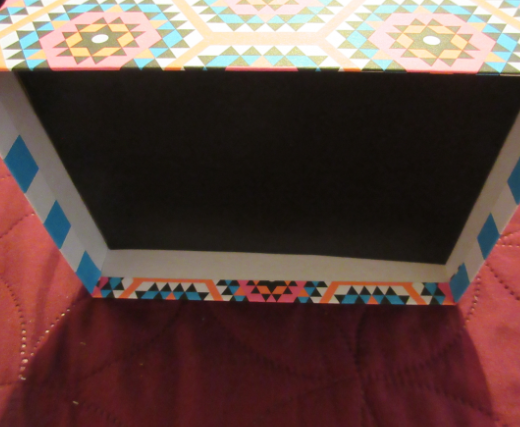
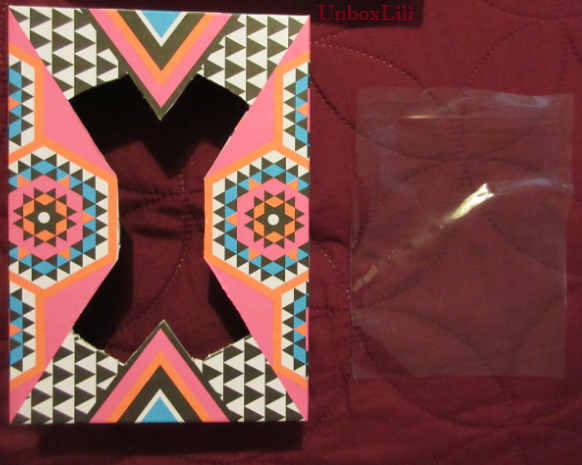
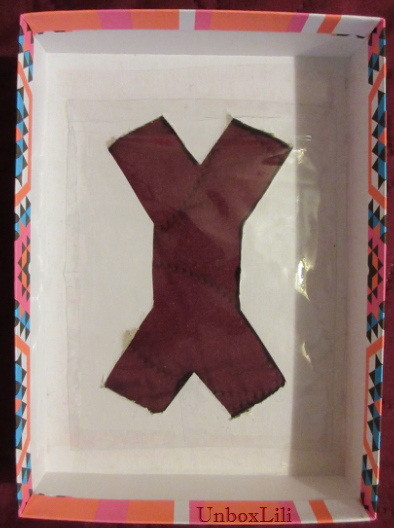
It’s been almost a year since my last post and during that time away from this blog I’ve been searching for ways to utilize and organize the mass of beauty products I’ve accumulated. I began to delve into the world of “upcycling” and although I no longer subscribe to Birchbox, I still have a gigantic collection of their pretty boxes that I don’t want to just throw away (in the recycling bin of course). I’ve always used them as gift boxes but most of the presents I give are too large to fit. I also use them as drawer dividers/organizers but I still have a tower of them left. So below are a few additional ways I’ve put my boxes to use:
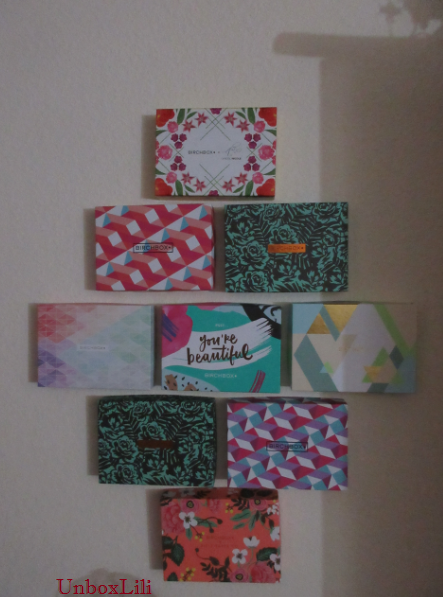
Wall Art
This one is straightforward. All you need are push-pins and a ruler to evenly space out your boxes along the wall. Although my design is different, credit for the idea goes to Tiffany Johnson on Youtube. I would not have thought of it otherwise.
Another great thing about it is that they can be interchanged as often as I like! I could have a day when I want to hang all the blue birchboxes or all the purple ones or only the geometics, only the flowered ones, etc.
Empty Magnetic Palettes
Z-palettes are a huge deal in the beauty industry and before their recent (now deleted) Instagram rampage on customers…
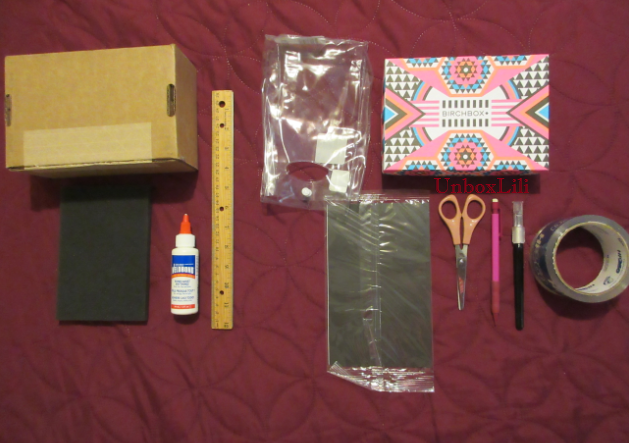
…I was already planning a way to create my own. When you really think about it, Z-palettes are just slim cardboard boxes with colored paper around it, magnetic sheets, and a thin acrylic lid. They can be easily duplicated and many cosmetic companies already have their own custom palettes. You can get them in metal or hard plastic instead of cardboard. Some versions have a mirror on the inside instead of a clear lid. You can also find some very inexpensive ones on ebay and amazon. That being said, none have the cute prints that are on Birchboxes and I still wanted to make my own. The only thing I had to actually buy was the magnetic sheet from Michael’s which cost me $2.99 without a coupon.ITEMS USED:
1 Birchbox or any sturdy box
1 cutting tool (scissors and/or x-acto knife or even a regular knife)
Tape (preferably clear and durable) or glue
1 pencil
1 magnetic sheet (strong enough to hold the weight of the eyeshadows)
ADDITIONAL ITEMS:
1 ruler (I didn’t end up using it but it helps to create an even square on the lid)
glue (any strong bond type of glue will work)
1 foam sheet (to add an additional layer of padding to the palette)
1 piece of cardboard (for the additional layer of padding)
1 sheet of plastic (doesn’t have to be acrylic but it should be thick, unwrinkled, and easy to clean/not stain)
*The foam I’ve had from multiple subscription boxes and mailed packages. The sheet of plastic I used came from hosiery packaging but additional household sources can be the plastic around products like my hot glue gun, markers, insoles, the plastic cover on bakery boxes, etc. It took me only a few minutes to find supplies around the house.
Part 1(skip this step if you don’t want the added protective layer)Make sure the piece of foam fits the dimensions of the box. Then use it to trace around the cardboard and magnetic sheet and cut those so they all are the same size. Then glue the foam to the bottom of the birchbox, making sure to spread an even layer (paying extra attention to the four corners).
Peel off the backing of the magnet and attach the magnet sticky-side down to the cardboard. Use a little glue if necessary for extra adhesion power. Then apply glue to the other side of the brown cardboard in order to attach it to the foam layer already inside the birchbox. Now your custom palette has extra protection!
Part 2
If you skipped part 1, cut the magnetic sheet to fit the dimensions of the bottom of the birchbox. Remove the paper backing and attach it to the bottom, adding extra glue if needed.
Now we’re moving onto the lid. In my example, I followed the pattern of the print but you can use a ruler and pencil to trace a rectangle underneath the lid and then cut it out to form a hole in the cover.
Cut the sheet of plastic to fit on the underside of the Birchbox lid. It should be large enough to cover the hole with a little extra room. When you tape or glue the edges of the plastic to the box, you don’t want tape lines to be visible once the lid is flipped over.
And that’s it! I like how sturdy this feels (it can even be stored upward but give the glue a day to dry before use). If you find this to be too bulky you can always cut the edges of the lid and base by half and then line it all with colorful tape to hide any jagged edges. In fact, next time I will line the edges around the lid hole with solid colored washi tape before I tape the clear plastic underneath. This has room for a minimum of 24 MAC sized eyeshadow pans.
I have SO many Birchboxes left that I should start gifting these to my eyeshadow loving friends. And with all the different Birchbox tops just imagine the number of unique magnetic palettes you could create too!
But really this could be done with any cardboard box, magnetic sheets, plus cutting and pasting tools. An ordinary box can be easily spruced up with printed paper or washi tape. 🙂
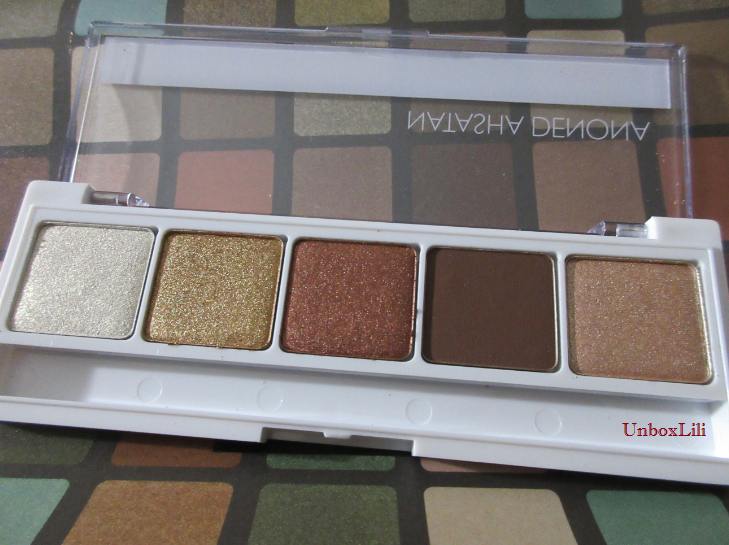
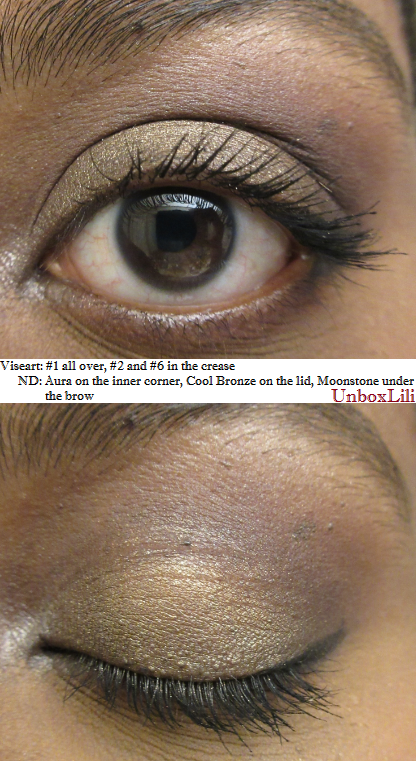
Some of the biggest beauty gurus on youtube say that these two brands make the best eyeshadows they have ever used. Although I am an eyeshadow junkie, I needed to do some research first before I invested in these products. And they are certainly an investment because you get a ton of product in each pan, which is ideal for makeup artists, but would last the average consumer ages. They’re also not cheap. The 5 pan palette was the most I was willing to commit to from ND’s line of shadows.
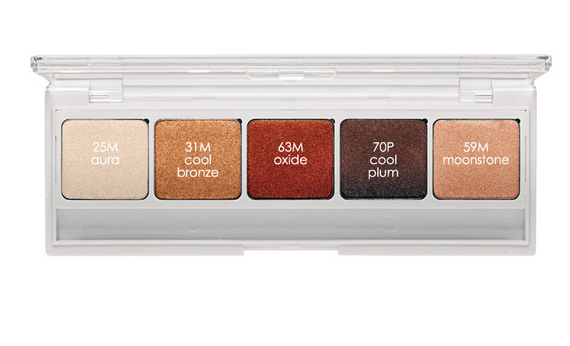
Natasha Denona Palette 04
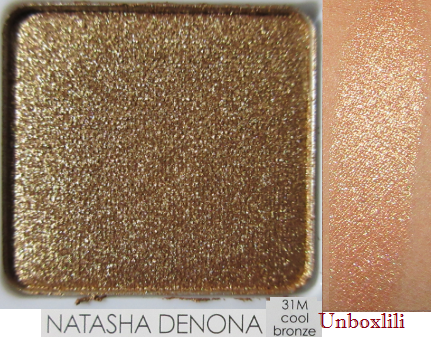
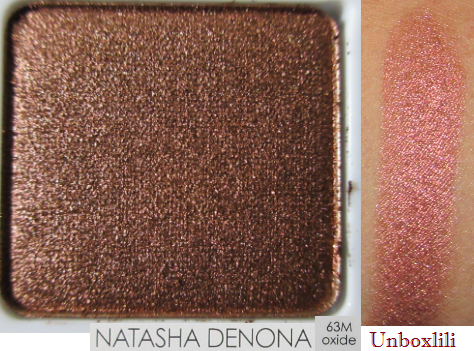
The single, 5-shadow, 10-shadow, and 28-shadow pans are available at Beautylish. Although ND has many other products for sale, the eyeshadows are the top sellers.
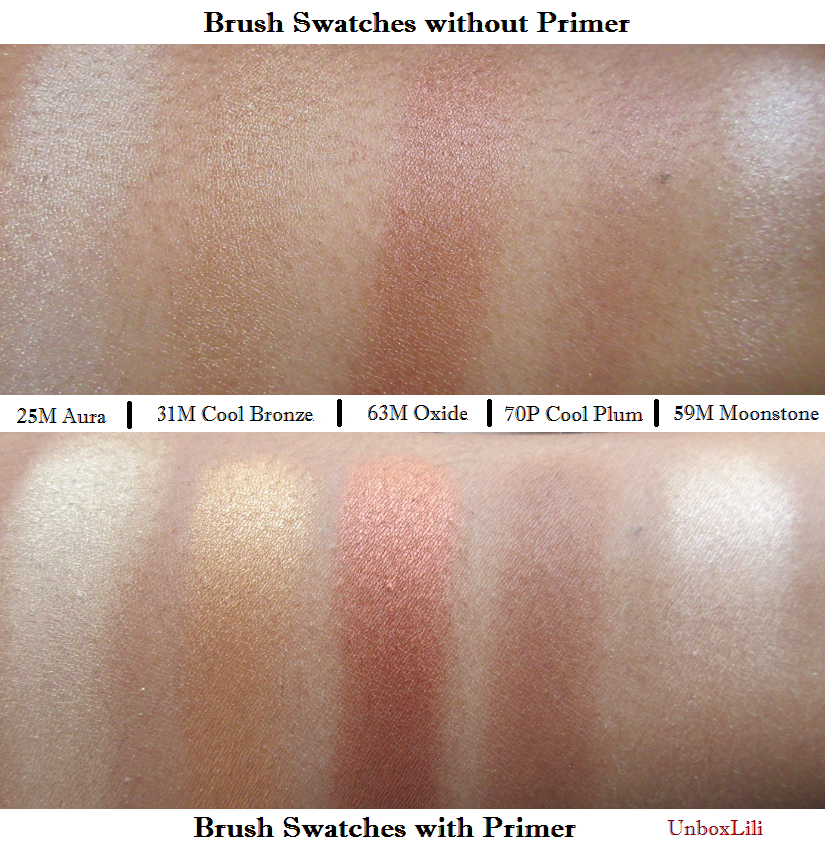
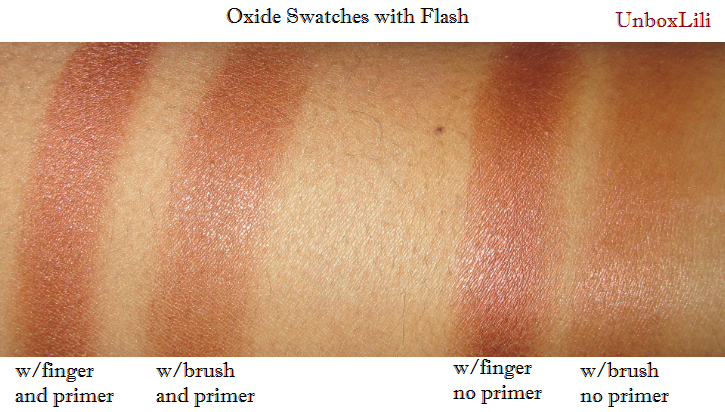
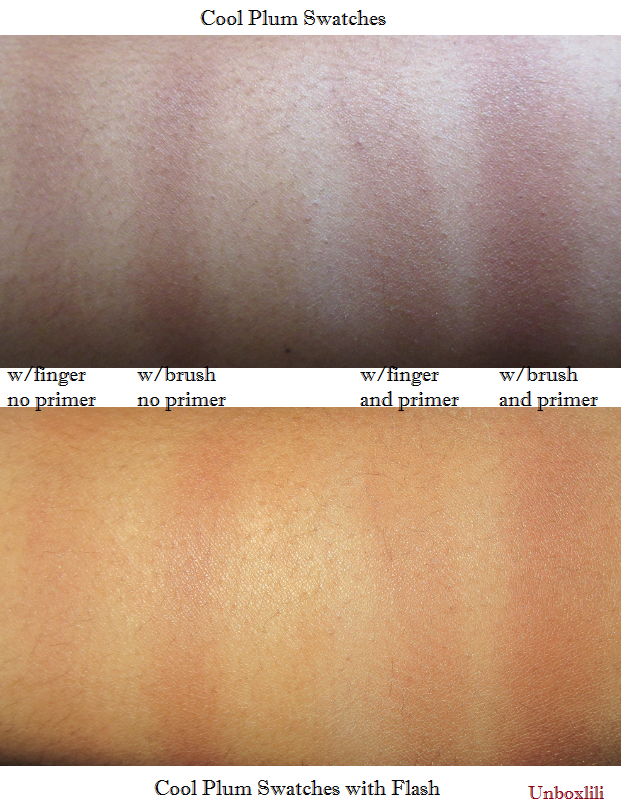
I used finger swatches without primer in the photos above. When using the fingers, these shadows are unparalleled in pigmentation. The tiniest touch (not even a full single swipe) produced those swatches above.
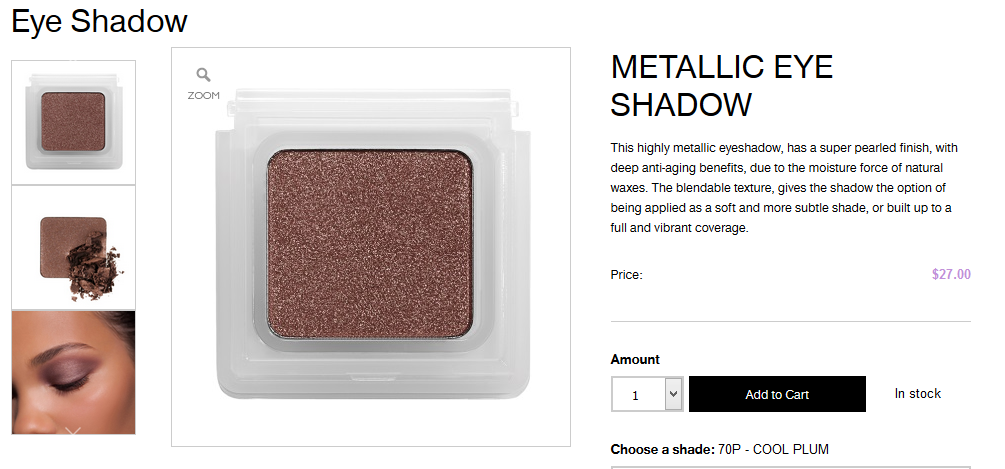
These are basically pressed pigments which are soft in texture, apply smoothly, and contain ingredients which maintain the shadow’s moisture while on the skin.
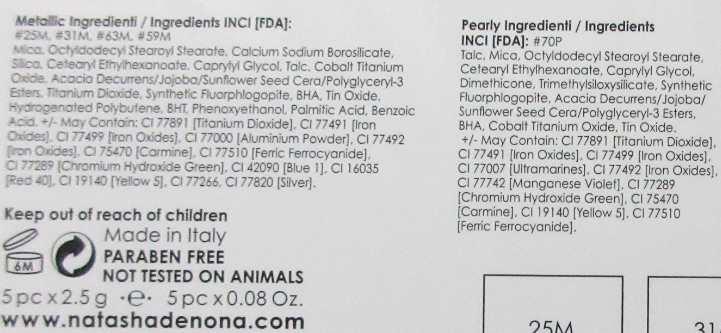
Although Natasha Denona stands behind the use of parabens in cosmetics, she removed all of them from her eyeshadows to assuage wary customers.
The shadows are very long lasting on my lids. The photo below is after 8 hours of wear.
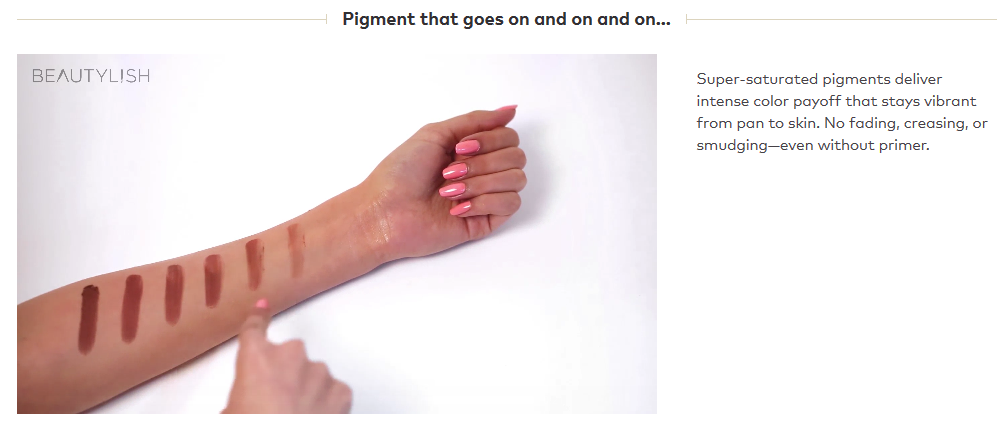
The video of the swatches going on and on, although true, is only practical for those who prefer to apply the eyeshadow with their fingers. Using the finger to apply it like a cream eyeshadow is actually the recommended method. If using a brush, Natasha Denona recommends one which is, “fluffy…thick and round, not flat brushes.”
I do not own her brushes, so I used natural and synthetic bristle brushes from various brands in the photos for this post. I also used the Too Faced Shadow Insurance in the primed swatches.
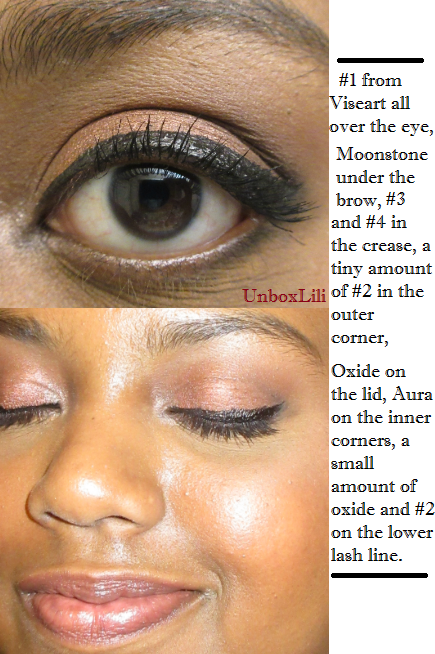
Please note that if used like any other eyeshadow, the color can be built up just as intense as the finger swatches. The brush demos were performed using one swirl of color, except Cool Plum. That shade required much more product to become visible at all on my skin. Here are some comparisons between my favorite and least favorite shades in the palette.
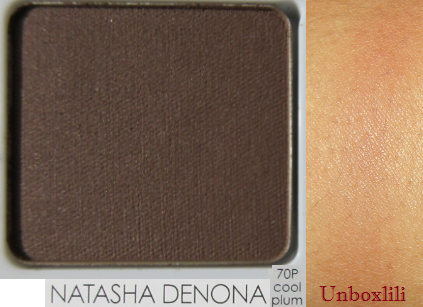
Cool Plum perplexes me. It is so much stiffer, harder to work with, and less pigmented than the other shadows. Considering the effort required to work with it, I’d rather use a dark color from any other palette instead. I’m also confused by the fact that it looks matte in person but in the photos of the palette online, and the description of the individual pan on both the ND and Beautylish websites, it’s supposed to be a shiny pearl shade. I see sparkle in their pictures but zero in mine.
From ND:
From Beautylish:
I spoke with a friend who bought this palette at the same time that I did and hers looked matte as well. Aside from that mystery, there are a few more things to know; when using multiple colors they don’t just blend. They mix and form a new shade, like paint. So if you want to keep each shade separate you have to apply and blend carefully. Cool Bronze was partially on the inner corner when I applied Aura on top and it created a yellow gold color.
If you have hooded eyelids you could run into the issue of color transferring from the lid to just above the crease. I have partially hooded eyes but this is the first time I’ve ever had this occur.
There may be as simple of a fix as using a different eyeshadow primer, but I would have to look into it. Although not necessary for some, ND recommends those with oily eyelids to still use a primer.
Overall, the negatives aren’t enough for me to dislike this palette or ND’s eyeshadows in general. I think the shimmers are very nice and I can see why so many people have been raving about them. The way it looks in person is quite special and I’m willing to work on perfecting a technique in order to use the shadows exactly the way I want. Minus Cool Plum.
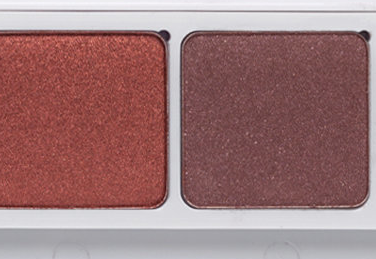
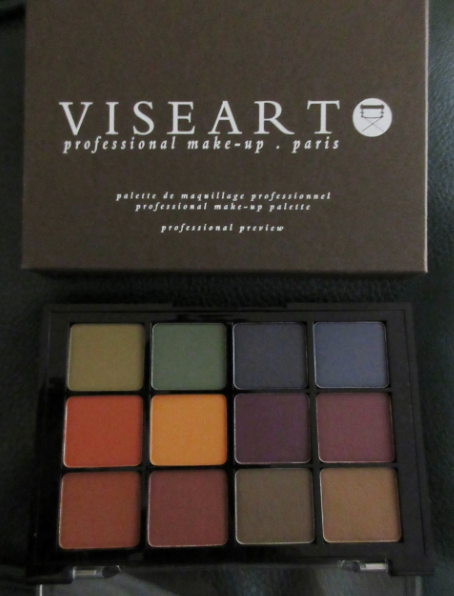
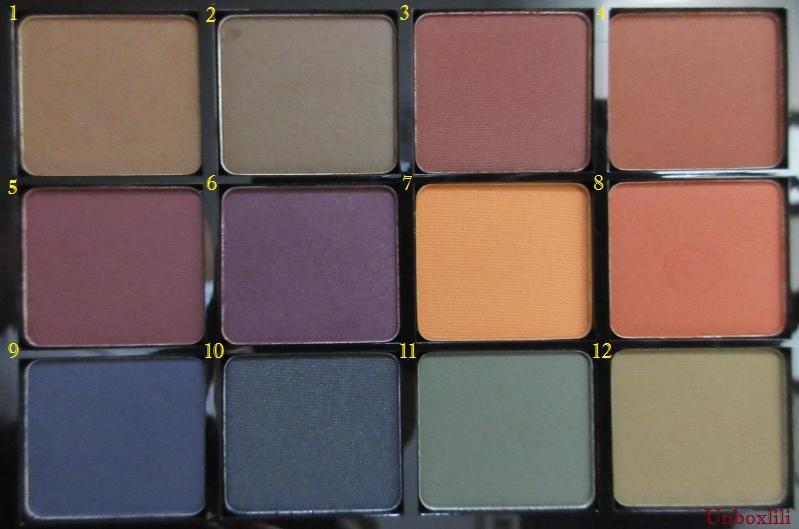
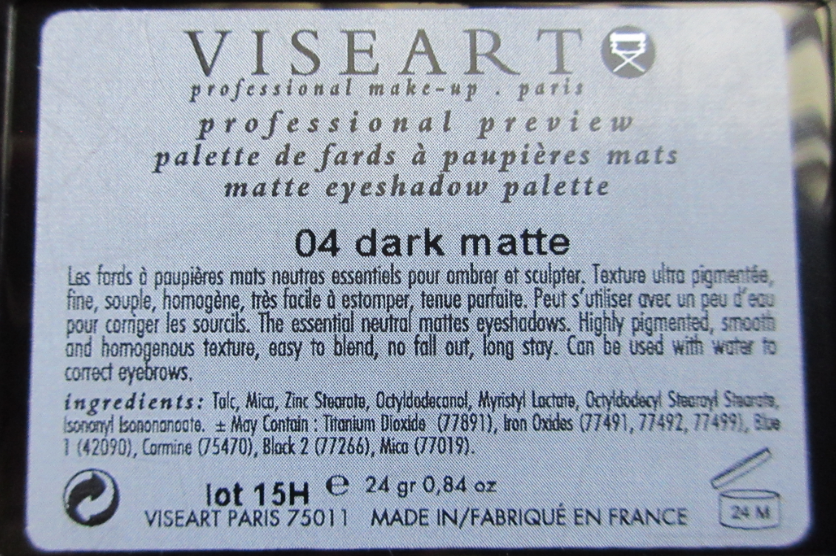
Viseart Eyeshadow Palette 4 Dark Mattes
This palette is also available at Beautylish but I purchased mine from Sephora.
The 01 Neutral Matte palette is what most people talk about but what makeup fanatic doesn’t already have at least one neutral palette after the Naked (and dupes) palette craze from 2014? There are seven of these 12-shadow palettes available and Viseart recently announced a new Rule of III collection of three half size (enfants) palettes coming soon to the makeup show LA.
For the rest of us, we can enjoy what is already available, like this Dark matte palette.
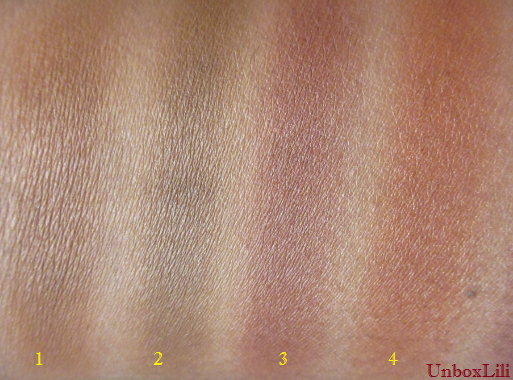
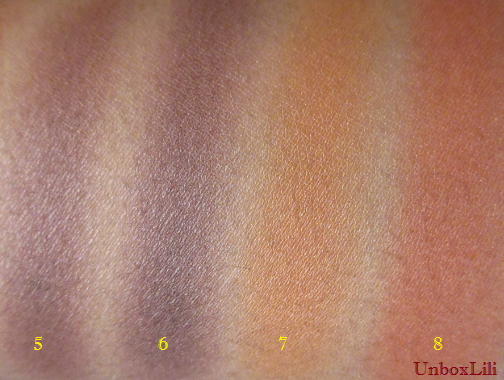
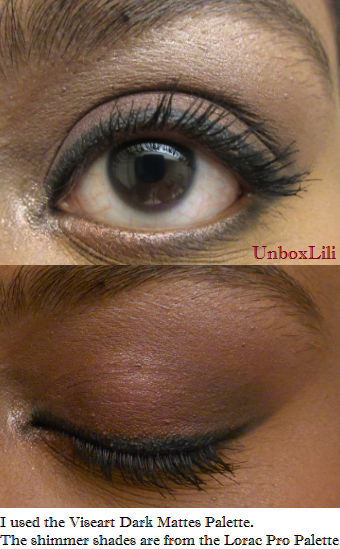
I’ve never seen such a beautiful arrangement of colors from a premade palette. I absolutely love fall colors and I will still be rocking these shades all year long. I absolutely love the first two rows. The last one is patchier but I don’t wear blue or green that often anyway. And when you build up the color it won’t be much of an issue. They all feel the same texturally. Not buttery but not super stiff either. They feel like Lorac matte shades but most of these perform even better. Below are single brush swipes over primer.
Although the color and pigmentation is on the same level to me as Lorac mattes, the blendability of the Viseart mattes are insane. I’ve never seen mattes perform this way (minus the bottom row). Now, non-shimmers aren’t terribly exciting. Even if the colors pop, I always feel like something is missing without some shine on the lids.
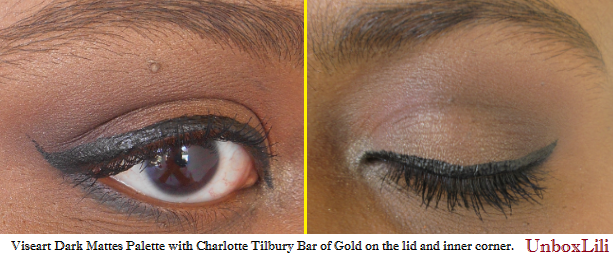
When I used an almost all Viseart eye look, I didn’t see what was so special about them at first. But then when I saw the pictures on camera it made complete sense. On camera they look ultra smooth/blended and just perfect. I’m certain a professional MUA can create even better looks with these eyeshadows than I can.
These and Lorac Pro mattes share similarities but this palette is free of parabens, mineral oil, and other such ingredients. I have heard good things about Viseart shimmer shades as well but none of their colors grabbed my attention.
Final Thoughts on Viseart and Natasha denona Eyeshadows
In certain areas they do live up to the hype. I wouldn’t use either of these palettes alone and even together these two aren’t quite enough for me. Anyone looking for practical makeup for everyday use will likely find the difference in quality between these and other good palettes not quite enough to warrant the price. Those who take a lot of photos, make videos, or are MUAs may be more interested in testing and purchasing them. I do just enough for these to be relevant for me and to fit my needs.
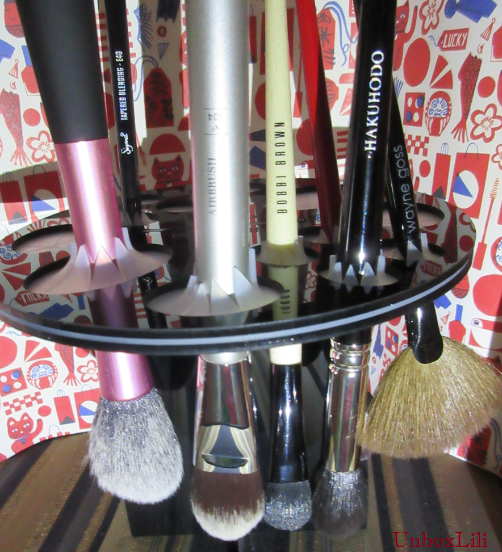
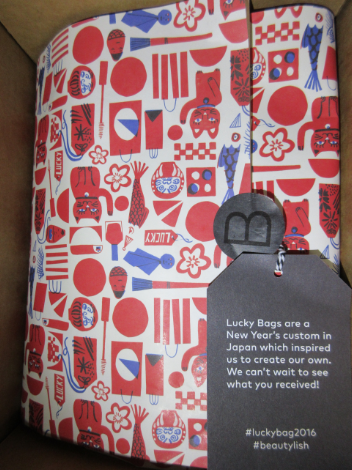
Beautylish is an online retailer which I use to purchase from overseas brands like Wayne Goss and Chikuhodo. They have an annual grab bag where you spend a specified amount of money and receive full size items worth an even greater retail value. This year, the bags were $80 ($75 plus $5 shipping) with the promise of at least $150 worth of products. Canadians had an extra duties fee, making their total $95.
If you hadn’t heard about these bags, I would not be surprised. It never made the front page of their website. On Dec 22nd, Beautylish’s email subscribers were sent a link to sign up for early access. I am subscribed under two different emails, and ironically it was the account I did not sign up on which was sent the purchase page link. I was informed by a few other beauty lovers that they did not receive the email either.
IS IT WORTH IT?
$80 is a lot of money to spend blindly on beauty products. It may not work with the buyer’s complexion or skin type. They could get products they don’t use or products they already own. I keep a list of items I’m saving money to purchase. So I had to decide whether or not I would be happier just buying a Viseart palette outright, or two $40 items I’m guaranteed to enjoy. I compared the Lucky Bags from 2015 and instead of a random sampling, last year’s participants had to choose between a Natural, Bold, or Makeup Artist themed bag. With the exception of the MUA bag (the first to be sold out), I was not impressed with what I saw. However, Beautylish is a company that strives to make their customers happy and I was willing to bet the 2016 edition would be much better.
Last year, I bought myself a brush tree dupe from Walmart and since then I’d been considering getting a second one. Now, I don’t have to and it’s such a cute shape! Drying brushes flat on their side is good but I find that hanging them upside down works best.
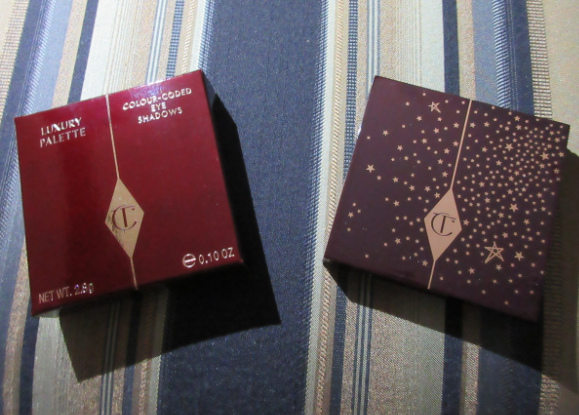
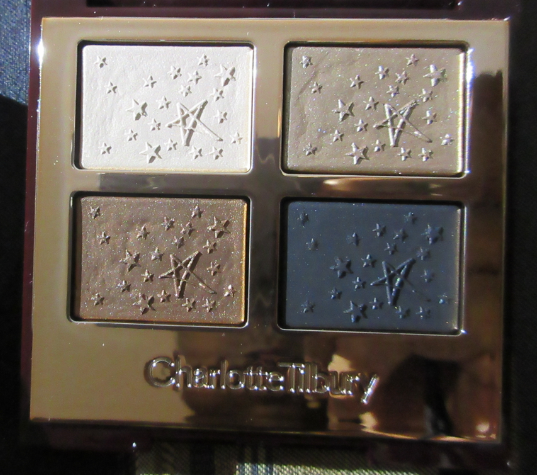
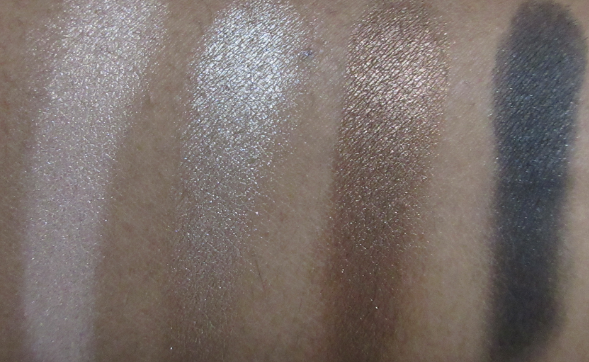
Charlotte Tilbury LTE Luxury Palette in Fallen Angel
I’ve been itching to try Charlotte Tilbury products but the price deterred me. I’m always looking for deals and CT is a brand I only see at full price. The other Luxury Palettes are $52, but because this one has limited edition shades and packaging, it’s even pricier. I only received my bag two days ago, so I would like to play with these shadows longer before I make a judgment but I really like them. The colors are beautiful but I would have to pair them with another palette if I wanted to create a look that really pops.
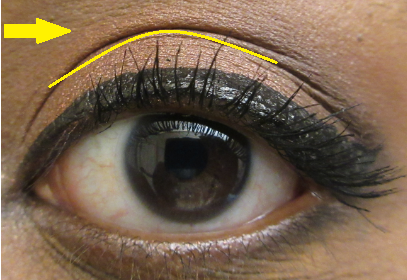
The lightest color is under the brow and on the inner corner. The lid is a mixture of both lighter colors. The brown shade is in the crease and I added a touch of black on the outer corner.
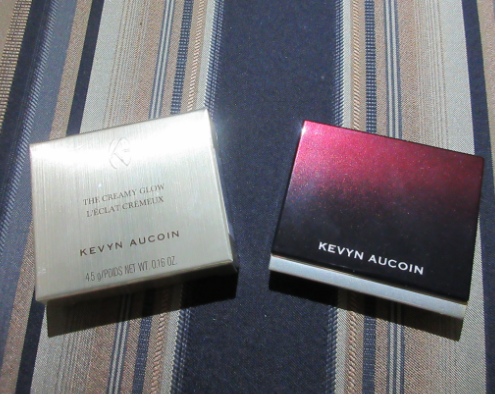
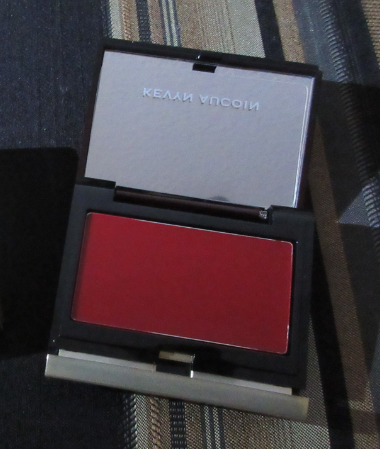
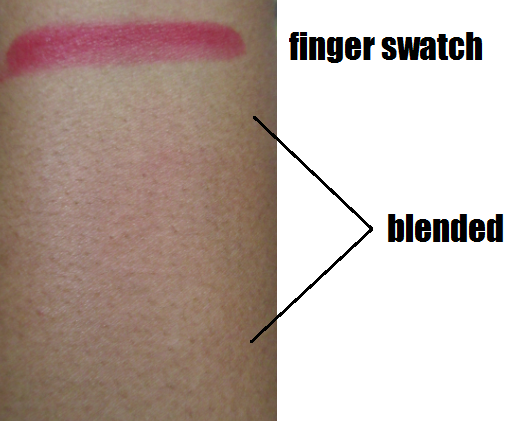
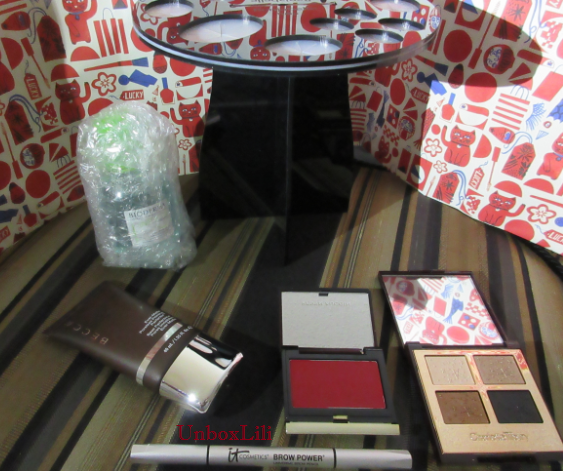
A huge percentage of buyers received either a KA blush or bronzer. I don’t wear bronzer so I feel lucky that I got a blush. Patrice appears to be the only shade in the collection that I could pull off, so I was relieved to see that one in my bag. I am a fan of the KA brand so this was another hit for me. The way it blends reminds me of the Make Up For Ever HD blushes, but I do think I prefer MUFE’s over this one. It is still nice though.
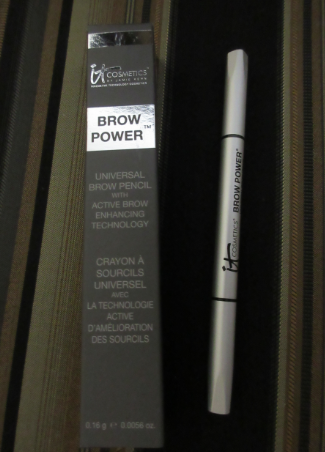
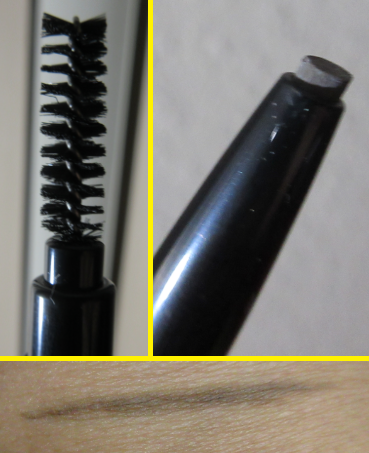
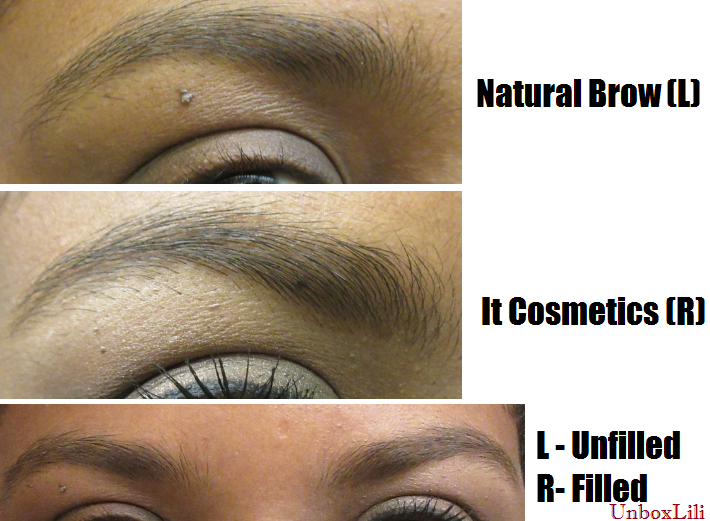
Again, I was glad to see this over the mascara option because I have a box full of unopened mascaras but I only own one brow product. This twist-up pencil is supposed to work for everyone. It is a cool toned shade that creates a shadow under the hair which makes the brows appear filled without adding additional color. At least that’s been the result for me.I consider myself a brow beginner so this product is actually perfect for me. I wasn’t as precise as I could have been when testing this out, but it takes a lot of effort to overdo it haha. I can see myself using this for everyday looks!
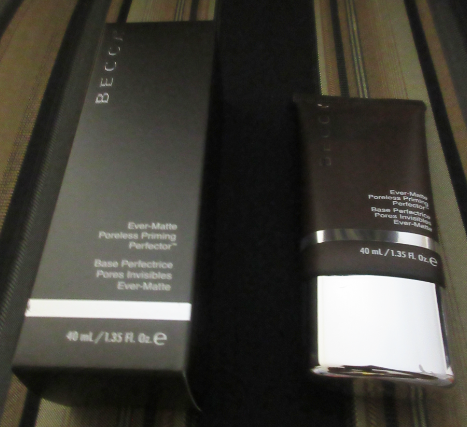
I’ll reserve this primer as something to gift a friend. I have heard great things about this product for those with combination/oily skin. Because mine is dry, I can achieve and keep a matte face quite easily. Testing this out myself would be a waste so I’m keeping this unopened.
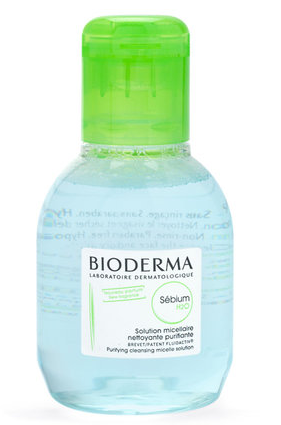
This is a stock photo from the beautylish website. The one I received is bubble-wrapped and I’m keeping it that way for a friend who could use this. I love Bioderma and already have 1.25 liters worth of the Sensibio version, so it would be a waste for me to try out this one.
WHAT COULD YOU HAVE GOTTEN?
Based on what I have seen on Instagram #luckybag2016 I’ve compiled this list. It is not 100% comprehensive as I’m sure I missed a few.
Bioderma: Sensibio and Sebium
It Cosmetics: Universal brow, Mascara, Pores no More
Becca: Backlight Primer, Ever-Matte, The One Perfecting Brush, Undereye concealer, Shimmering Skin Perfectors (Pressed, Poured, Liquid), Ombre Eyes Palette
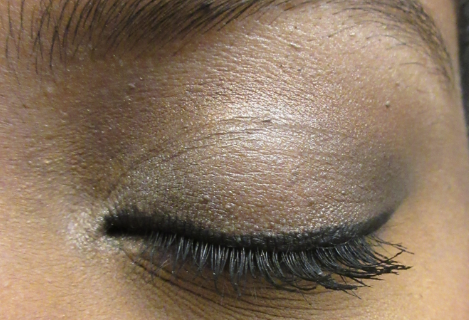
Kevyn Aucoin: Blush, Bronzer, Eye Pigment
Charlotte Tilbury: Eyeshadow Palettes, Lip Pouch, Filmstar (Bronze & Glow and Killer Cheekbones), Charlotte Tilbury x Norman Parkinson Items
Bliss: Lean Machine (VERY FEW), hand cream, spray, cleansing milk, 15-minute facial, cooling gel
Sugarpill: False Lashes
Jeffrey Star: Lip Scrubs, Velour Liquid Lipsticks
Korres: Lip Butter, Black Pine cream, Sleeping Facial
Anastasia Beverly Hills: Self Made Palette
FINAL THOUGHTS?
Beautylish sent out prestigiously branded, high quality items. Many of them are best sellers! The total retail price of my bag is $182.90 but it is only as valuable as the products I can actually use. Since my favorite items would have cost $140, the $60 savings is something I am extremely happy with! That being said, I’m not sure if I will take the gamble in 2017. The number of items I saw on Instagram which I already have made me feel like it was pure luck I got products I’ve never owned. If I had a guarantee that my account profile photo would ensure that I don’t get complexion products too light for me or bronzers I couldn’t use, then I would sign up in a heartbeat!
But let’s be real…the lure of potentially getting another fantastic bag will make me participate again next year. 🙂
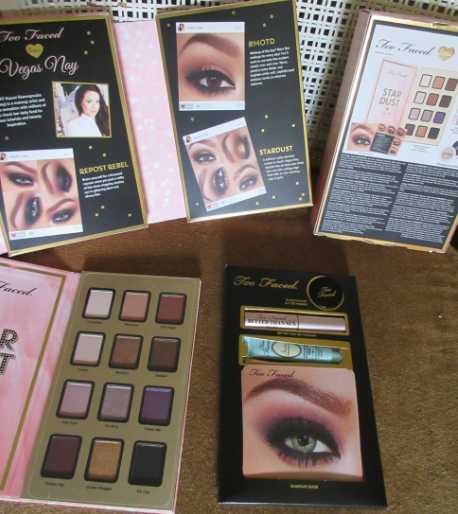
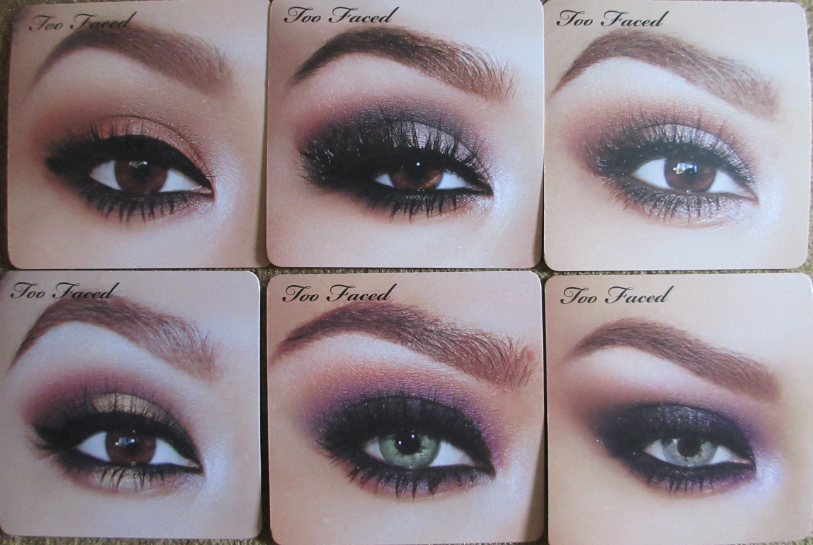
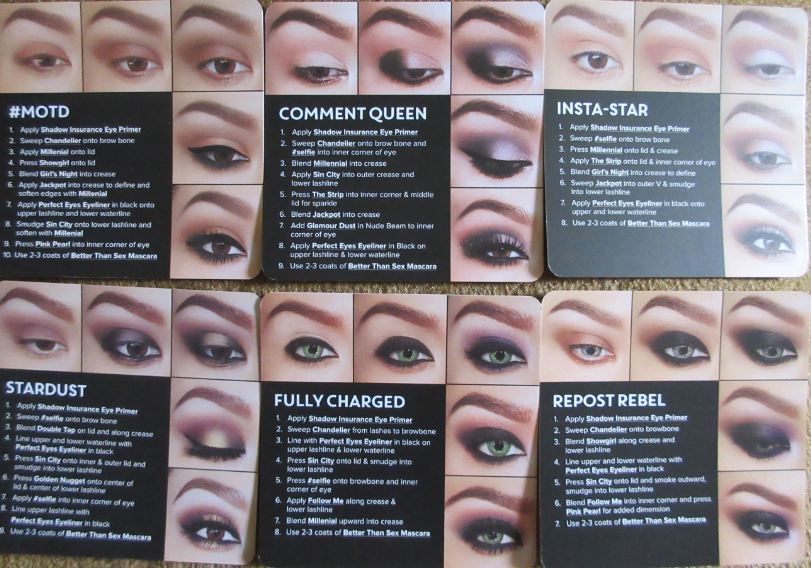
This Ulta Exclusive is really a pack because it includes a mini Better than Sex mascara, Shadow Insurance Eyeshadow Primer, 6 tutorial cards, and Glamour Dust loose pigment. The extras are worth at least $18 at the most competitive pricing. This puts the palette itself at around $27. I think the Stardust palette is worth the price although there are some major flaws, depending on your preferences.
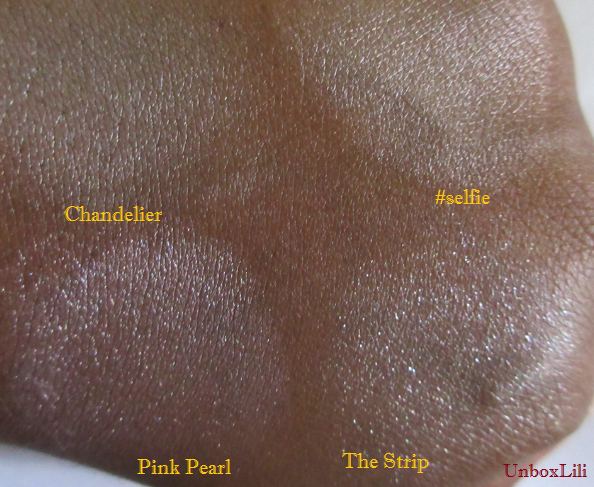
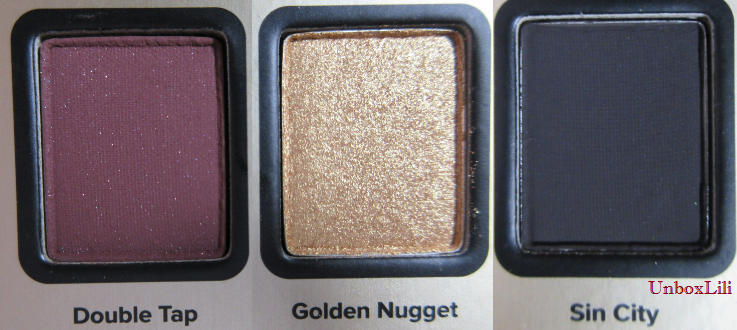
Row 1
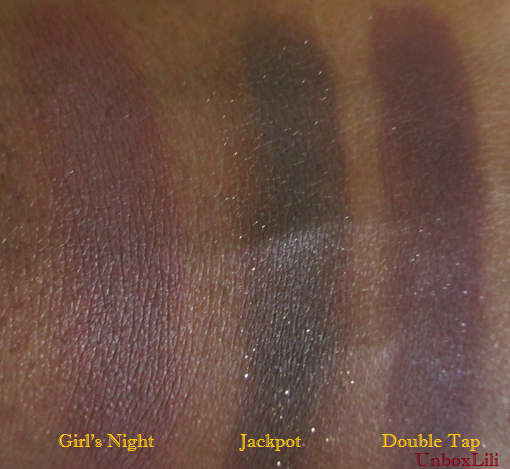
Chandelier looks stark white on my hand but I was surprised to see it wasn’t too light to use as a highlight shade. It looks completely matte but upon closer inspection in the pan, it has a little shimmer. Millennial is a peachy tan matte shade which I also find works nicely as a highlight shade. Girl’s Night is a rust colored matte shadow and a little inconsistent in swatches. Sometimes it comes off as a little more orange, or more red. At times the brown looks in a way I can only describe as “dirty” and other times it’s bright.
I still like this as a transition color, although it can be tricky to make each eye the same shade when using it. All three of these are well pigmented, blendable, and soft in texture.
Row 2
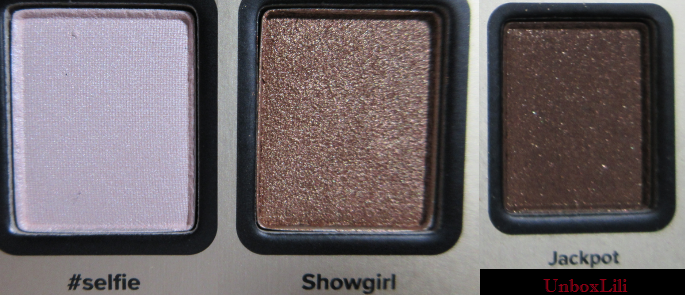
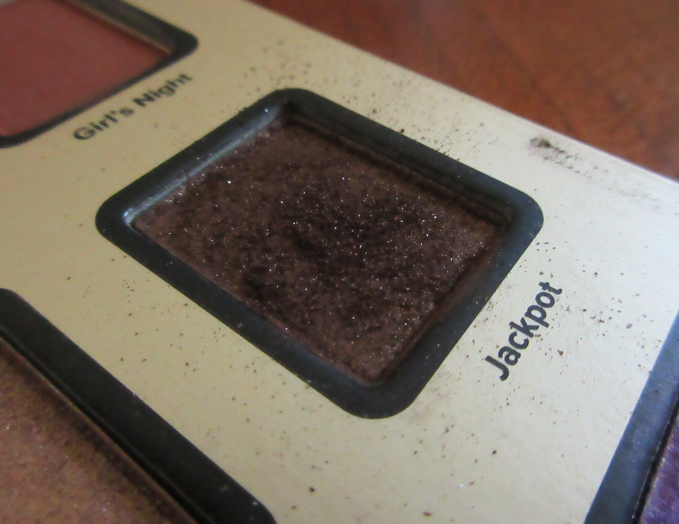
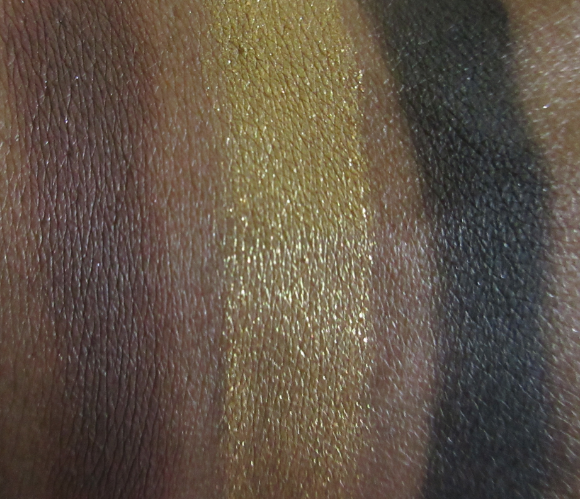
#selfie is essentially Chandelier with much more shimmer and a metallic finish. Showgirl is another metal and the most impressive shadow in the palette. It’s a beautiful golden shade with a smooth texture, well pigmented, and no fallout. Jackpot is a deep brown with gold glitter and good pigmentation but the amount of kick up is the worst of any palette I’ve ever owned. It’s one step away from being a loose pigment. Jackpot, The Strip, and Golden Nugget are the eyeshadows with the loosest formulation.
Row 3
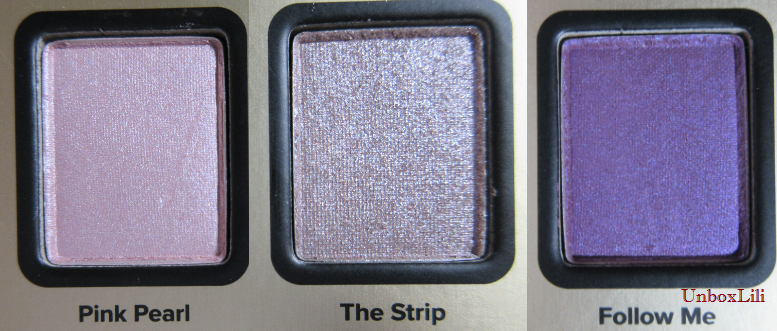
This is the least exciting row for me. Pink Pearl is a pale pink with slight purple tones and minimal fallout. The Strip is the color that made me realize just how similar these light shades are. In the pan, The Strip looks like someone mixed #selfie, Pink Pearl, and a ton of glitter. If you apply your foundation and concealer before doing your eye makeup, I hope you have the best glue-like shadow primer to keep the fallout away. I wear contact lenses so this shade is particularly nightmarish because of how easy it is to get glitter in my eyes. I used it as an inner corner and lid color for two of the suggestion cards and it looked like no pigment, just sparkle.
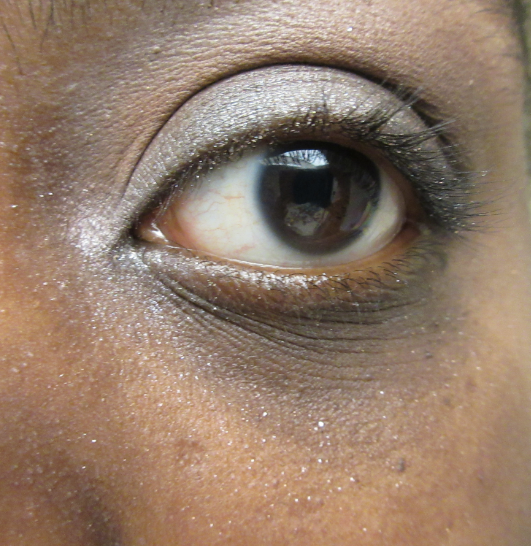
Insta-Star
Comment Queen
I was afraid to put The Strip on the inner corner again, so I put #selfie instead. The strip is on the lid though.
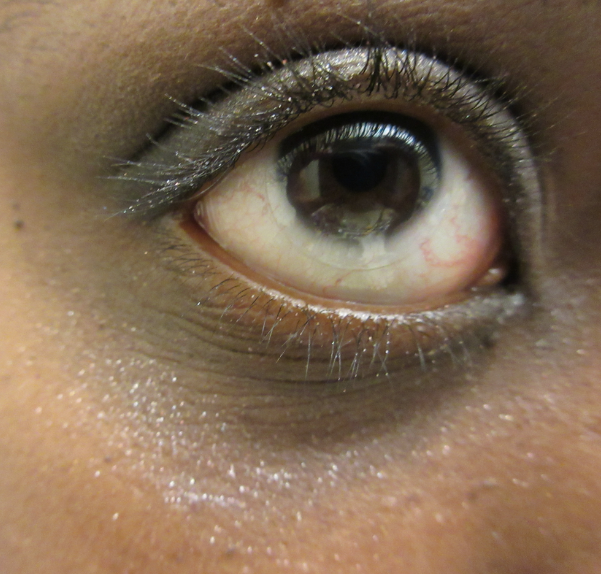
Jackpot is messy but at least it shows up on my skin, unlike this one. Even with a pencil brush, the inner corner looks messy. Follow Me is a pretty violet purple shade with only minor fallout. I haven’t experimented with this shadow as much as the others but I imagine I can use it for the same purpose as Sugared Violet from the Too Faced Sugar Pop palette.
Row 4
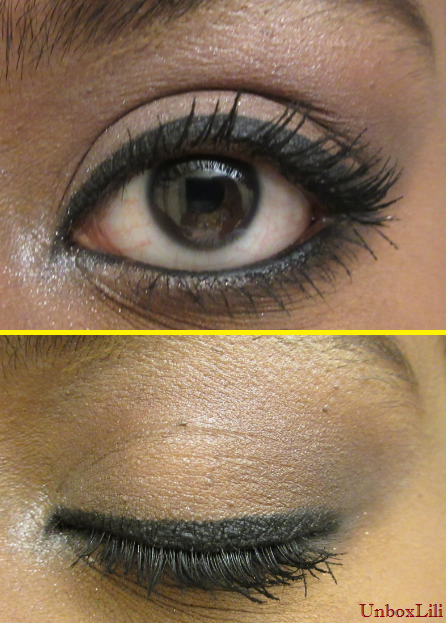
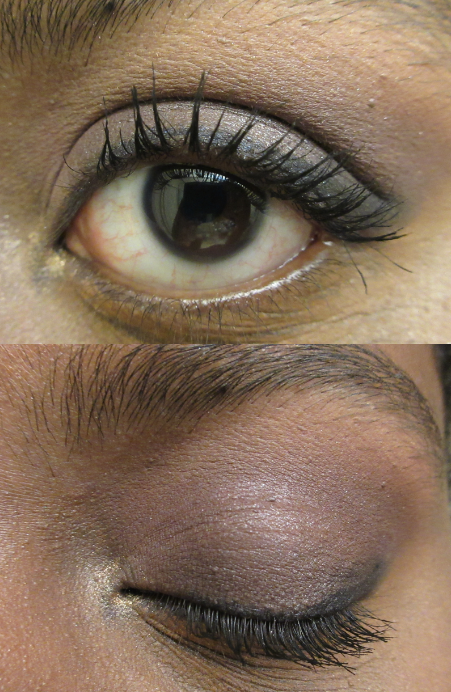
I can’t tell if the shimmer on Double Tap is supposed to be there or if it’s just glitter from another shadow, especially because it looks mostly matte in swatches. It’s a burgundy shade with dark brown tones. I wish there was more purple in it, because when I apply on my eyes, I only see brown with a touch of red. It’s the lid color in my custom eye look photo.
Custom
I use both Double Tap and Girl’s Night as crease colors or for the outer V, and I don’t see an instance when using one would be better than the other. If Double Tap was a truer burgundy, I wouldn’t feel like this shade is redundant.
Golden Nugget is a stunning yellow gold color but that beauty is spoiled by the same fallout-heavy formulation as The Strip. Too Faced makes a glitter insurance primer and considering how many of these shades perform like loose pigments (plus the inclusion of the glamour dust) I have no idea why they didn’t include that as the mini primer instead. In my custom eye look, I tried to use Gold Nugget as an inner corner shade but nothing stuck to my eyes. I attempted to use water and it was still unsatisfactory. This eyeshadow was one of biggest reasons I wanted this palette, so I am willing to try switching to my usual primer (Lorac) to see if it will work better. Sin City is a matte black (when glitter from other shades don’t get into it). It’s soft and blendable. I do wish it was more intense, but it’s still darker than Licorice from my Too Faced Semi-Sweet Chocolate Bar Palette.
I kept pushing back the date of this post because I wanted to ensure I tested this thoroughly and gave this palette a fair review. Despite having this for 6 weeks, I haven’t tried every possibility. I could buy another primer and see if it yields better results. I know that using a finger in swatches held the pigment better in place, so I could apply the sparkly lid colors with my finger in the future. I could use all the colors wet to see if they would adhere more intensely and stay put, but for the time being, I have no more desire to try and make this palette work. Not when I have the Vice 4 which is better formulated and has more variety.
I intended to include a review of the Too Faced Stardust Palette as well but I need more time to test that palette.
Urban Decay Vice 4
This is my first Vice palette! I purchased it after Sephora issued the $50 code as an apology for the Epic Rewards fiasco. The retail price is $60.
The outer packaging is so unique and beautiful. They nailed the oil-slick look! The palette includes a dual-ended brush. I’m not a fan of that brush type because it’s tricky to clean without getting water into the ferrules.
I appreciate the duo fiber style crease brush side, as I have nothing like it in my collection, but it doesn’t perform the way I want. The base is too stiff and the top is too floppy. The other side of the brush is for blending, and it does the job fine.
First Column
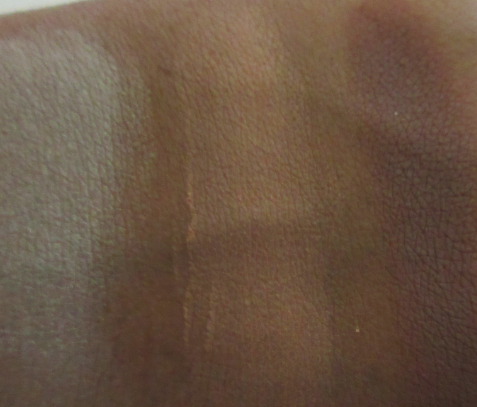
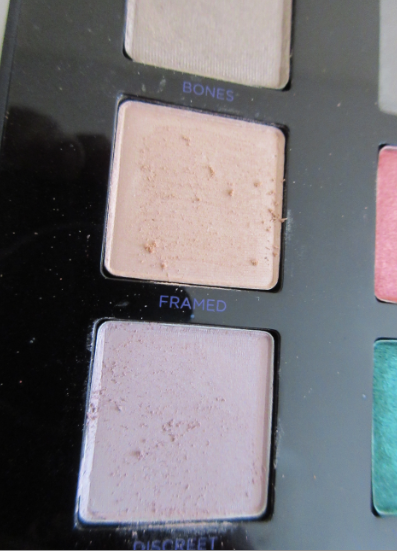
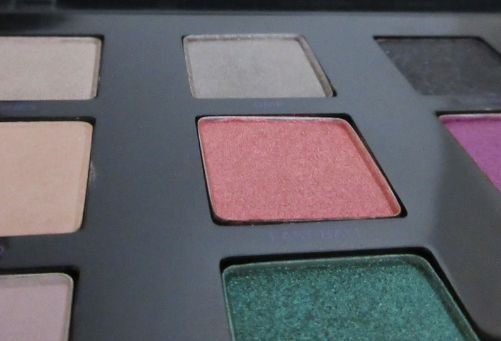
Light shades are notorious for not showing their true colors on me. Bones is a slightly beige satin which just looks white on my hand. Framed appears yellow instead of light peach tones it is supposed to have. The purple in Discreet shows a bit. The brown tones in Bitter are blending with my skin but the red/orange pigment keeps it visible. The mattes are extremely smooth in texture and all four in this column are well pigmented. I used the Too Faced Shadow Insurance under all the swatches in this review.
Second Column
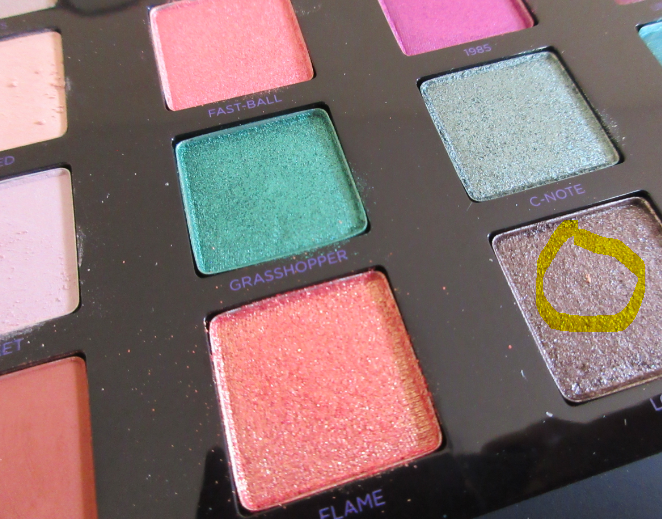
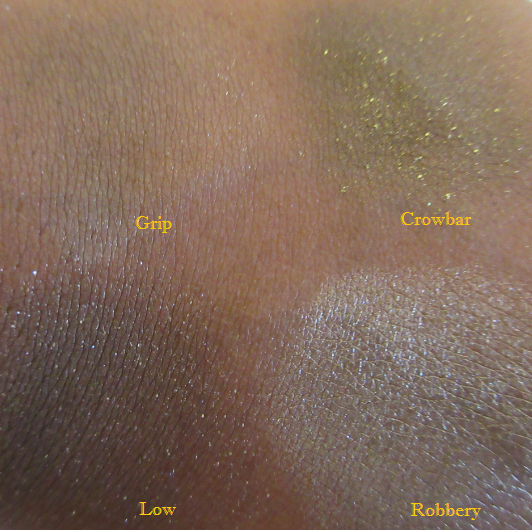
Grip is the most disappointing shade in the entire palette. The texture is fine but the pigmentation is lacking and the silvery grey tones don’t flatter me either. The faults in a few other colors don’t come close to being as bad as this one. Fastball is a nice pink glitter shade. Grasshopper is a gorgeous opaque jewel toned green. Flame is the shade I was most excited for but the orange-red shadow with its gold glitter is a little rough and patchy.
Third Column
All of these shades are decent in texture. Deadbeat, 1985, and C-Note are nicely pigmented. With Low, I couldn’t tell if the brown is blending too well with my skin or if it truly is a sheerer shade.
Fourth Column
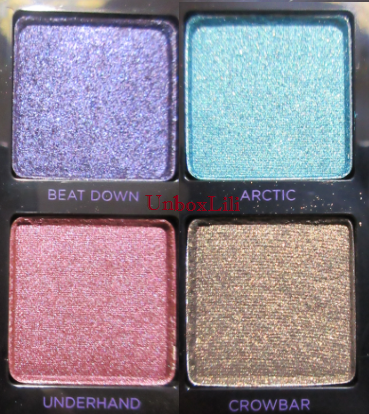
This is my favorite stack of adjacent colors in the palette! They all swatch well. Beat Down is a pretty violet blue. Underhand is a stunning wine color. Arctic is a beautiful teal and Crowbar’s dark olive tones compliment the gold glitter.
Fifth Column
These final four are also good in both texture and pigment. I love the plum in Pandemonium. I generally don’t use light purple colors like Harlot or chromes like Robbery but I can acknowledge that they’re pretty shadows. Delete is the fourth matte shade which looks much darker on the skin than the pan.
These shadows are very soft, so they must be lightly tapped onto the brush to avoid powdery messes. What I found strange was that Framed breaks off into clumps or flecks of product.
As you can see, even bits of it landed in shades a few rows away. I also found some of it on my hand as well when doing swatches.
Another thing to note is that this palette has some manufacturing issues. I have read many reports of improperly placed pans in both this and the Spectrum palettes. They are either crooked or partially popped out. One woman in my Facebook group shared a photo where one of her pans (Grip) popped out of the palette on the first day that she received it. In my own palette, Fastball wasn’t pressed all the way either.
After taking photos for the blog, I used my finger to press the shadow back into the palette.
Sometimes cosmetic companies put similar shades within the same palette. Besides the shadows in Column 1, the only other similarities are shown in the photo below…
but I can see distinct differences.
I love this palette! I wish there were more matte shades but this is the best $10 I ever spent! Even if I paid full price, I would not have returned this and I’m happy I have it.
This palette didn’t come with suggested looks so I tried a few of my own. I was in a rush and was still shocked by how quickly I could produce the two looks below.
Test Eye Look Number 1
I used Framed under the brow, Delete in the crease, Bitter as the transition shade, Underhand on the lid, and Harlot on the inner top and lower lash lines.
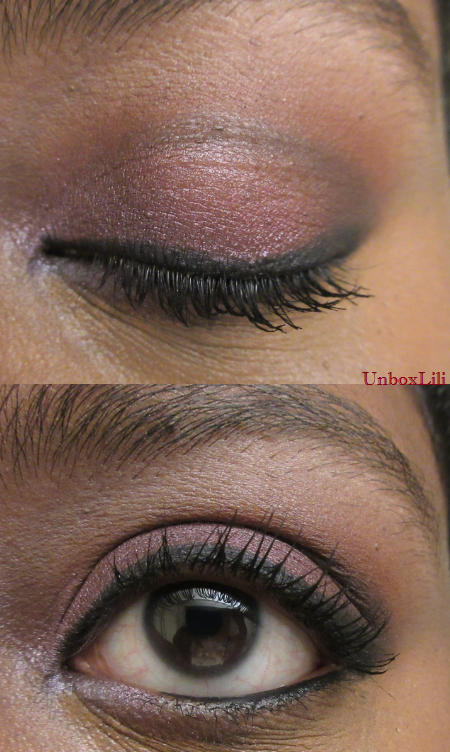
Test Eye Look Number 2
I used Bones under the brow, Crowbar in the crease, Grasshopper on the lid, C-Note in the center of the lid as well as the inner corner of the top and bottom lash lines. I also used a tiny bit of Deadbeat on the outer V.
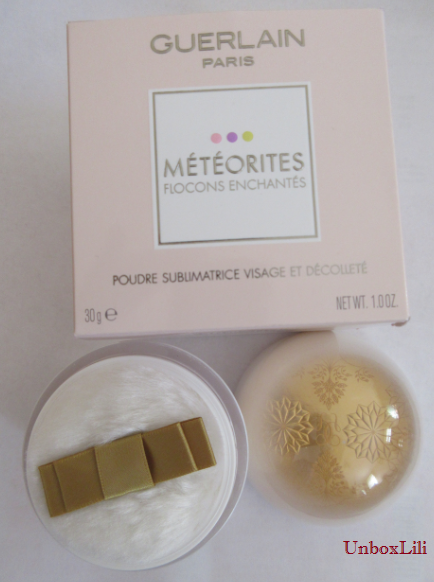
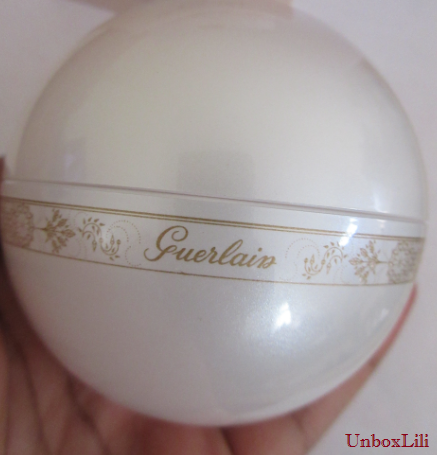
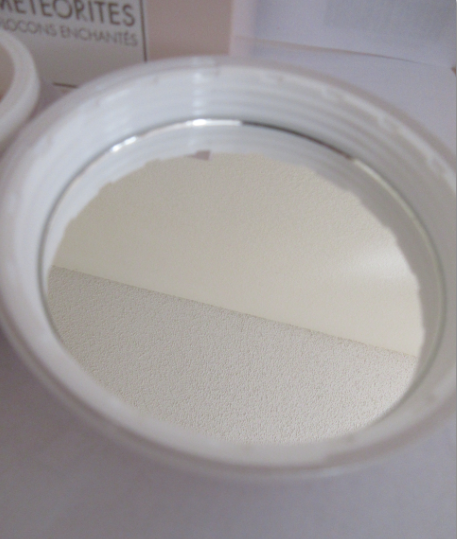
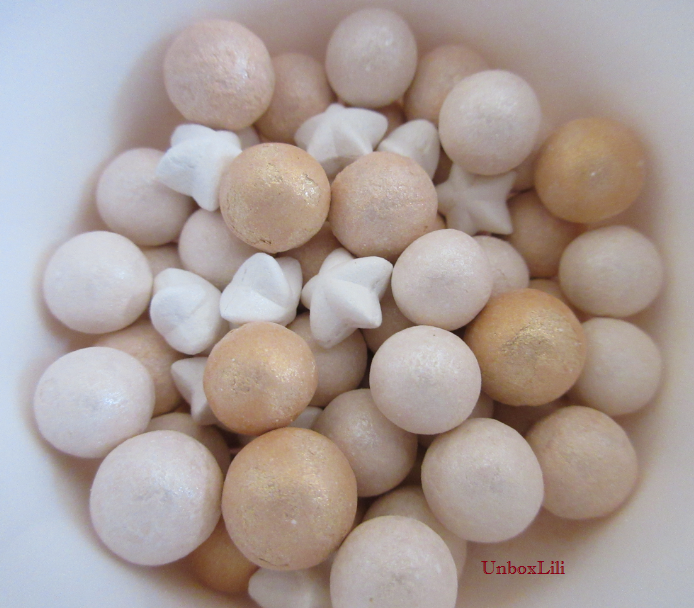
Guerlain Météorites Powder For The Face And Décolleté
This new beauty is part of Guerlain’s holiday collection. There is a significant price hike between these and the permanent meteorites. They are currently sold out at Sephora (where I purchased them) but they will likely return to the site, as Sephora is notorious for having out-of-stock limited edition items eventually return to their website. They retail for $80 but for those willing to snag them at a better price at the risk of them being sold-out, I suggest waiting for the Friends and Family sale or other 20% sales that usually happen between late October and mid-November. I used a 10% off coupon via Sephora Shake-Up and a gift card to get mine.
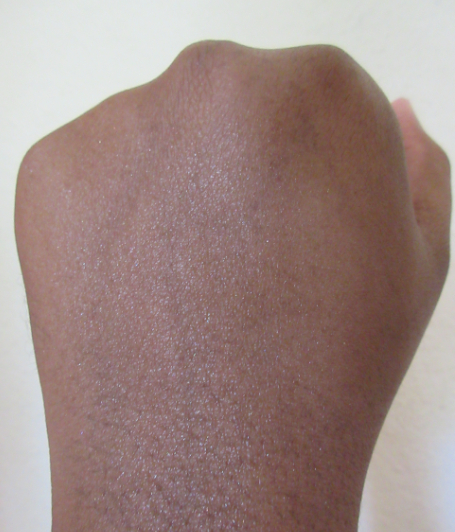
This is my first ever Guerlain product. It’s my understanding that these meteorites have more shimmer than the original. It’s supposed to be an all-over-the face product but as immensely fine as the glitter is, it’s too visible on me in person. I mentioned strobing in my highlighter review last week but this the perfect product for that.
I used a stippling brush to apply the powder to the center of my forehead and cheekbone. It is very difficult to show anything other than a glow on camera, as you can see from the face photo. But the up-close look is better depicted by the picture of my hand.
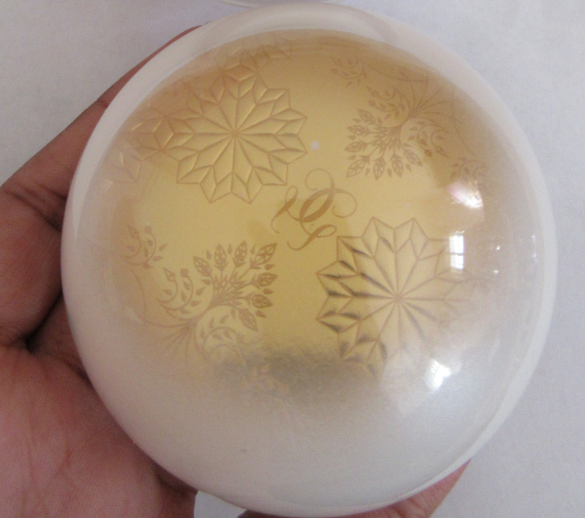
“These Météorites pearls are made of light-reflecting iridescent pearly particles that leave the skin looking radiant with an illuminating glow. It features pearls in beige hues to even out the skintone, champagne to illuminate, and golden for a subtle, sunkissed effect. These pearls are infused with light-correcting nacres that harmoniously blend together to create a pure and correcting light for perfectly tailored luminosity, creating an ultrasoft powder that smooths the complexion for a unique, soft finish. These powder pearls reveal the iconic violet fragrance of Météorites.” -Sephora’s Product Description
I love the delicate violet scent which is strong enough to linger on the face for about an hour before the scent dissipates. As much as this is a luxury product and not a necessity for many people, I love these so much that I’m considering buying the original in the color Dore during the 20% sale so I can add darker colored balls to the globe. I figured the darker tones and will make it a little less frosty, especially if I remove some of the lighter balls and the stars.
I must say that the holiday items this year are even prettier than last year, which is great for collectors but certainly a burden on my wallet!


 Price: